
Need to find similar photos on your iPhone? iOS does a great job of making it easy to find duplicate photos automatically, but similar photos don’t have the same feature.
And in many cases, photos that are visually exact duplicates are still considered similar photos by iOS. This makes it easy to fill up your library with redundant photos that you can’t easily find or get rid of.
This guide aims to help with that. In this article, we’ll show you 5 smart and convenient ways to find similar photos on an iPhone, as well as briefly go over where they usually come from.
Table of Contents
Common Sources of Similar Photos
iOS considers similar photos and duplicates as completely different from each other, which is why similar photos don’t appear in the Duplicates folder in the Photos app. But how do you produce similar photos in the first place, and what made them “non-duplicates”? Here are the most common ways:
- Multiple photos in succession. If you take multiple photos, even if they visually look alike (no camera movement, lighting changes, or changes in the subject), they are still considered similar photos—not duplicates.
- Burst mode photos. Taking photos with your iPhone camera using Burst mode generates multiple different photos in sequence and stores them in a single Burst. Because the photos are taken in rapid succession, they can look nearly identical. However, because of their slight variations, they are considered similar photos.
- Edited photos. Let’s say you have two copies of a photo (which are technically considered duplicates at that point). Once you edit one copy, even if you only cropped it slightly, they are now considered similar photos—not duplicates.
- Saved or downloaded photos. Even if photos are visually identical, with no variations, differences in their metadata mean that they are also technically considered similar (not duplicates). This commonly occurs when you save a photo as a file attachment or download it from another source.
5 Smart Methods to Find Similar iPhone Photos
In this section, we’ll show you how to find similar photos on your iPhone using 5 different methods. Depending on your photos and their metadata, some methods may be more effective than others at rounding them all up.
With that in mind, some users may need to try all methods in this guide until all similar photos are found. However, we made sure method 1 had the highest success rate—so start with that.
Method 1: Use an Appropriate iPhone Cleaner App
The fastest and easiest way to find similar photos on your iPhone is to use a third-party cleaner app, with a feature specifically designed for this task.
To make sure anyone can follow this guide, we’ll be using Clever Cleaner: AI Cleanup App. It’s completely free and you can use all of its features without any limitations, whereas other apps would limit you per usage or for a limited trial period.
Clever Cleaner has several clutter management tools, including a feature completely dedicated to identifying all the similar photos in your library and grouping them together. And from our experiences with dozens of cleaner apps, Clever Cleaner is excellent at identifying photos that are actually similar to each other, without being duplicates. Many apps are unable to balance this and end up grouping photos with very little similarity, or are only capable of identifying duplicates.
The app is lightweight and costs nothing (and has no ads either), so give it a try and follow along:
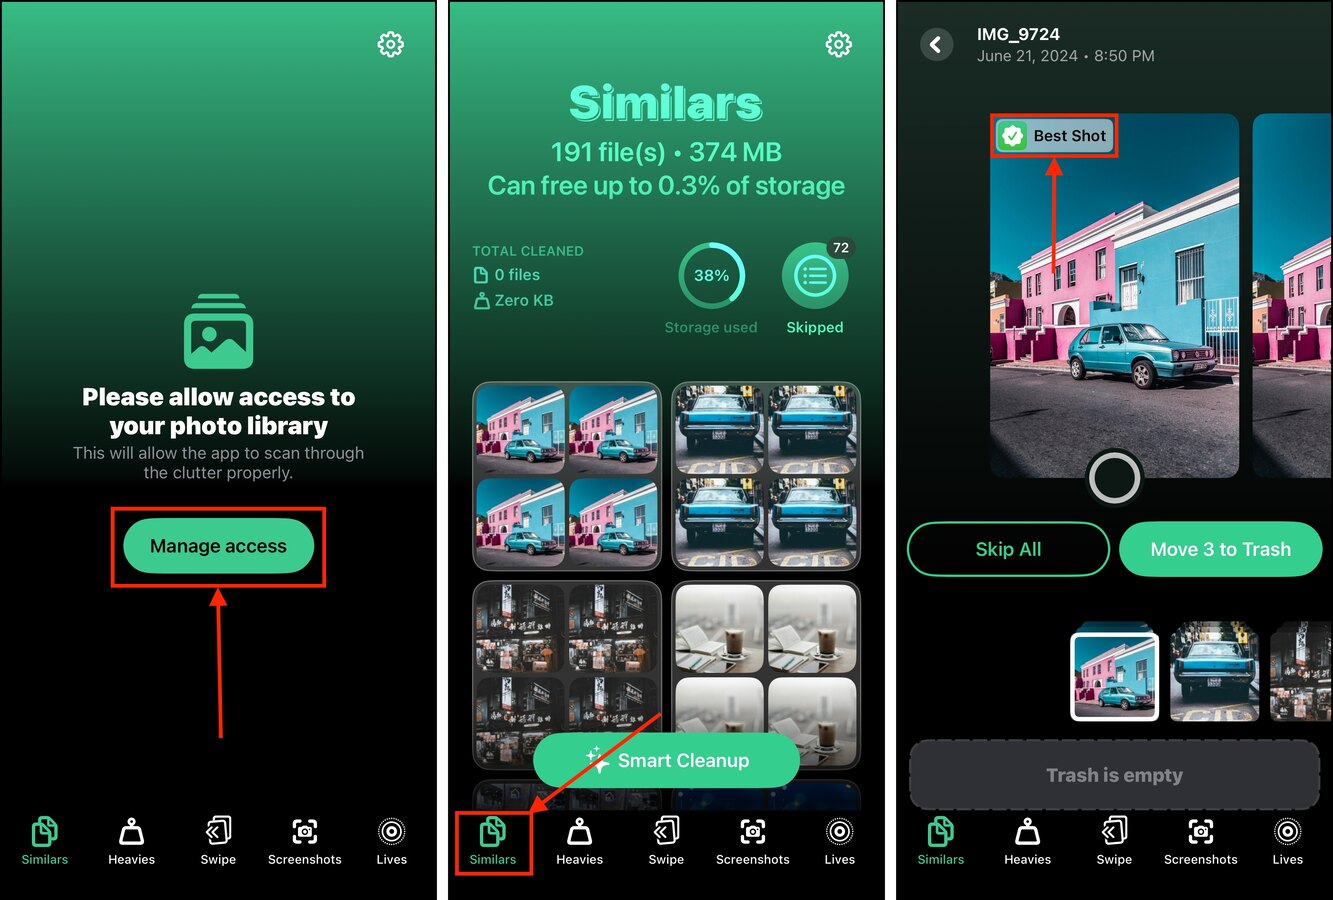
Step 1. Download Clever Cleaner: AI Cleanup App from the App Store. During the first launch, Clever Cleaner will ask you for permission to access your library. Grant Full Access.
Step 2. From the options at the bottom of your screen, choose Similars. In this menu, you’ll find all the similar photos Clever Cleaner automatically compiled for you. At this point, you can tap Smart Clean if you want to auto-delete all the similar photos Clever Cleaner found (while leaving one “best” copy). But if you want to review a specific group of similar photos, tap it once.
Step 3. Clever Cleaner automatically chooses the best among the cluster for you (marked with a Best Shot tag), in case you want to delete the rest.
Method 2: Check Your Burst Mode Photos
Burst mode is a special feature of the iPhone’s Camera app that takes multiple photos in rapid succession. It’s useful when you’re trying to capture moving subjects, such as athletes in motion or running vehicles.
Fortunately, you can easily access all Bursts (and their photo content) via one of iOS’ auto-generated Collections, called Media Types. Not only can you review each similar photo in every Burst shot, but you can also choose one photo to keep and delete the rest automatically.
Step 1. Open the Photos app.
Step 2. In the lower left corner of the screen, tap Collections. Then, scroll down to the Media Types section and swipe left on it once to show the Bursts Collection. Tap it.
Step 3. Tap on a “Burst” to view its contents. Then, in the upper left corner of the screen, tap Burst to view all the images within.
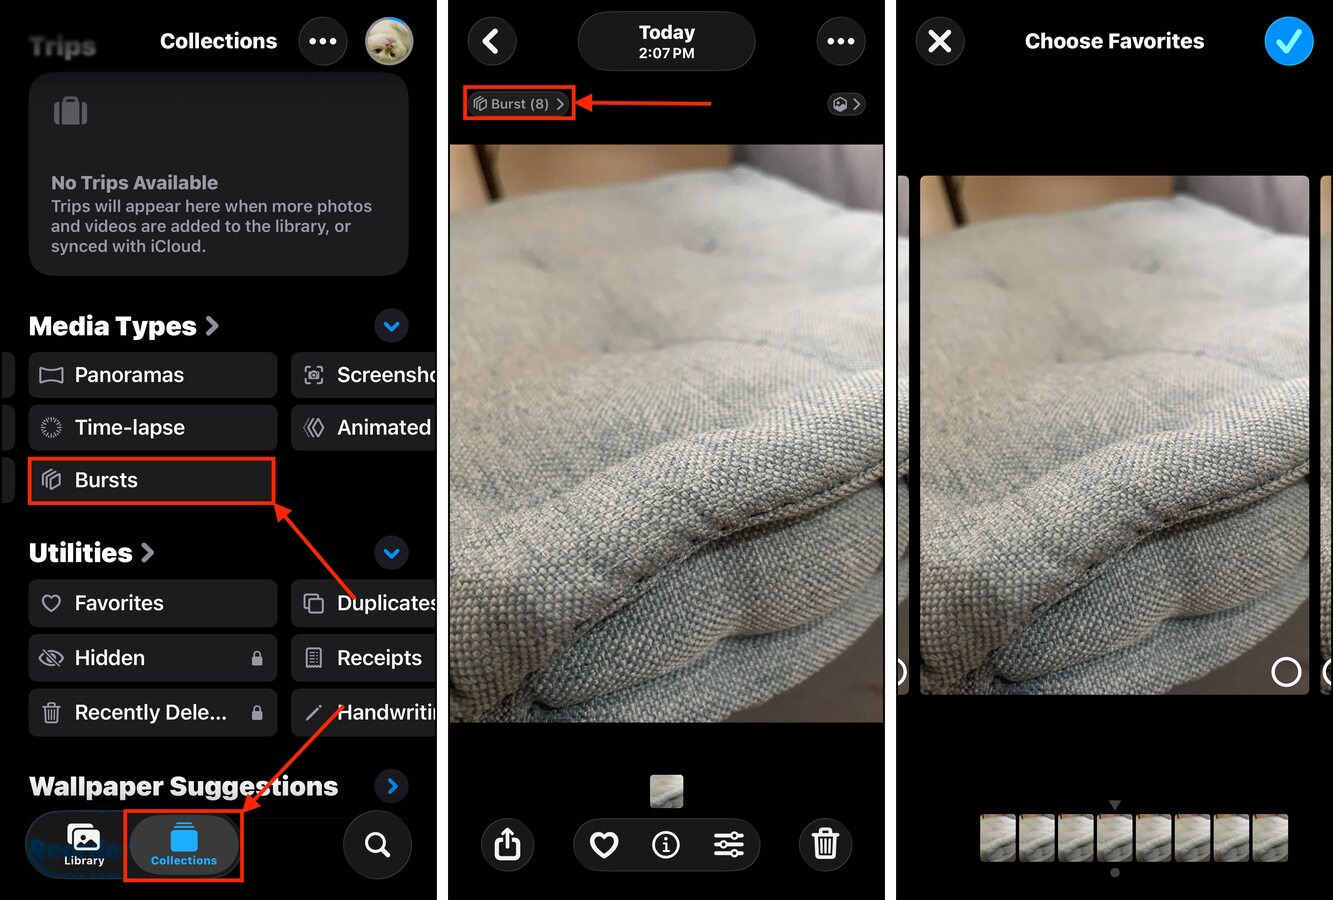
You should see a set of photos that are slightly different from each other. You can choose to remove individual photos from a Burst or keep one photo and eliminate the rest.
Method 3: Browse Your Collections in the Photos App
Collections are groups of photos that iOS automatically organizes for you using a combination of facial recognition, photo analysis, and metadata analysis (e.g., file names, keywords, locations, tags, etc.). These are good places to search for similar photos.
In this section, we’ll briefly discuss the different Collections that are most likely to include similar photos in their lineup.
- People & Pets: iOS identifies the faces of people and pets and groups them together, making it easier to find all the photos of a specific person or pet in one place. If you took similar photos of a particular subject, you may find them here.
- Memories: Memories are Collections of specific themes (people, places, events, activities) that iOS analyzes from your library. You may find your similar photos among these Collections if they fall under a specific theme—for example, it may compile all the pictures you took of a football game or car meet.
- Trips: Whenever you travel away from your “home” area, photos taken during this time period are compiled in their own Collections. This is super helpful if you’re looking for similar photos you took during a vacation or while traveling.
- Media Types: iOS also generates Collections based on their “Media Types”—namely Videos, Selfies, Live Photos, Panoramas, Time-lapse, Screenshots, and Animated. Similar photos typically have the same Media Type (e.g., a bunch of selfies), making these Collections potentially useful for you.
- Utilities: Similar to Media Types, Utilities are automatically generated Collections that compile specific types of images (that don’t fall under Media Types). These include receipts, photos of handwriting, illustrations, QR codes, imported images, and more.
Method 4: Utilize the iPhone Photos Search Tool
A more hands-on way to utilize your iPhone’s “smart” features (to find similar pictures) is by using the advanced search tool in the Photos app.
The search tool allows you to enter one or more keywords that describe some element of your photo that the Photos app can recognize. This can range from descriptors of the image to metadata (e.g., date, location, tags, etc.).
The idea is to try different keyword combinations until all your similar photos appear. Here’s how to access the search tool:
Step 1. Open the Photos app.
Step 2. In the bottom right corner of the screen, tap the Search button (which appears as a magnifying glass).
Step 3. In the search field, add as many keywords as you can that would help pinpoint your similar photos. For example, the keywords “cats”, “June”, and “2024” will narrow down the list to all cat photos taken within the range of June 2024.
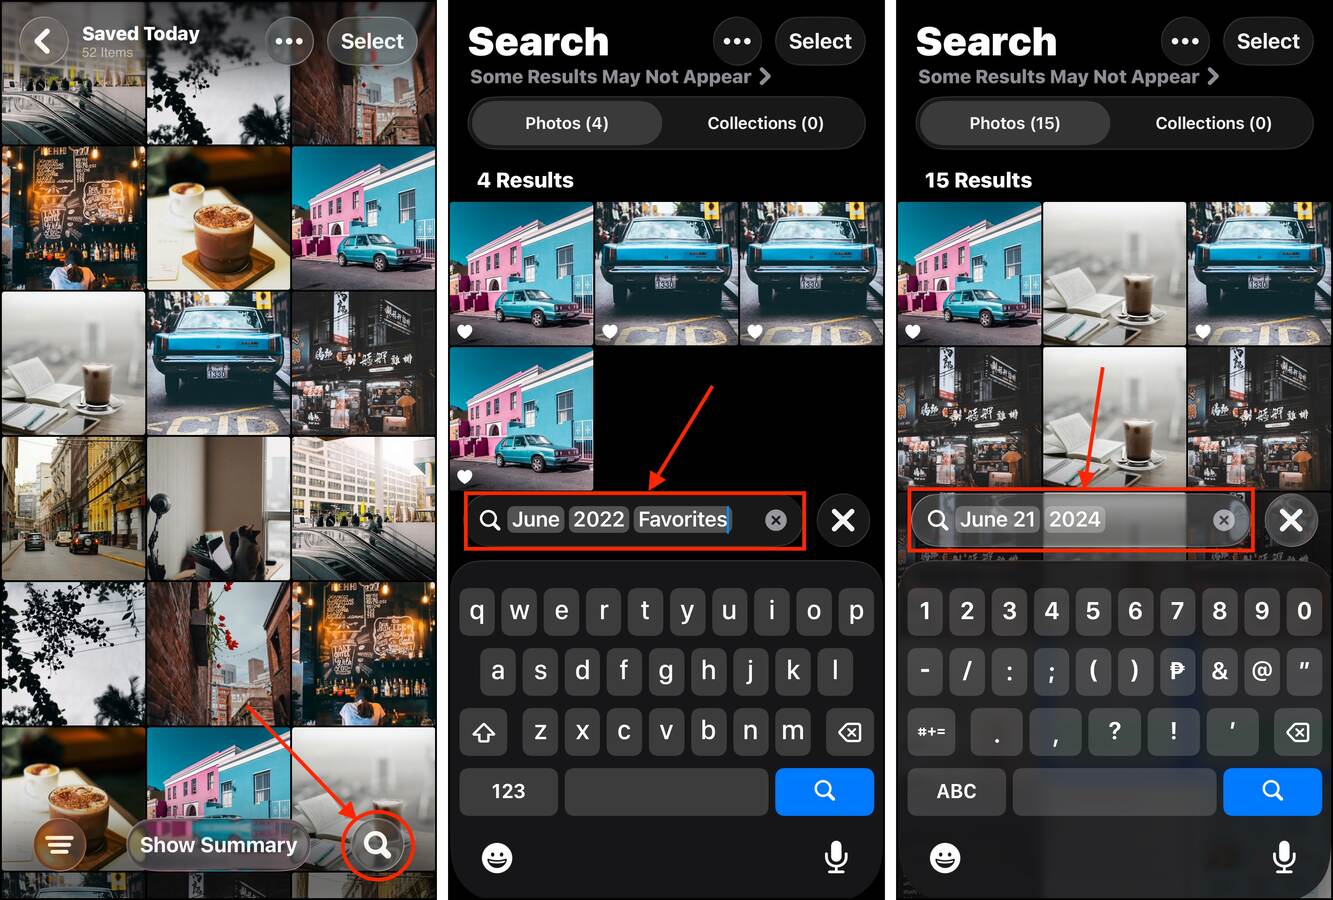
Experiment with different keywords until you find the right combination that reveals all the similar photos of that particular subject or event.
Method 5: Create a Smart Album on Mac
If you have a Mac, you can create Smart Albums using the macOS Photos app. Smart Albums is a feature that allows you to auto-generate albums based on specific “conditions.” Think of them as stackable filters that help you define which photos are to be included in the album automatically.
For example, you can choose to include photos that were taken in a specific date range with a certain photo or pet. This method can basically auto-generate a Smart Album with all your similar photos, as long as you can find the right combination of conditions.
Step 1. Open the Photos app on your Mac.
Step 2. On the menu bar, tap File and select New Smart Album…
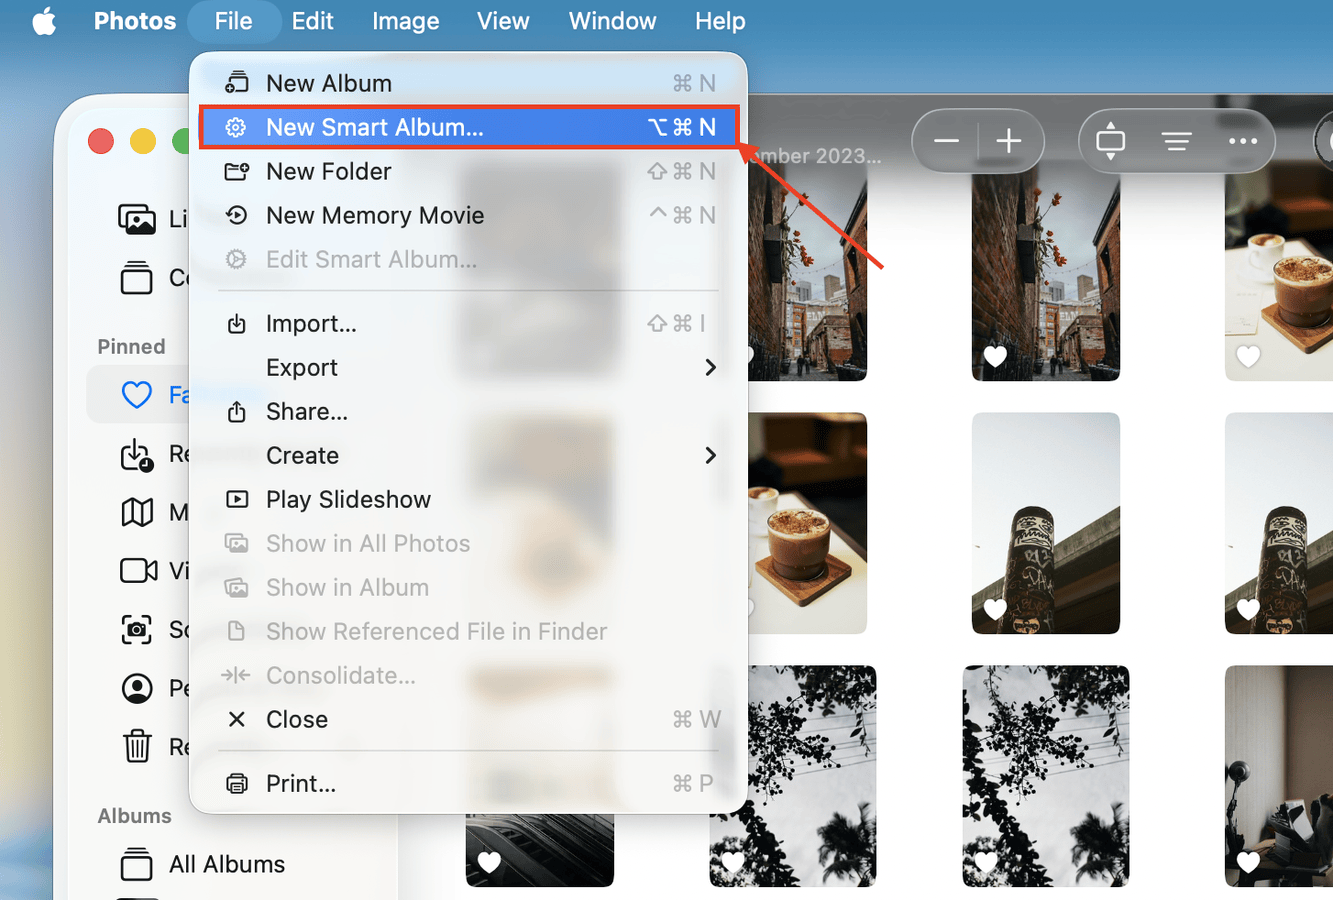
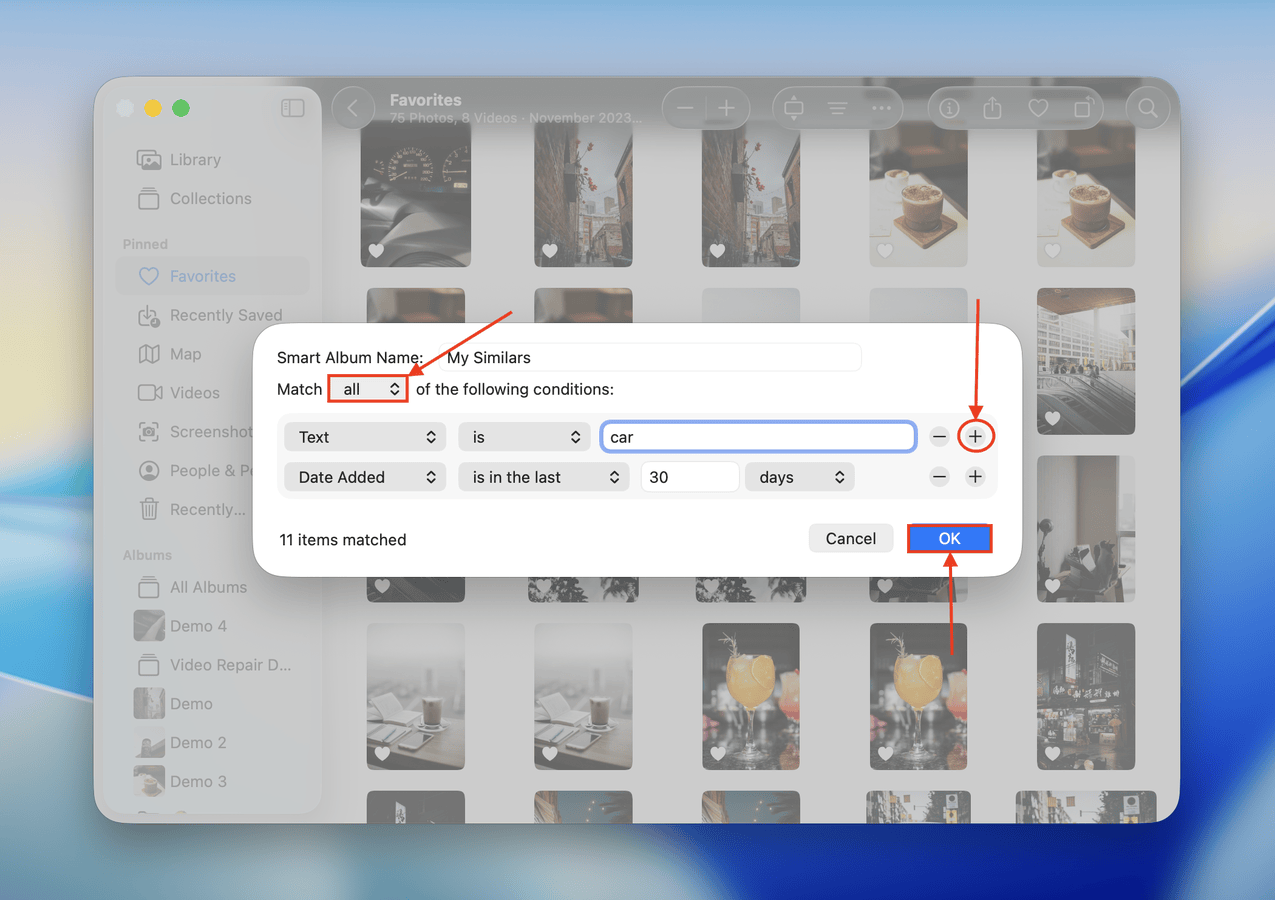
Step 3. Choose a name for the album. Then, use the dropdown menus to define its conditions. For example, I’ll set this album’s conditions to include photos that were only added in the last 30 days, which also includes the text “car” in its title, file name, captions, or location. You can keep adding conditions with the + button, as well as choose whether photos must meet all or any conditions. Once you’ve set your desired conditions, click OK.
Don’t worry! If you’re not satisfied with the included photos, you can modify the conditions of your Smart Album anytime. To find your Smart Album, view the sidebar and scroll down to the bottom of the Albums section.
Before You Go, Want More Ways to Clean Your iPhone Library?
Aside from similar photos, there are many different types of clutter that may build up in your library–such as obsolete screenshots, blurry images, and more. If you want to learn different ways to find and delete them, check out our guide on cleaning up unwanted photos on your iPhone. We cover several methods to eliminate all the different types of clutter on your device using free tools.


