
iPhone videos can take up tens of gigabytes of storage space, especially when you save them in high definition. They also come from loads of different sources–such as the internet, message attachments, and your own device camera–making them hard to collectively track down if you want to free up that space quickly.
This guide helps you do exactly that. We compiled 6 methods that help you purge any video from your iPhone permanently.
Table of Contents
How to Delete Videos from an iPhone
In this section, we’ll cover 6 different methods of deleting videos from your iPhone. You might not need them all, but we recommend going through each one to ensure you maximize your purge.
Because while all methods featured in this guide delete videos, each of them covers different sources—that’s the key.
Method 1: Delete Videos Manually Using the Photos App
The Photos app conveniently compiles all of your videos into the Videos album, found in the Media Types section. They are sorted by date, but you can guess which ones have the largest file size based on the duration stamps on their thumbnail.
If you don’t have that many videos in your library, deleting them manually through the Videos app (where you can batch-select media) is relatively straightforward.
To remove videos from the Photos app:
Step 1. Open the Photos app and tap Albums. Then, scroll down to Media Types and tap Videos.
Step 2. Tap Select in the top-right corner of the screen.
Step 3. Tap the videos you want to delete and tap on the Trash icon. When prompted to confirm, tap Delete Videos again in the pop-up.

Method 2: Utilize the “Review Personal Videos” Feature
If you have a lot of videos (or a few super long videos) in your camera roll, iOS itself will recommend that you review your library to avoid completely filling up your storage. This will appear as Review Personal Videos in the RECOMMENDATIONS section of your iPhone’s storage menu.
To find large videos using the Review Personal Videos recommendation:
- Open the Settings app and tap General.
- Tap iPhone Storage.
- Under RECOMMENDATIONS, tap Review Personal Videos (you may have to tap SHOW ALL first to make it appear).
- You should now see your camera roll videos sorted by size.
Method 3: Quickly Delete Large Video Files Using an App
Our pro tip (manifested as a method) is to use a free third-party app to review your videos by file size. This helps you with: (1) reclaiming large amounts of storage space quickly and (2) reviewing your video collection with a different sort setting (iOS Photos only lets you sort by date).
For this use case, we recommend Clever Cleaner: AI CleanUp App. It has this exact feature—called “Heavies”—which automatically compiles all the largest files in your library, sorted according to size or date (you can choose). Most importantly, the app is 100% free, with no ads and limitations!
Step 1. Download Clever Cleaner: AI CleanUp App from the App Store. Then, launch the app and allow it access to your photo library.
Step 2. Tap Heavies on the bottom menu. Your largest media will be displayed according to file size, but you can also sort them by date. Tap any media to open the gallery viewer.
Step 3. You can easily browse and preview clips by swiping the interface and pressing the play buttons. When you find media you want to delete, tap the sphere at the bottom to select it. Then, tap Move to Trash.
Step 4. In the dialogue pop-up at the bottom of the menu, tap Empty Trash to delete trashed files permanently.

Method 4: Remove Downloaded Videos
Files downloaded from the internet (through browsers and some apps) are saved in the Downloads folder, which you can access via the Files app.
Even if they appear in your photo library—and you delete them from there—most downloaded videos have to be deleted from the Downloads folder itself to remove all traces. Here’s a quick demo of deleting a downloaded video in the Files app (which comes preinstalled on your device):
Step 1. Open the Files app and tap Browse at the bottom of the menu. Then, tap either iCloud Drive or On My iPhone, depending on whether or not your Downloads folder is saved in iCloud.
Step 2. Locate and tap the Downloads folder.
Step 3. Tap the meatball menu in the top-right corner of the screen.

Step 4. In the context menu that appears, tap Select.
Step 5. Tap the videos you want to delete. Then, tap the trash icon at the bottom of the screen. Make sure to tap Delete Videos in the pop-up dialogue to confirm the action.

After deleting the videos from your Downloads folder, make sure to delete them again from the Recently Deleted folder (seen in the screenshot of step 1 in this guide).
Method 5: Delete Movies from App
Video streaming apps like YouTube, Netflix, Amazon Prime, and others usually have a video download feature for offline viewing. Some apps even download videos automatically if given permission.
Fortunately, deleting downloaded videos can also usually be done within the app itself, so you won’t have to hunt through iOS Settings. We’ll demonstrate the feature in the popular video streaming app, Netflix:
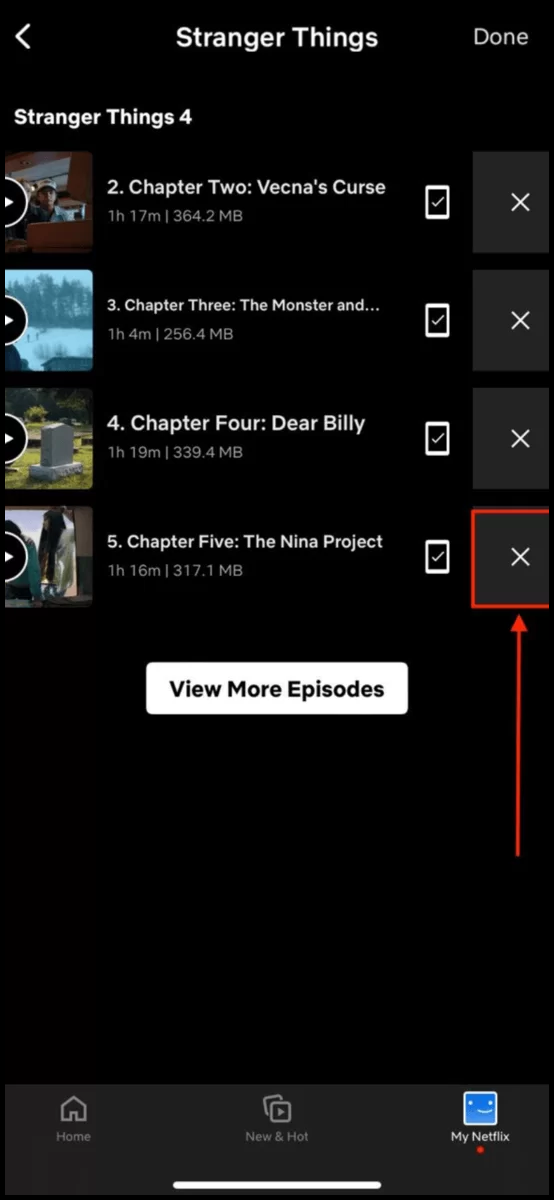
Step 1. Open the Netflix app and login to the profile you were using when you downloaded the video. Then, tap My Netflix in the bottom-right corner of the screen and tap Downloads.
Step 2. Tap on the show or movie you want to clean up.
Step 3. Tap on the pencil icon in the top-right corner of the screen.

Step 4. Tap the X icon beside the videos you want to delete. Beware because you won’t be asked to confirm the action.
Method 6: Delete Videos from iPhone Messages
Do you often send and receive videos to your contacts via iMessage? Those attachments are saved automatically to your device and can take up a lot of storage space over time – especially if you receive videos from a lot of contacts.
You’ll have to manually open up each conversation thread to access these attachments and delete them. Fortunately, the Messages app will at least compile all the attachments in the thread into a handy list. We’ll show you how to access that menu and delete the videos.
To delete videos from your iPhone messages:
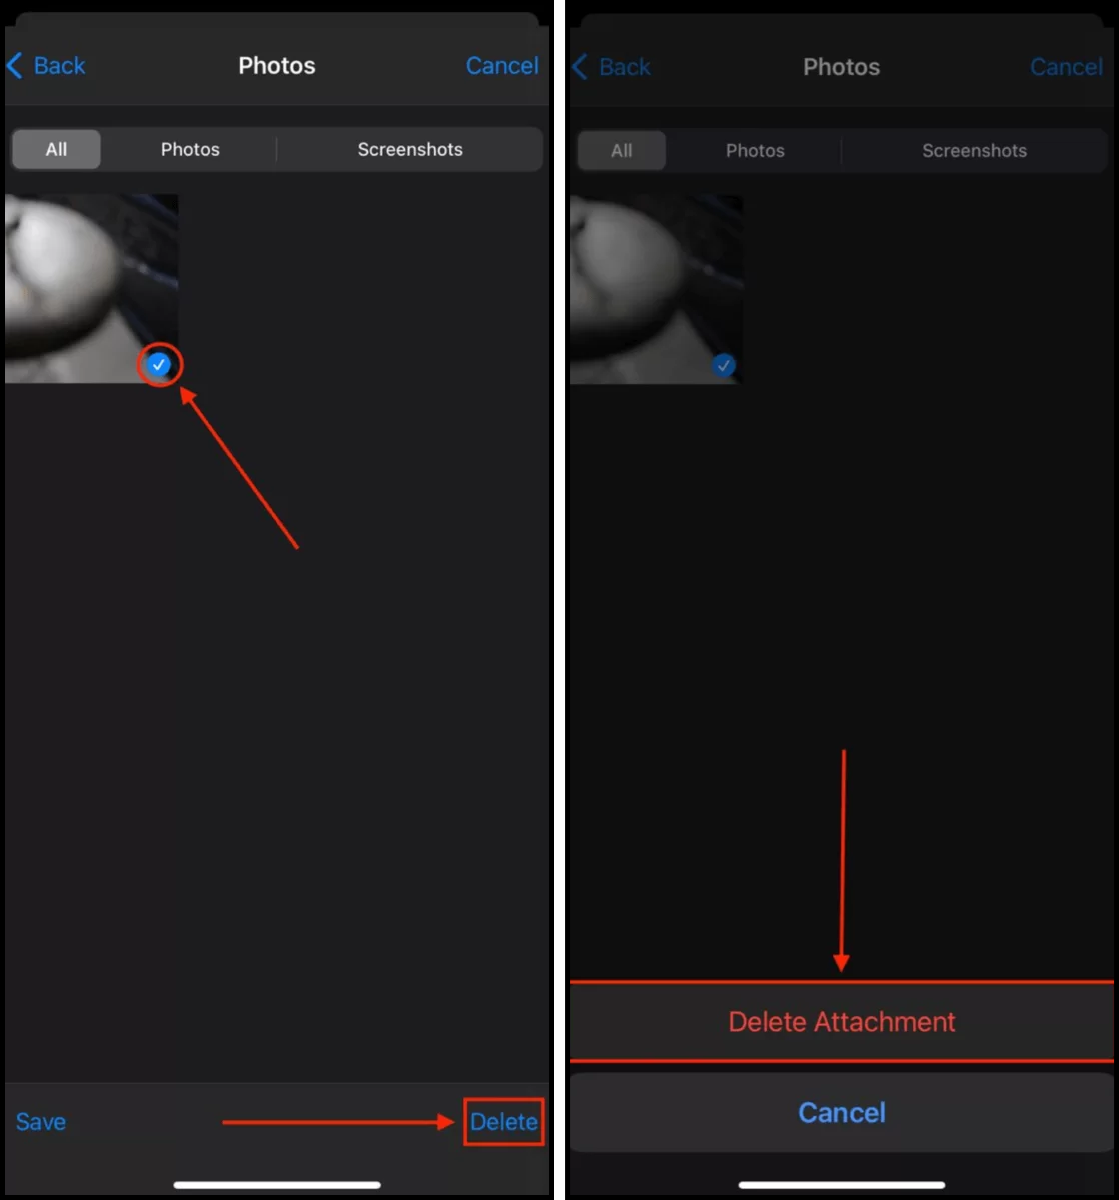
Step 1. Open the Messages app and open a thread with the attachments you want to delete.
Step 2. Tap on your contact’s icon at the top of the screen.
Step 3. In the Photos section, tap See All.
Step 4. Tap Select in the top-right corner of the screen.

Step 5. Tap on the videos you want to get rid of and tap Delete.
Step 6. Tap Delete Attachment/s to confirm the action.
What to Do if Videos Won’t Delete from iPhone
If your videos are not deleting from your iPhone (or won’t stay deleted), there’s likely a minor issue that needs your attention. It’s easy enough to fix, but there’s no one-size-fits-all solution. There are a number of possible causes and the solutions are dependent on which scenario applies to you.
To help you, we created a simple table with the most scenarios along with a short description and the appropriate solution for each one.
| Cause | Summary & Solution |
| You added your videos to your device using iTunes or Finder | If you added videos to your iPhone by syncing them from iTunes, you can’t delete them directly from the device. You have to disable the Sync photos to your device setting in iTunes or Finder and opt to Remove Photos from there. |
| You enabled iCloud Photos, disabled it before deleting your videos, and enabled it again. | When iCloud Photos is enabled, all the photos and videos currently on your device get uploaded to the cloud. If you disable iCloud and delete the videos, they will reappear when iCloud is enabled again and it re-downloads the files to your device. To ensure that the videos stay deleted, keep iCloud Photos turned ON as you erase the videos. However, note that deletion will be reflected among all your devices connected to iCloud. |
| You enabled iCloud Photos on your iPhone and you’re trying to delete a video originally stored on another device (like your iPad). | By design, you can’t use your current device to delete videos that were synced from another device. This is to avoid accidentally losing data. You can either accept this result or disable iCloud Photos on your iPhone. |
| Your storage is full. | This may seem counterintuitive, but iOS sometimes can’t delete videos when your storage is completely full. We suggest deleting or offloading an app and trying again. |
| Your version of iOS is outdated. | OS updates often include bug fixes and optimizations. Updating iOS may resolve whatever issue is preventing you from deleting videos from your iPhone. |
One More Thing! Here’re a Quick Tip for Smaller Video Files
If you don’t need the most cutting edge video quality whenever you shoot or download videos, you can consume less space by saving them in lower quality. This can save you gigabytes of storage space, especially if you need to store multiple videos on your device.
There are 2 ways you can do it: (a) change your camera settings (Settings app > Camera) or (b) use an app or website to compress your videos. You can also enable iCloud’s optimization setting to automate this process, but the space-saving feature only triggers when your device is low on storage.
FAQ
- Open the Settings app and tap on your Apple ID.
- Tap on iCloud.
- Tap on Photos.
- Disable iCloud Photos by switching OFF the toggle beside it.
- Your videos came from iTunes or Finder sync.
- You enabled iCloud Photos after deleting the videos, which downloads your library in the state it was in during the sync.
- Your store is full, preventing your iPhone from working optimally.
- iOS is outdated.
- Delete videos again from the Recently Deleted album in your Photos app.
- Disable iCloud Photos and allow iOS to remove the videos from your device.
- Update iOS to hopefully install bug fixes and optimizations.


