
Whether you’ve synced the photos on your iPhone more than once or keep forgetting to delete the photos after editing them, you might begin to notice that duplicate photos can start piling up sooner or later. Duplicate photos can quickly overload the storage space on your iPhone, which is why it is best to take the time to organize the Photos app on your device and remove the unneeded data.
In this article, we’ll help you to understand why photos get duplicated in the first place and cover the best methods for deleting duplicate photos on an iPhone.
Table of Contents
How to Delete Duplicate Photos on an iPhone
In this section, we’ll cover 5 convenient and effective ways to remove duplicate photos on your iPhone. We recommend trying each method in the order we’ve written them as we started with the easiest.
Method 1: Use the Duplicates Feature
The Photos app on your iPhone has a built-in utility that automatically analyzes your camera roll for duplicate photos. Found duplicates are grouped together in a utility folder called Duplicates in the Photos app, where you can easily merge them.
This process not only gets rid of other copies but also keeps the high-quality version. It even adds to it any relevant data extracted from the deleted copies.
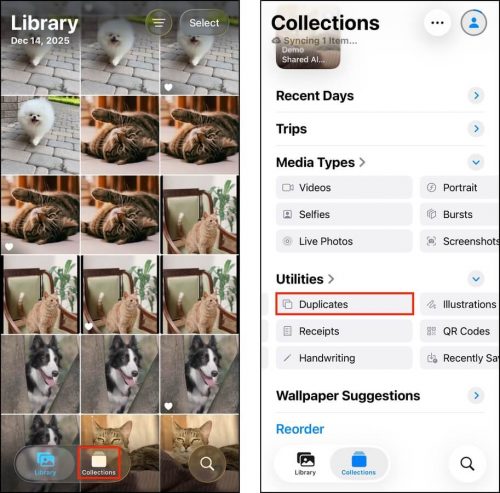
Step 1. Open the Photos app. In the Collections tab, scroll down to the Utilities section. Then, tap Duplicates.
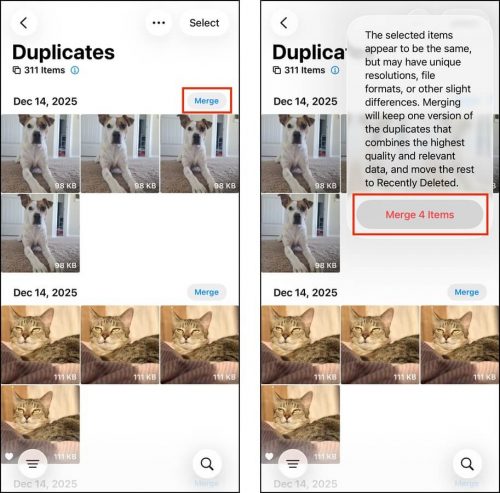
Step 2. You’ll find your duplicates grouped together, with a Merge button beside its title date. Tap it to merge all the photos in that group.
Step 3. When prompted, tap Merge Items to confirm the action.
Redundant duplicate copies are sent to the Recently Deleted folder in the Photos app (also under Utilities). Make sure to delete those as well to free up storage space.
Method 2: Use a Third-Party App to Remove Duplicates
In cases where iOS fails to detect duplicates on your iPhone, and you want to delete similar photos as conveniently as possible, you’ll need to rely on third-party iPhone cleaning apps. Other methods in this list help you with manual deletion, but if you have a huge library, you’ll probably run out of patience.
There are several great iPhone cleaners you can choose from, but we recommend an app called Clever Cleaner: AI Cleanup App. It has the specific tool we need (similar photo cleanup), along with other useful features. It’s also completely free (as of this writing), has no limitations, and zero ads–which is very rare for iPhone cleaning apps.
We’ll show you how to use Clever Cleaner to delete both duplicate and similar photos on your iPhone step by step. Since it’s free, you can immediately download it and follow along.
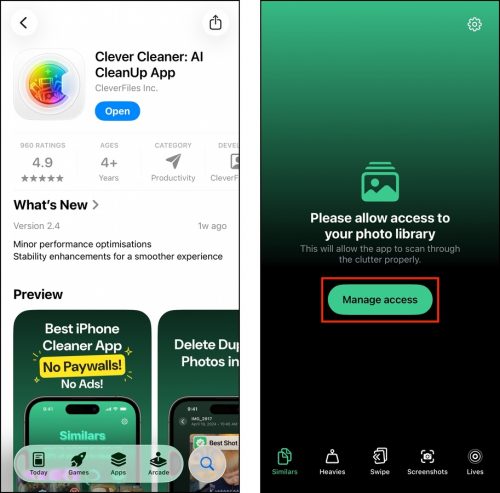
Step 1. Download Clever Cleaner: AI Cleanup App from the App Store (or scan the QR code from the official website).
Step 2. Open Clever Cleaner and grant full access to your library (don’t worry, it’s safe!).
Step 3. On the bottom menu, tap Similars. You can tap Smart Cleanup to auto-delete all the similar and duplicate photos Clever Cleaner found, leaving one “best” copy for each group. If you want to review your similar and duplicate photos yourself, tap a group to open it.
Step 4. Each group of similars and duplicates are presented to you in a slideshow. In this view, Clever Cleaner has also automatically chosen the “best” copy for each group and selected the rest for deletion. You can simply tap Move to Trash to apply the suggestion. Alternatively, you can choose which copies you want to delete yourself.
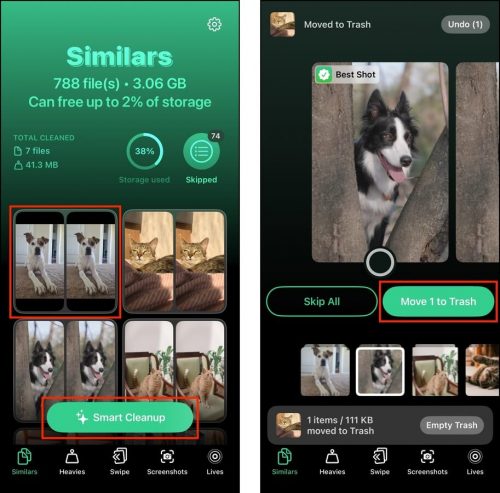
Step 5. Whenever you delete photos, you’ll see them in the Trash section at the bottom of the screen. Tap it to open the Trash menu, where you can opt to restore your photos or confirm deletion.

Here’s a quick rundown of Clever Cleaner’s other features if you want to clean up your iPhone library further:
- Heavies: The largest videos in your library are compiled for you to review, and you can sort them by size or by date. You can delete unwanted videos or compress them, which shrinks their file size with minimal impact on video quality.
- Swipe: Your photos are displayed in a slideshow, and you can use left and right swipe gestures to keep or delete them.
- Screenshots: All your screenshots can be reviewed from this app, as well as sorted and mass-deleted.
- Lives: You can compress your Live Photos, which means removing the video and audio clip files and only leaving a high-quality still image. Clever Cleaner lets you compress all the Live Photos in your library at once.
Method 3: Delete Duplicates Manually Using Advanced Search
If you only have a few hundred photos saved on your iPhone, you can utilize the keyword-based search feature in the Photos app to group most of the duplicates together.
You can search by month, year, city, state, business name, category, events, and more. For example, it’s reasonable to assume that duplicates are typically saved in the same month — we’ll show you how to use it to your advantage.
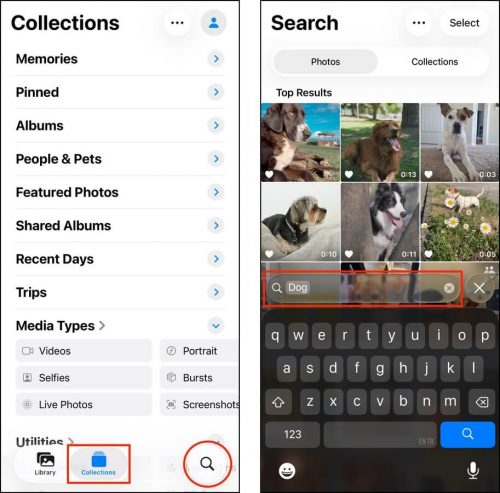
Step 1. Open the Photos app and navigate to the Collections page. Then, click the magnifying glass in the bottom right corner of the screen to open the search tool.
Step 2. Type one or more keywords related to the subject of the duplicated photos. For example, you can look up photos of “Dog” or specify a month where duplicates were more likely, such as when you took a vacation.
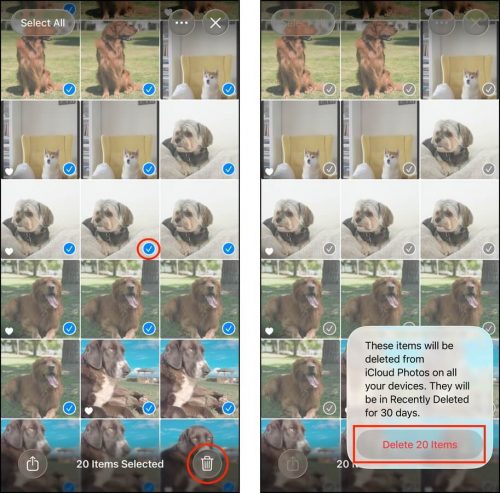
Step 3. Once you find your duplicates, tap Select and tap the duplicates you want to delete (make sure to leave at least one copy). Then, tap the trash icon in the bottom right corner. When prompted, press Delete Photos again to confirm the action.
Once you’ve deleted the duplicates, make sure to delete them again from the Recently Deleted folder (Photos > Utilities > Recently Deleted).
Method 4: Find and Delete Similar Photos Using Map View
Another way to leverage the utilities in the Photos app to find duplicate and similar photos is by using the Map tool. When you check the Map from the Photos app, you’ll find all your library photos and videos distributed by location. This allows you to view photos with the same context.
For example, if you recently took a trip to a foreign country (or even a city or restaurant), it’s reasonable to expect that some photos from that location look identical. It’s also possible that you took more selfies or landscape photos during the trip, which are likely to produce similar images in your library.
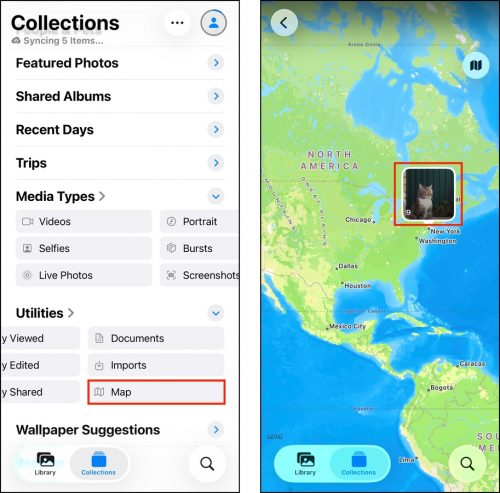
Step 1. Open the Photos app. Then, tap Collections in the bottom left corner of the screen. Scroll down to the Utilities section, then swipe left until you find Map.
Step 2. Map view literally opens a world map, automatically sized to show all the locations you’ve captured photos in. Each location is marked with a thumbnail of its most recent photo, which you can tap to review further.
Step 3. Once you find the photos you want to delete, tap Select in the top right corner of the screen.
Step 4. Tap the photos you want to delete. Then, tap the trash button in the bottom right corner of the screen.

Method 5: Use Smart Albums on Mac
On the macOS version of the Photos app, you can create Smart Albums. A Smart Album automatically adds photos to itself based on filters you set beforehand.
What makes it powerful for locating duplicates is the many variations of filters you can combine. If you have a rough idea of what photos likely have duplicates, you can have a combination of keywords, “is” and “is not” conditionals, date ranges, caption, title, and more.
Step 1. On your Mac, open the Photos app.
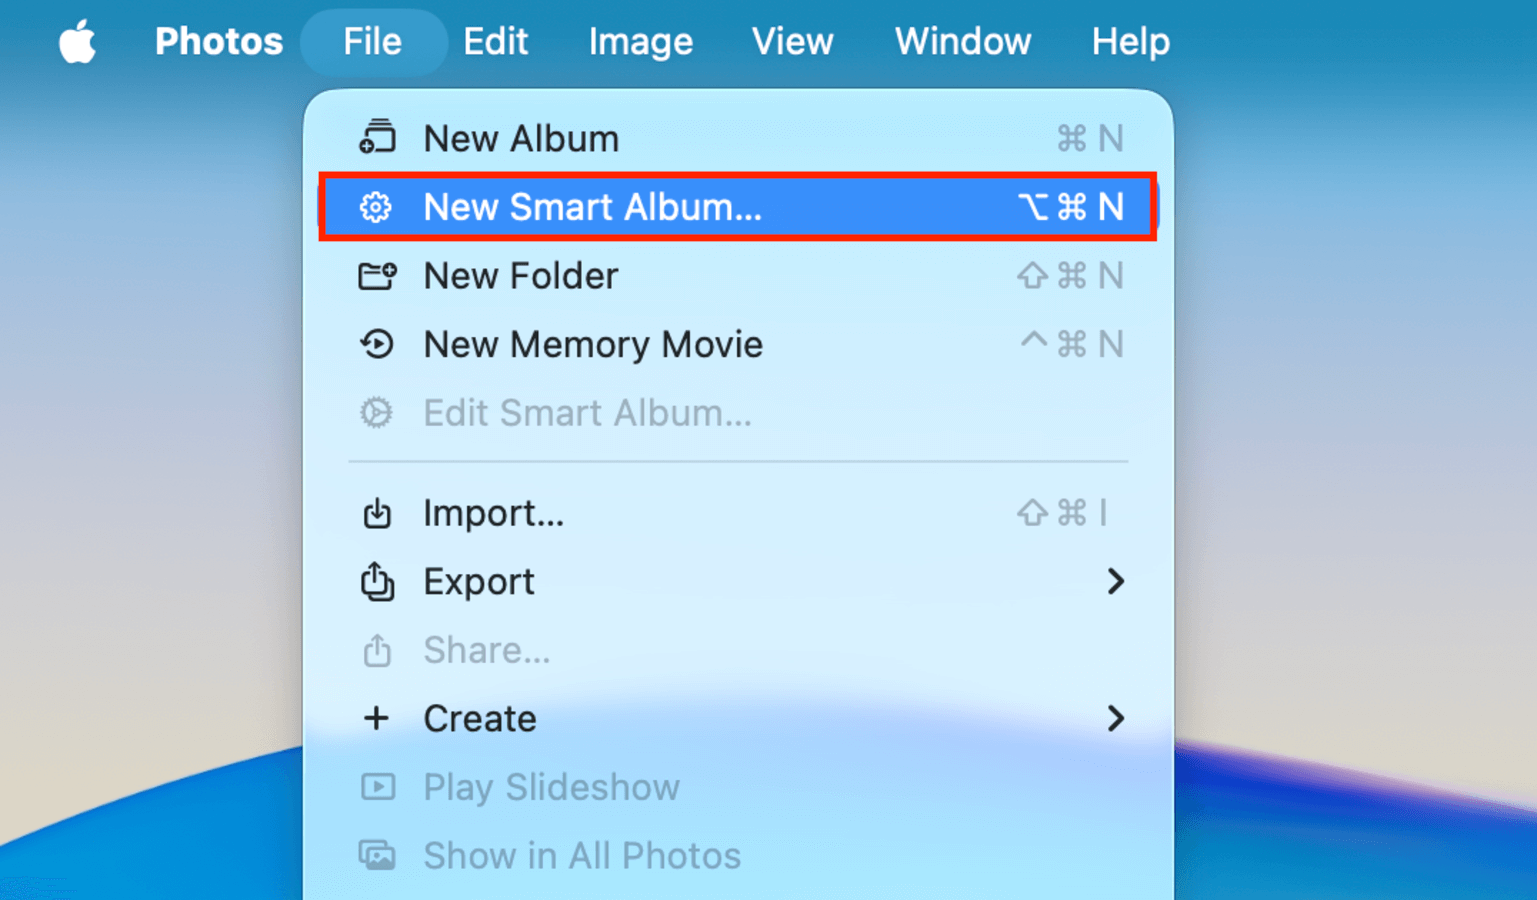
Step 2. On the menu bar, click File > New Smart Album.
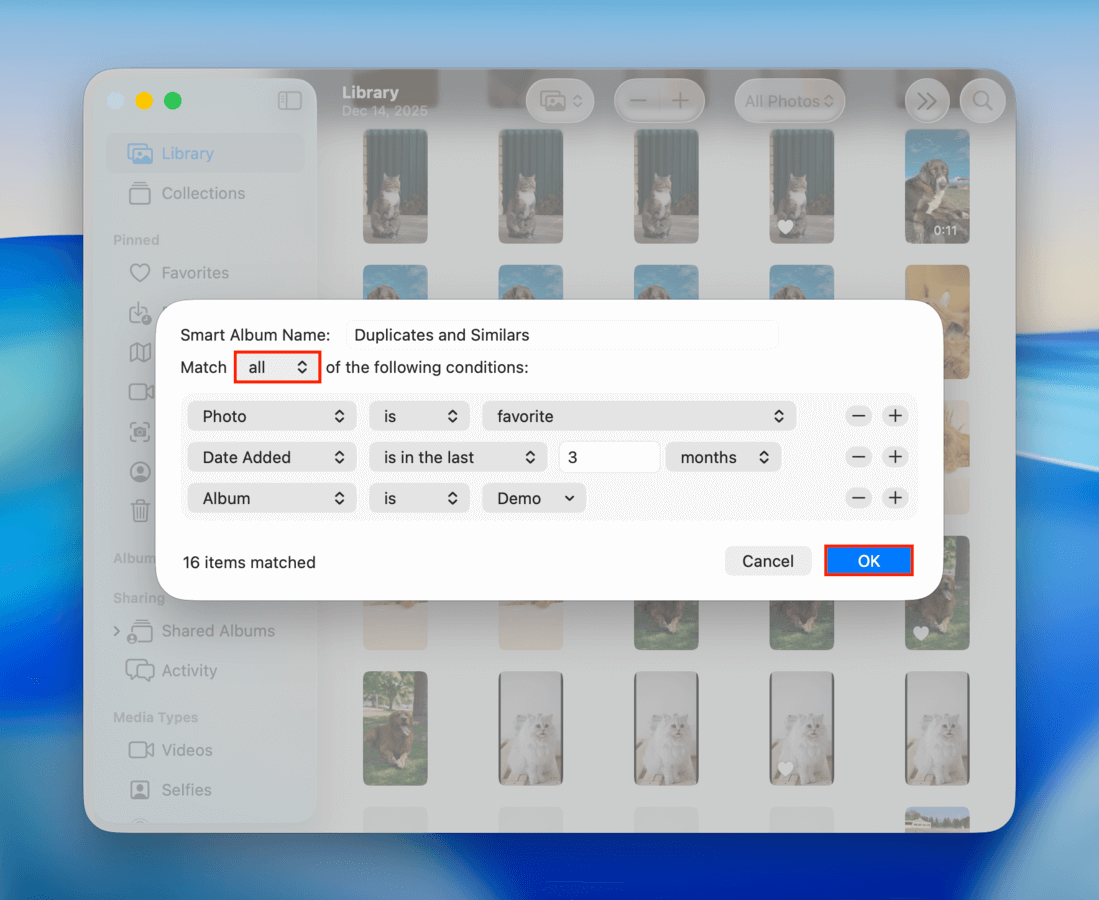
Step 3. Choose a name for the album and set the conditions for its filter. For example, I’ll specify that the duplicates I’m looking at were part of my favorites, were not screenshots, and were added to the Photos sometime in the range of May 2024 to June 2024 (you can also choose whether photos need to meet all conditions or any one of those you selected). Finally, click OK.
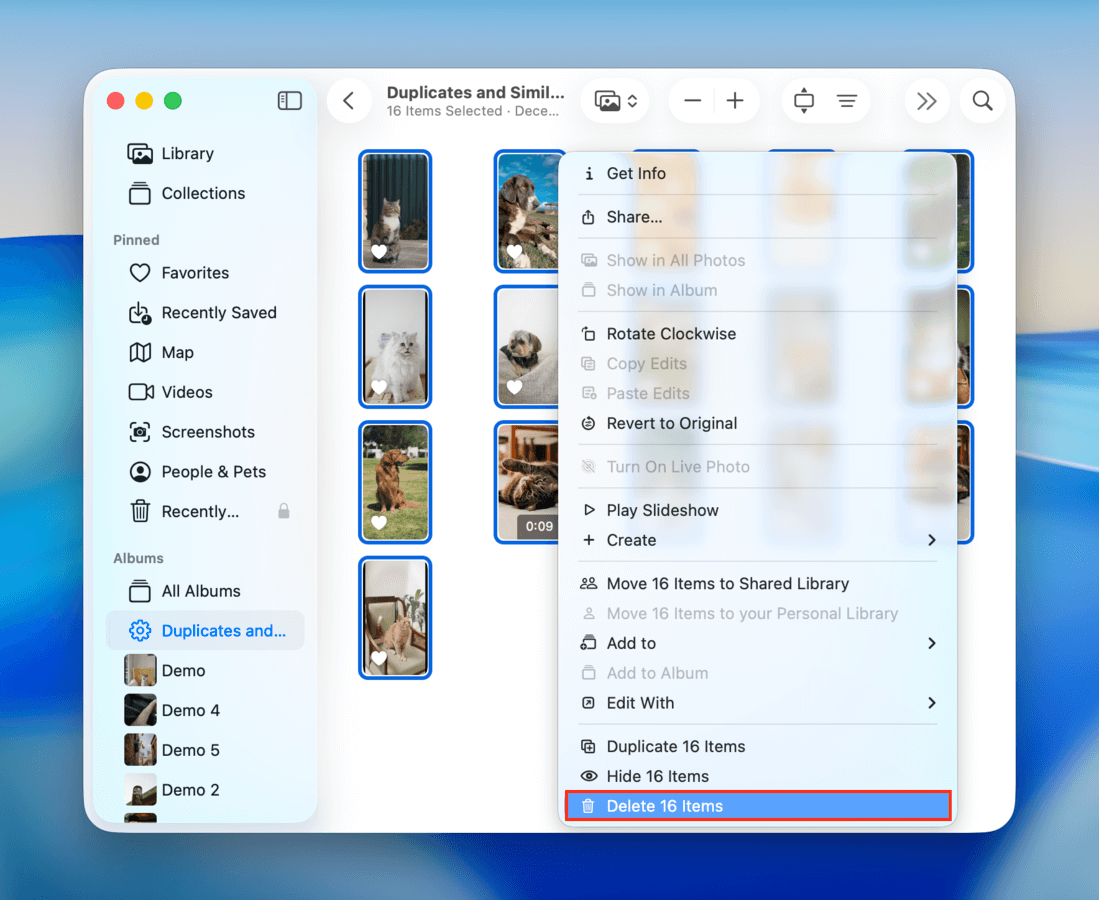
Step 4. You’ll find your newly created Smart Album under the Albums section in macOS Photos. You can edit it anytime to add or remove filters to change which photos get included. You manually delete any duplicates you find – simply click a photo to select it (CMD + Click for multiple photos). Then, right-click any selected photo and click Delete Photos.
After confirming that the duplicates were successfully deleted, make sure to erase them again from the Recently Deleted folder.
Why Are Photos Duplicated on iPhone?
iOS and the third-party apps have a lot of useful photo management features that can sometimes work against each other if you don’t properly set them up. Even if you successfully get rid of your duplicates, build-up is guaranteed to happen again if you don’t optimize beforehand.
Here’s a quick list of the most common causes for duplicate photos on iPhones and how to avoid them:
| What Happens | How It Happens / How to Avoid It |
| You imported the same photo multiple times. | If you already transferred or copied files to your iPhone using a specific method, like iCloud synchronization, don’t attempt other methods of transfer. iOS won’t always (reliably) interpret those files as duplicates, depending on the methods you use. |
| You’re taking multiple photos at once. | Accidents are common. For example, swiping the shutter button to the left initiates Burst Mode, which takes many photos in rapid succession (for moving shots). The shutter button itself is very sensitive, so you might not notice tapping it multiple times. There are even apps with auto multi-capture capabilities. You can set Burst Mode to use the Volume Up button instead (Settings > Camera). You can also use either volume button instead of the on-screen shutter. |
| If you edited your photo, you may have saved both the original and edited versions. | Most photo editing apps save edited photos as new image files to avoid overwriting original photos in case you change your mind. And if you take Live Photos, converting them to stills also gives you the option to save different versions of the same photo. You can at least turn Live Photos off by tapping the spherical button at the top-right corner of the screen. |
Need Help Cleaning Other Library Clutter?
If you’re on a cleaning spree of your photo library, there are many other types of clutter that you can delete to tidy up your iPhone and free up a lot of storage space. Aside from similar and duplicate photos, you might want to clear out blurry images, old screenshots, Live Photos individual Burst Photo images, and more.
Check out our more comprehensive guide on cleaning up photos on your iPhone, where we show you how to use free native and third-party tools to remove unwanted photos from your device as conveniently and efficiently as possible.
FAQ:
Yes! With the release of iOS 16, a new feature called Duplicates has been added to the Photos app. It automatically detects duplicate photos on your iPhone and can help you quickly remove them.
If your iPhone 11 is running iOS 16 or later, you can use the Duplicated feature to remove all of the duplicate photos from your device. Here’s what you should do:
- Open the Photos app.
- Go to the Albums tab.
- Scroll down to Utilities and tap Duplicates.
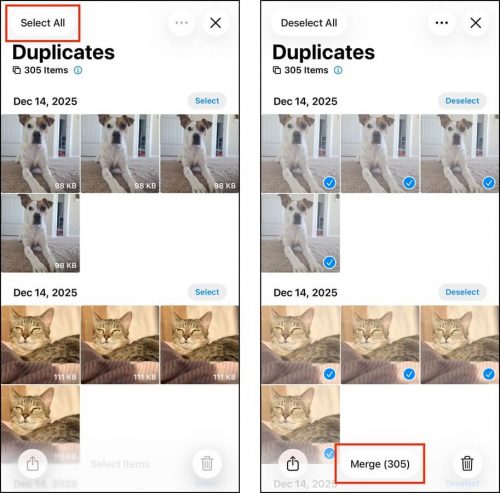
- Tap Select at the top-right and then tap Select All.
- Tap the Merge button to merge photos on your iPhone.
You can also use a third-party app like Clever Cleaner, or a similar alternative, to clean up duplicate (and similar or identical) photos.
You have two options if you want to automatically remove all of the duplicate photos from your iPhone: either use the Duplicate feature (only for devices running iOS 16 or later) or a special third-party app.
There are several possible reasons why you’re unable to delete duplicates. Here’s how to resolve them:
- While unlikely, you may be running iOS 15 or below. Update iOS to get the Duplicates album feature on your device.
- If you’re using iOS 16 but your duplicates won’t appear, it’s possible that iOS hasn’t finished indexing your photos yet; keep it charged and don’t use it for a few minutes to an hour, depending on the size of your library.
- The photos you want to delete aren’t exact duplicates–just similar or identical-looking photos. The native Photos app can only detect exact duplicates; use a third-party app like Clever Cleaner instead.
Yes, it’s possible to delete duplicate photos on an iPad. If it’s running iOS 16 or later, you can easily use the Duplicates feature to remove the duplicates. Otherwise, your best option would be to download a special third-party app to get this job done or to manually remove the duplicate photos from your iPad.
Here’s what you can do to prevent your iPhone from duplicating photos:
- Don’t re-download the same photos (e.g., from social media apps).
- Make it a habit to delete unnecessary photos immediately after capturing them (e.g., you took several identical selfies and only intend to keep a few).
- Choose one sync method for your iPhone and stick to it all the time.
- Delete photos after editing them with the help of a third-party editing tool.


