Deleting albums in the Photos app can be confusing. You’ll find that some albums can be deleted while others can’t. There are even some albums that you need a computer to erase, even if you reset your iPhone.
This is simply a byproduct of the Photos app’s many powerful features, such as synchronization, smart categories, and cloud storage.
But it’s still confusing. So, here’s a detailed guide on how to delete photo albums on an iPhone–permanently. We also briefly lay out all the albums you can’t delete, as well as the reasons why.
Table of Contents
Can You Delete Albums on iPhone?
Real answer: it depends. You can easily delete albums that you created on your iPhone, locally. However, problems arise if you attempt to delete: (a) albums synced TO your iPhone FROM iTunes/Finder, (b) albums shared TO you by someone else.
But on top of user-generated albums, iOS-generated albums also exist in the Photos app–unfortunately, you can’t delete them. And you shouldn’t.
In summary, here’s a quick rundown of the only albums you CAN’T delete:
- Camera Roll/All Photos/Library. Acts as the “main” album of the Photos app; it stores and streams ALL media captured by the device.
- Media Types. iOS-generated albums that compile all your photos and videos by specific type based on the capture tools, settings, and scenes used.
- Utilities. iOS-generated albums that help users keep their library organized.
- Shared Albums. Albums created by you or another user for the explicit purpose of sharing. Only Shared Album owners can delete the album itself, as well as any photo, video, or comment. Other members can only delete whatever media they contributed.
- Albums synced from iTunes/Finder. User-generated albums that were originally created in the Photos app on a computer, then copied to an iPhone through synchronization. Deleting such albums requires deleting them on the computer and initiating synchronization again.
How to Delete Albums on an iPhone
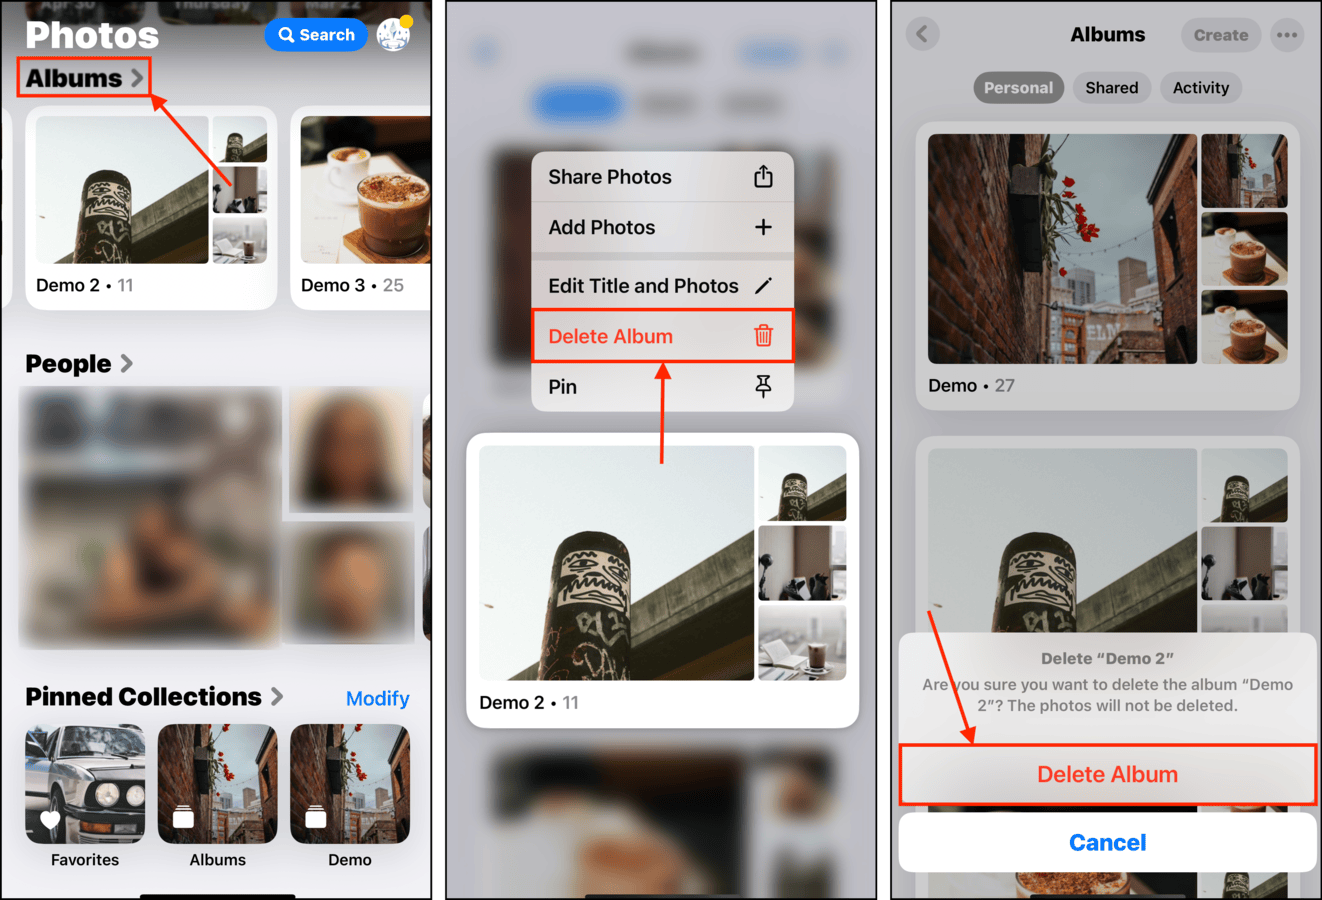
In this section, we’ll quickly go over how to cleanly delete the albums you created in the Photos app. The GUI has undergone some changes recently, so have a look at the screenshots we prepared as well.
Step 1. Open the Photos app.
Step 2. Scroll down past your library photos until you see the Albums section. Tap Albums >.
Step 3. Tap and hold the album you want to delete. Then, in the context menu, tap Delete Album. To confirm the action, tap Delete Album again in the dialogue pop-up.
How to Delete Albums on iCloud Photos
You may also want to delete a photo album on your iPhone by deleting it from iCloud – this will help you free up cloud space and organize your photos. You can technically do this using any browser or any device, but we’ll show you how to do it on your iPhone.
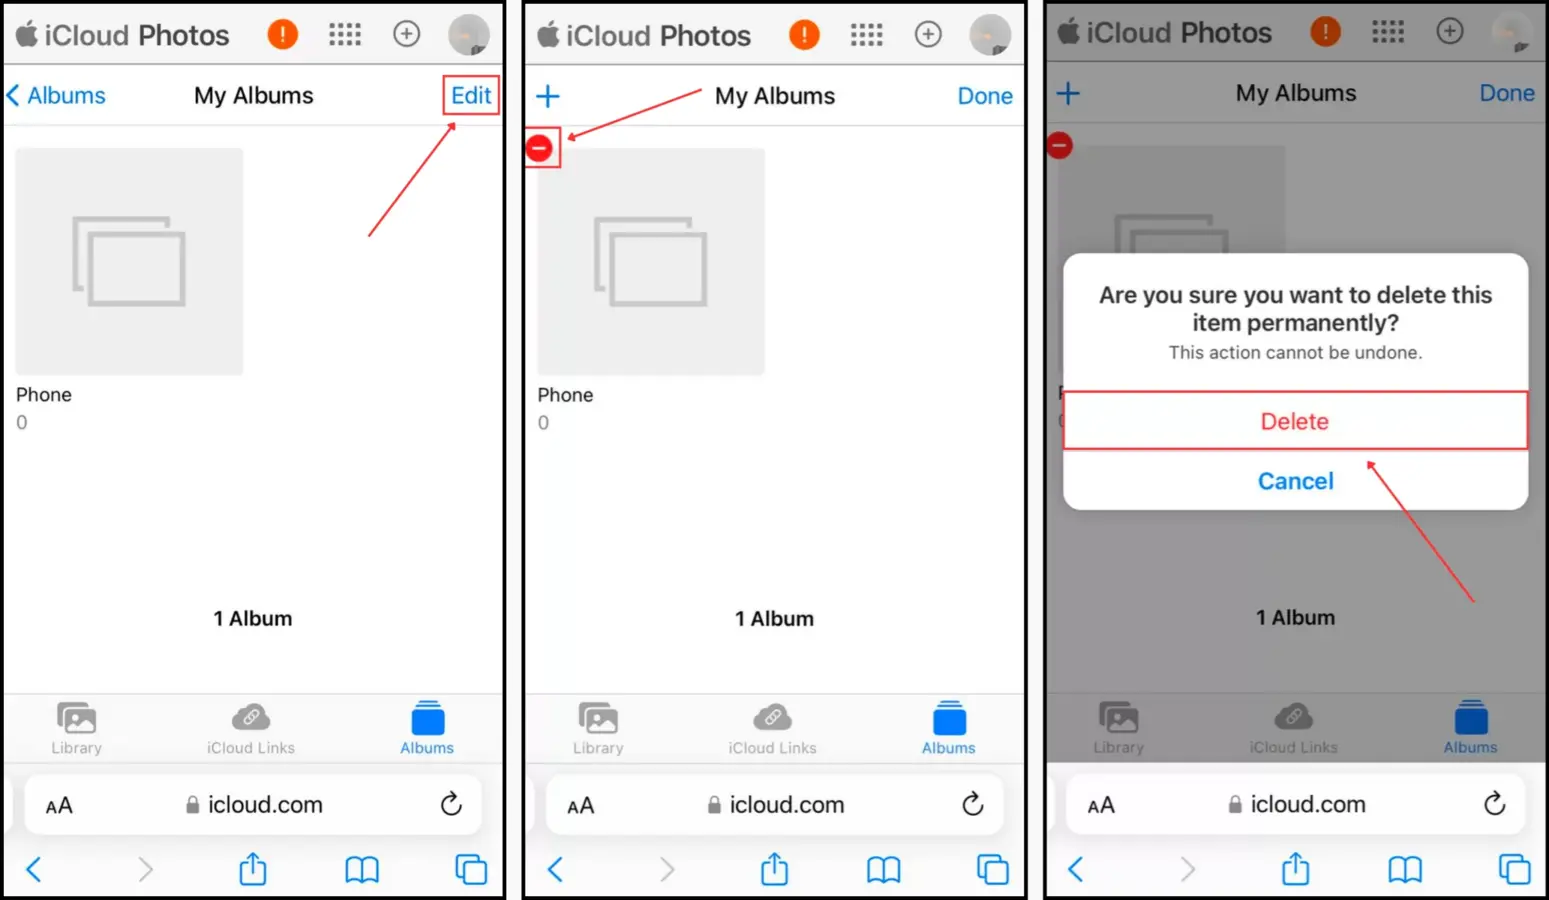
To remove an album from iPhone by deleting it from iCloud:
Step 1. On your iPhone, open a browser and login to iCloud.com.
Step 2. Scroll down and tap Photos.
Step 3. Tap Albums in the bottom-right corner of the screen and tap See All beside My Albums.

Step 4. Tap Edit in the top-right corner of the screen.
Step 5. Tap on the – button in the corner of the album you want to delete.
Step 6. Tap Delete to confirm the action.
Before You Go, Here’s One Tip for Easier Albums
The key to a manageable photo library is to pre-emptively organize it. So whenever you conclude a photo or video session, immediately save ALL photos to the event album. You can review the album and delete unwanted photos later–but for now, save everything.
This ensures that your photos are immediately given some context, making them easy to search for and categorize while they are still fresh in your mind (and BEFORE they get lost in the vortex of your photo library).
FAQ
To create an album on an iPhone:
- Open the Photos app.
- Tap Albums at the bottom of the screen.
- Tap the + button at the top-left corner of the screen.
- Choose an album name and tap Save.
- Select the photos you want to add to the album and tap Done.


