
Is the “Other” data type on your iPhone storage taking up way too much space? Because of its ambiguity, “Other” data can be difficult to reduce–how do you even know what to delete?
We decided to answer that question ourselves–and we created the ultimate guide for understanding and cleaning up “Other” storage on your iPhone. Finally, you’ll know what “Other” data actually means and how to get rid of it.
Because of the variance of its data, we compiled a LOT of methods–9, to be exact.
Table of Contents
What is “Other” in the iPhone Storage Menu?
In a nutshell, “Other” data on an iPhone includes all non-user files that don’t cleanly fall into any of the other categories. It also stores data that may be part of other categories in some way, but iOS still reports them as “Other” data.
Here’s a quick breakdown of what constitutes “Other” data on your iPhone so you have a better idea of what this guide is about:
- iOS files. Operating system files take up a big chunk of “Other” data. These are files that iOS requires to function, like kernels, drivers, libraries, firmware, etc. We can’t touch this.
- iOS updates. iOS updates are downloaded and stored before they can be installed. On the iPhone, update files are stored as “Other” data.
- System cache data. Like most systems, iOS utilizes cache data—or temporary files—to improve performance. For example, it may store pre-rendered UI elements from recent operations in case you need to access them again (faster). These are reported as “Other” data. Usually, iOS cleans up after itself really well. Sometimes, obsolete cache files get stuck.
- Some app and browser cache files. Similar to the system’s cache, apps and browsers utilize temporary files for performance. Some of these files are reported as “Other” data, and they can collectively take up gigabytes of storage.
- Logs. iOS generates logs whenever it encounters errors. They don’t cost much storage space, but they can still pile up.
9 Ways to Reduce “Other” Storage on Your iPhone
In this section, we cover 9 reliable ways to get rid of “Other” storage on your iPhone. The methods in this guide are ordered according to convenience and impact, but we recommend you use as many as possible for a deeper clean.
Method 1: Restart Your iPhone
Restarting your iPhone is an easy way to clear the device’s cache of temporary files that may have been used for background processes. It’s a less permanent fix but it can help you identify if any apps are causing the bloat to your iPhone’s “Other” data.
And if you end up not triggering the same process that bloats “Other” in your iPhone storage—problem solved!
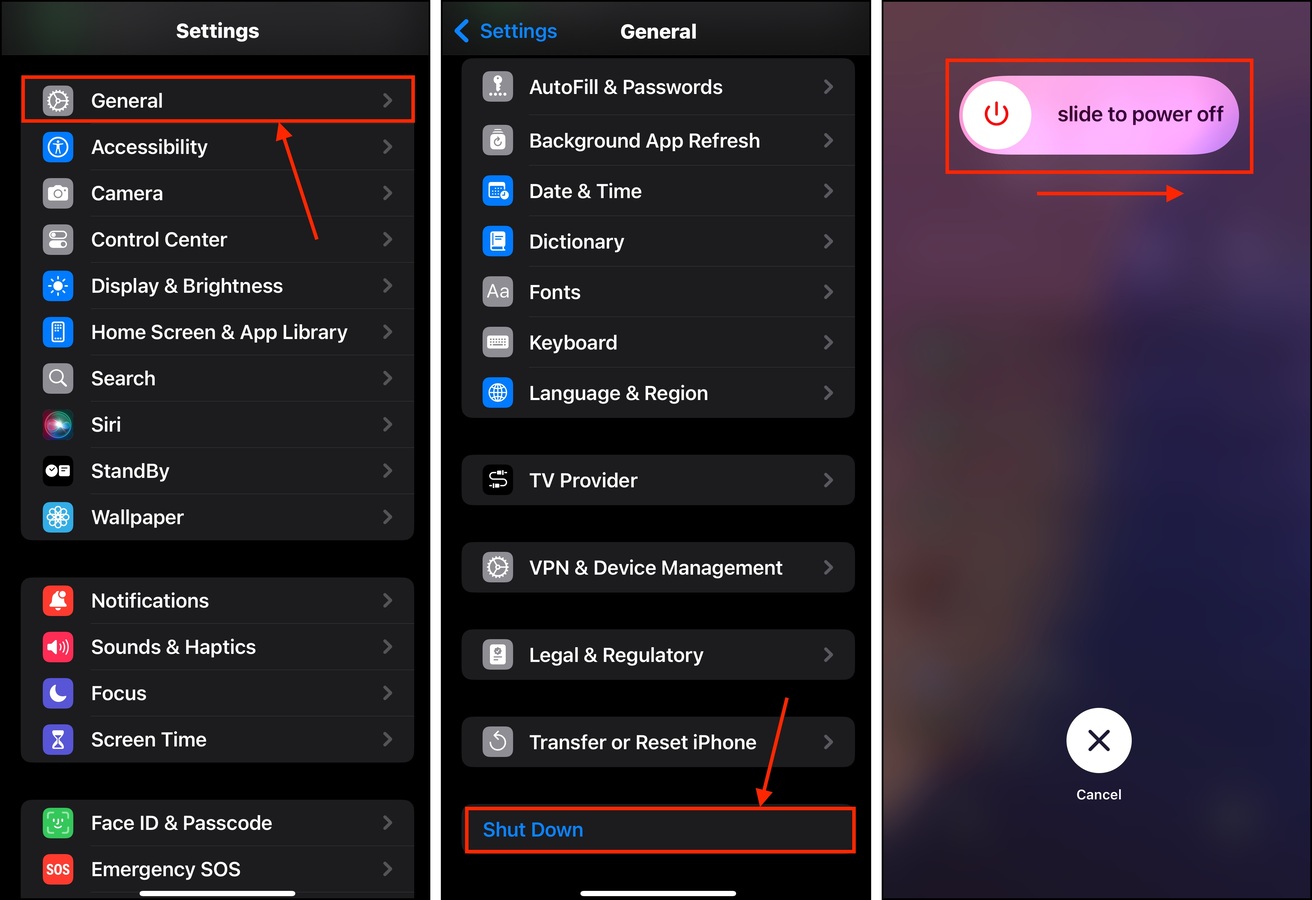
Step 1. Open the Settings app. Tap General.
Step 2. Scroll down to the very bottom of the General menu and tap Shut Down.
Step 3. Slide the toggle switch that appears at the top of your screen to the right. This should power down your device.
Once your iPhone boots up, try to observe when during your normal activity your device storage spikes. There should be a specific trigger.
Method 2: Clean Up Your Unwanted User Data
An indirect way to help manage “Other” data on your iPhone is to free up as much storage space as you can by removing unnecessary user files. Having more free storage space gives iOS more elbow room for its internal processes.
There are 2 approaches you can choose from:
- Manual cleaning. Manually delete files via the Files app (local and iCloud) and erase photo library clutter (blurred photos, large video files, Burst Mode pictures, etc.).
- Automatic cleaning. Use third-party apps to clean up user files automatically. For photo library media specifically, we recommend Clever Cleaner: AI Cleanup App because it’s one of the very few cleaner apps that are 100% free with no ads. It can help you quickly clean up.
Method 3: Fill Up Your Photo Library (Then Delete the Photos/Videos)
If freeing up space doesn’t work, filling it up might instead! This method is an attempt to manually initiate iOS’ automatic cache cleanup process, which is supposed to delete “Other” storage on your iPhone. By filling up your photo library with photos and videos, iOS detects that the device is running low on space and will more aggressively clear obsolete files to make room.
Step 1. Open the Settings app. Then, tap Camera.
Step 2. Tap Record Video.
Step 3. Select the highest available resolution for your iPhone. Then, return to the Camera settings menu. If you have the ProRes setting on your device, enable that too.

Once you’ve enabled the highest quality settings for your iPhone camera, start taking videos until you fill up your storage. Once you’ve noticed that your iPhone’s “Other” data has reduced enough in size (Settings > General > iPhone Storage), you can delete the photos and videos you just took.
Method 4: Remove Old iOS Update Files
If you update iOS directly through your iPhone, you’ll need to download and store the update files on your device before installing it. Ideally, installation files are deleted after the device is successfully updated.
This creates 3 opportunities for “Other” bloat: (a) the update wasn’t successful, (b) the update was only partially successful, or (c) iOS was unable to delete the installation files after the process.
In any of these situations, the obsolete installation files are left on your device as “Other” data. This might be why your iPhone “Other” storage is huge! Here’s how to get rid of obsolete update files:
Step 1. Open the Settings app. Tap General.
Step 2. In the General settings menu, tap iPhone Storage.
Step 3. Scroll down to your list of apps, which should include the iOS update you were able to download. Tap it.
Step 4. Tap Delete Update.
If you were unable to successfully update your device beforehand, you can try again now. Make sure that you have a good network connection and that you plug your iPhone into a wall charger.
Method 5: Delete and Re-Add Email Accounts
iOS may add email attachments that you’ve already viewed to the device cache, just in case you need to see them again. You may have a case of large obsolete attachments filling up your device.
By deleting your email account (from the Mail app—not the account itself) and adding it again, iOS will only download the most recent emails and any of its associated data.
Step 1. Open the Settings app. Then, scroll down to the bottom of the main Settings menu and tap Apps.
Step 2. Locate and select the Mail app.
Step 3. In the Mail menu, tap Mail Accounts.
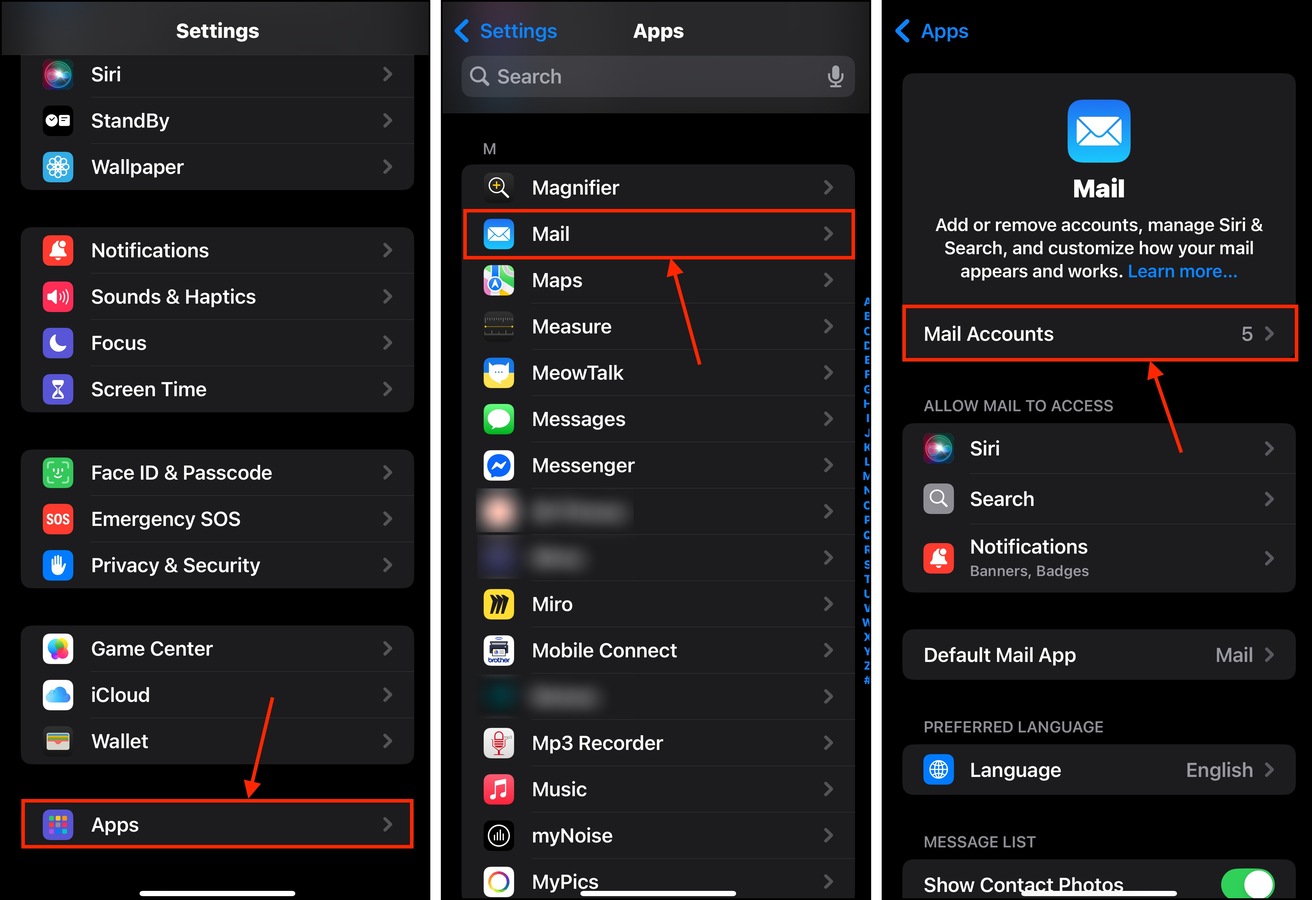
Step 4. Tap a mail account with a lot of large attachments that you want to delete.
Step 5. In the mail account’s menu, tap Delete Account.
Step 6. When prompted, tap Delete Account to confirm.

Once you’ve successfully deleted the account, you can add it again in the Mail Accounts menu.
Method 6: Clean App Caches Natively
Depending on how an app is designed (and how iOS interacts with it), some of its temporary data might be stored as “Other.”
Some apps provide a feature that allows you to clear their cache directly. We’ll demonstrate this with the Telegram app, but you can find more examples in our other guide on how to clear cache and cookies on an iPhone.
Step 1. Open the Telegram app and tap Settings on the bottom menu. Then, find and tap Data and Storage.
Step 2. At the top of the Data and Storage menu, tap Storage Usage.
Step 3. Tap Clear Entire Cache.

After clearing your app caches, give iOS some time to analyze its storage space again before checking “Other” data in the Settings app. A few minutes to half an hour will usually do, depending on how much data you cleared up.
Method 7: Clear Your iPhone’s Browser Caches
Like some app temp files, iOS can also store temporary website data as cache files—another contributor to “Other” data. A good example is graphical elements on a web page that iOS pre-renders so you don’t have to wait for it to load.
Unfortunately, like most cache files, that data soon becomes obsolete. But most iPhone browser apps allow you to clear cache data directly.
Step 1. Open the Settings app. Scroll to the bottom and tap Apps.
Step 2. Find and tap Safari.
Step 3. In the HISTORY AND WEBSITE DATA section, tap Clear History and Website Data.

Method 8: Offload or Reinstall iPhone Apps
If the apps you want to clean up don’t provide a “clear cache” button, you have two other options: (a) offload the app or (b) delete and reinstall the app.
Offloading an app removes the installation but keeps user data. Deleting an app removes everything, allowing you to create a fresh installation. In both cases, the app cache gets cleared from your device.
Step 1. Open the Settings app. Then, open the General menu.
Step 2. Tap iPhone Storage.
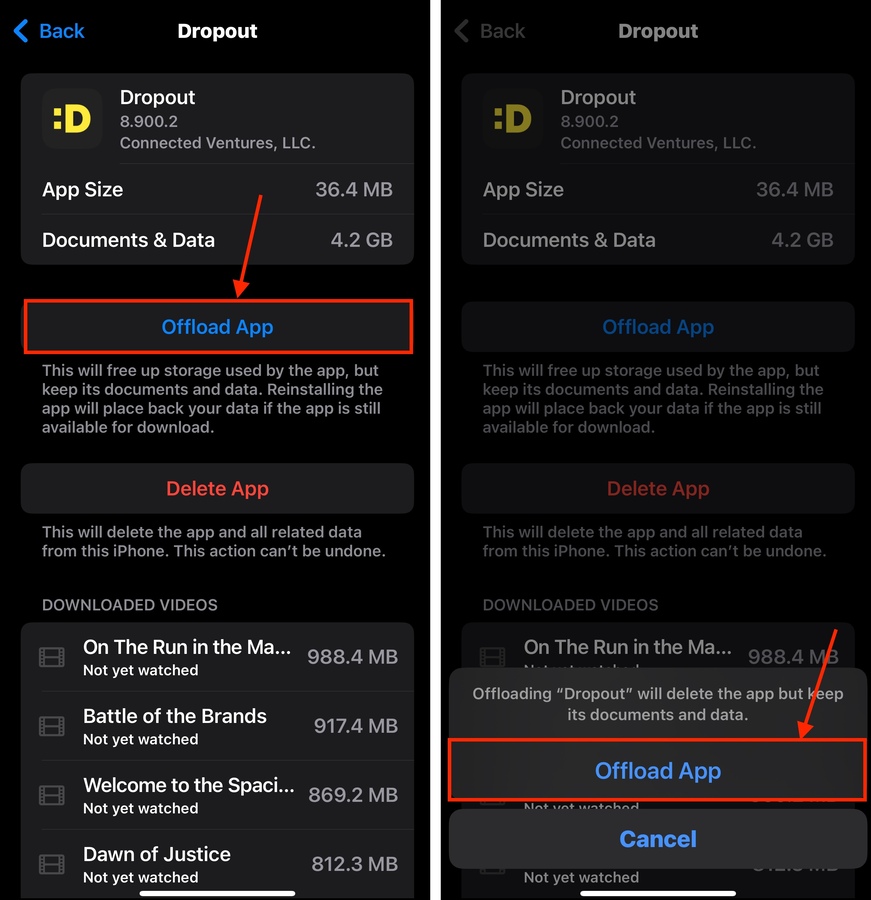
Step 3. Scroll down the iPhone Storage menu until you see the list of installed apps. Tap one—ideally, one close to the top (biggest file sizes).

Step 4. Tap Offload App or Delete App, depending on what you need.
Step 5. Finally, you’ll be prompted to confirm—tap Offload App or Delete App again.
We recommend checking the iPhone Storage menu each time you delete or offload an app so you can get hard data on which applications are the worst offenders.
Method 9: Factory Reset Your iPhone
There may be some cases where individual cleanup features aren’t enough to pare down the “Other” data on your iPhone, it may be worth performing a Factory Reset.
This completely wipes your iPhone and creates a new installation of iOS on your device. Not only does this process clean up “Other” data to its bare necessities, but it also removes built up cache data, resolves software conflicts, and repairs bugs that worsen storage consumption issues.
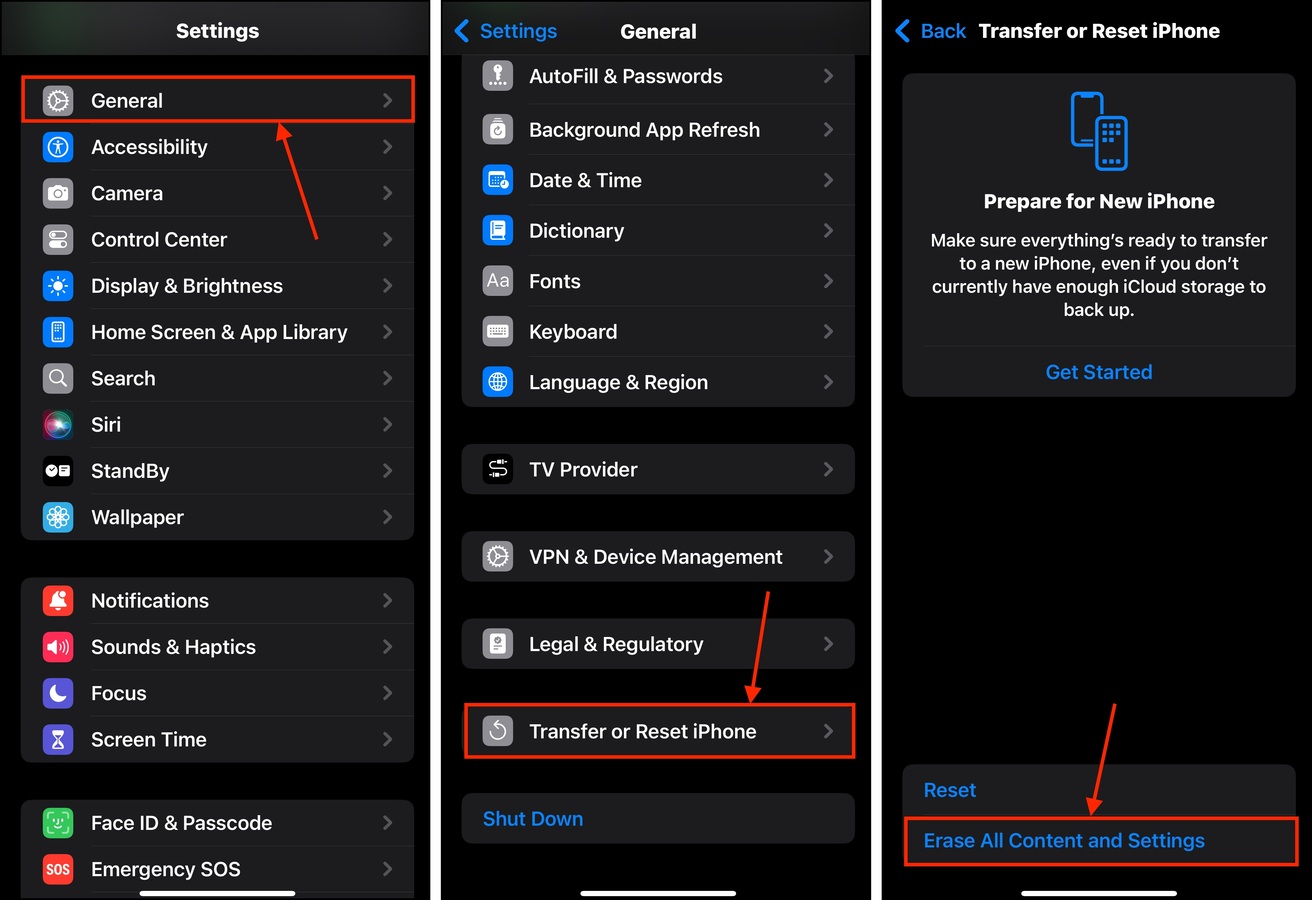
Step 1. Open the Settings app. Then, tap General.
Step 2. Scroll down to the bottom of the menu and tap Transfer or Reset iPhone.
Step 3. In the Reset menu, tap Erase All Content and Settings. In the next menu, tap Continue and follow the reset wizard.
Once your iPhone has been erased, you can restore any backups you created. “Other” data will not be included.
Simple Tips to Keep “Other” Data Under Control
It’s nearly impossible to directly influence “Other” data on your iPhone. Instead, you can help iOS prevent bloating the “Other” category by observing good storage hygiene.
First, review and purge your files regularly. Maintaining at least 10-15 GB of free storage space helps iOS manage itself more easily (especially if you work with huge assets). Second, only download apps from reputable sources. Poor memory management can cause “Other” data to bloat quite easily. Third, keep your device’s iOS updated. Apple regularly rolls out bug fixes and performance enhancements, which can resolve storage issues by themselves.


