
Do your apps take up way more storage space than when you initially downloaded them? They’ve likely accumulated a lot of app data over time and usage. In many cases, a lot of that app data can be deleted to free up space, without affecting the app itself–sometimes, up to 10 or more gigabytes at a time.
Unfortunately, the method to do that isn’t always that obvious, depending on the data type and the app design. To prevent you from having to check every nook and cranny yourself, we prepared an in-depth guide on how to clear app data on your iPhone without deleting the app.
Table of Contents
Quick Guide: Different Types of App Data
Applications are made up of many different types of data. Some of them are part of the app’s core functionality (and so can’t be removed), while others are user-accessible files that are safe to delete. Here’s a quick list so you know what to look for when cleaning up your apps:
- Attachments: Apps allow you to create, send, or receive content typically allow attachments, which are files third-party that are appended to the original app content. For example, the Messages app allows you to send messages with image or video attachments.
- Downloads: Many streaming apps allow you to download media for offline viewing. A great example is Netflix, which lets you save shows or movies in the app so you can watch them later, even without an internet connection.
- Cache data: All applications use a cache, which is a folder that “holds” temporary files for faster access. For example, a video game might save any upcoming cutscenes in advance so you don’t have to load them on the spot.
- iCloud data: A lot of native and third-party iOS applications utilize iCloud to save backup files online. Some upload smaller files (like user preferences), while others are gigabytes in size (like media file backups).
- Application package: When installing an app on your device, as well as downloading new content or updates for your apps, your device downloads a bunch of different files that make up the package. These include scripts, drivers, and large assets, like images or videos, that are required for the app to run.
- User data: Applications save relevant user data, such as login details, settings and preferences, usage tracking, and others (depending on the app functionality). This app data type usually takes up a very small amount of storage space.
Attachments, downloads, iCloud data, and cache data can be safely and conveniently deleted (in most cases). We’ll show you how to do that in the next section.
7 Ways to Clean Up Your iPhone App Data
In this section, we’ll cover 7 different methods to clear data from an app on an iPhone (without deleting it completely). Since there are a bunch of different types of app data scattered throughout different locations on your device, we recommend trying all the methods you find in this guide so you don’t miss anything.
Method 1: Offload Apps to Keep User Data
If you won’t be using an app for some time, consider offloading it! “Offloading” an app uninstalls it from your device, removing all its assets and other files from your device—but it keeps your user data intact.
This allows you to download the same app later without losing user-related data, such as progress trackers, settings and preferences, and more. It’s also a good way to reset an app on your iPhone without deleting it completely.
Step 1. Open the Settings app and tap General.
Step 2. In the General menu, choose iPhone Storage.
Step 3. Scroll down to the section where your installed applications are listed. Then, select an app you want to offload.

Step 4. Tap the Offload App button.
Step 5. Finally, Then, tap Offload App again to confirm the action.
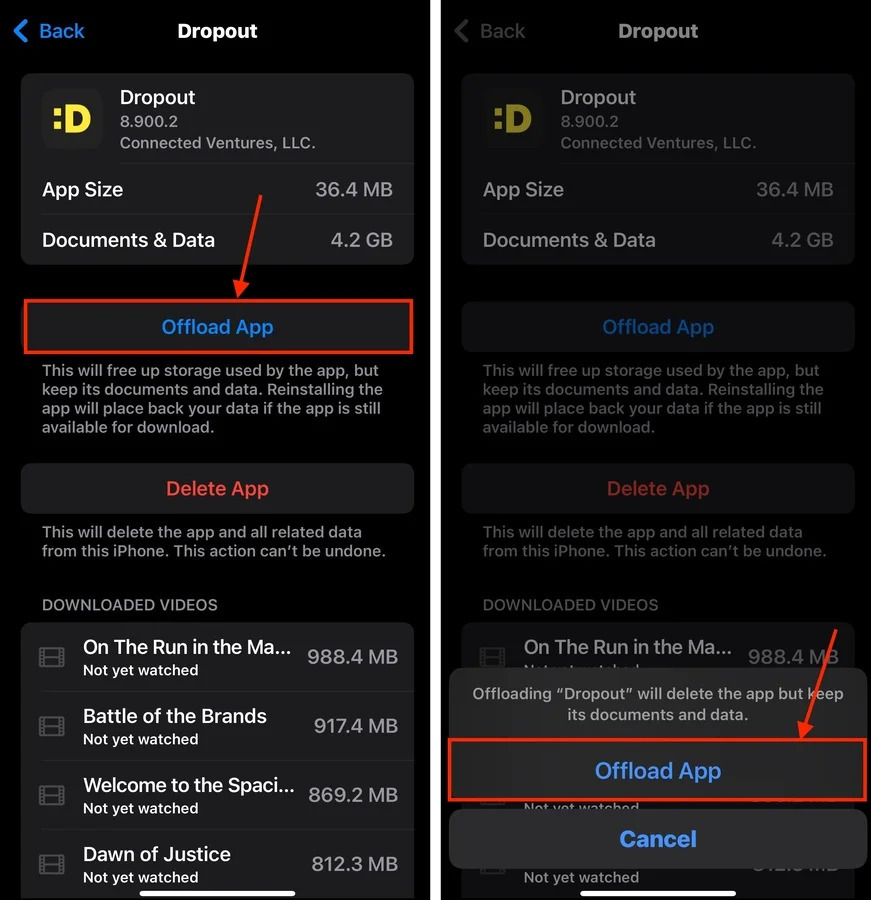
Offloaded apps still appear on your iPhone’s home screen, but greyed out with a cloud icon next to it. Tapping on the app will download it again to your device.
Method 2: Clear App Caches
Applications use caches to store temporary files, which improve performance and reduce load times. The problem is that cache files can be large in size individually or they can add up over time.
A great example is Spotify, which we’ll be using for our demonstration. Spotify’s cache quickly fills up with user interface elements, album art, recently played songs or podcasts, and much more. In fact, a Reddit user reported having a Spotify cache 10GB in size.
We’ll show you how to check Spotify’s cache and how to clear it.
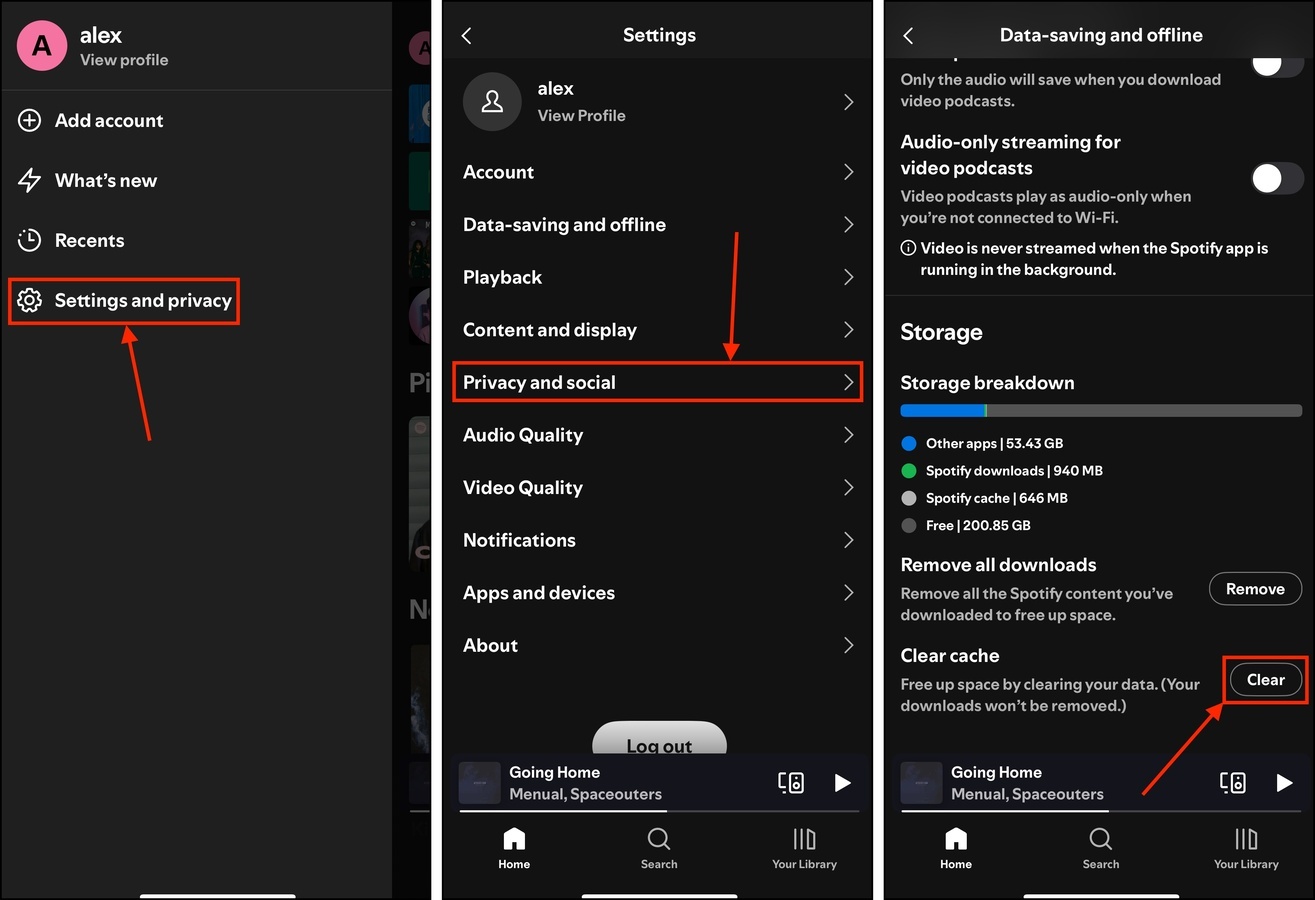
Step 1. Open the Spotify app (or whatever app you want to clean).
Step 2. Tap your user icon in the top left corner of the main menu. Then, select Settings and privacy.
Step 3. In the Settings menu, choose Data-saving and offline.
Step 4. Scroll down to the very bottom of the menu to the Storage section. Beside the Clear cache setting, tap the Clear button.
Method 3: Remove Downloaded Media
Media streaming apps usually have a download feature that you can easily press by accident. And depending on the type of media being downloaded by the app, as well as its video or audio quality, you might be losing dozens of gigabytes to downloaded files.
Fortunately, most apps make it easy to remove downloaded files through their own interface. We’ll demonstrate this method with the Dropout app, which allows you to add and remove downloaded shows from the user library.
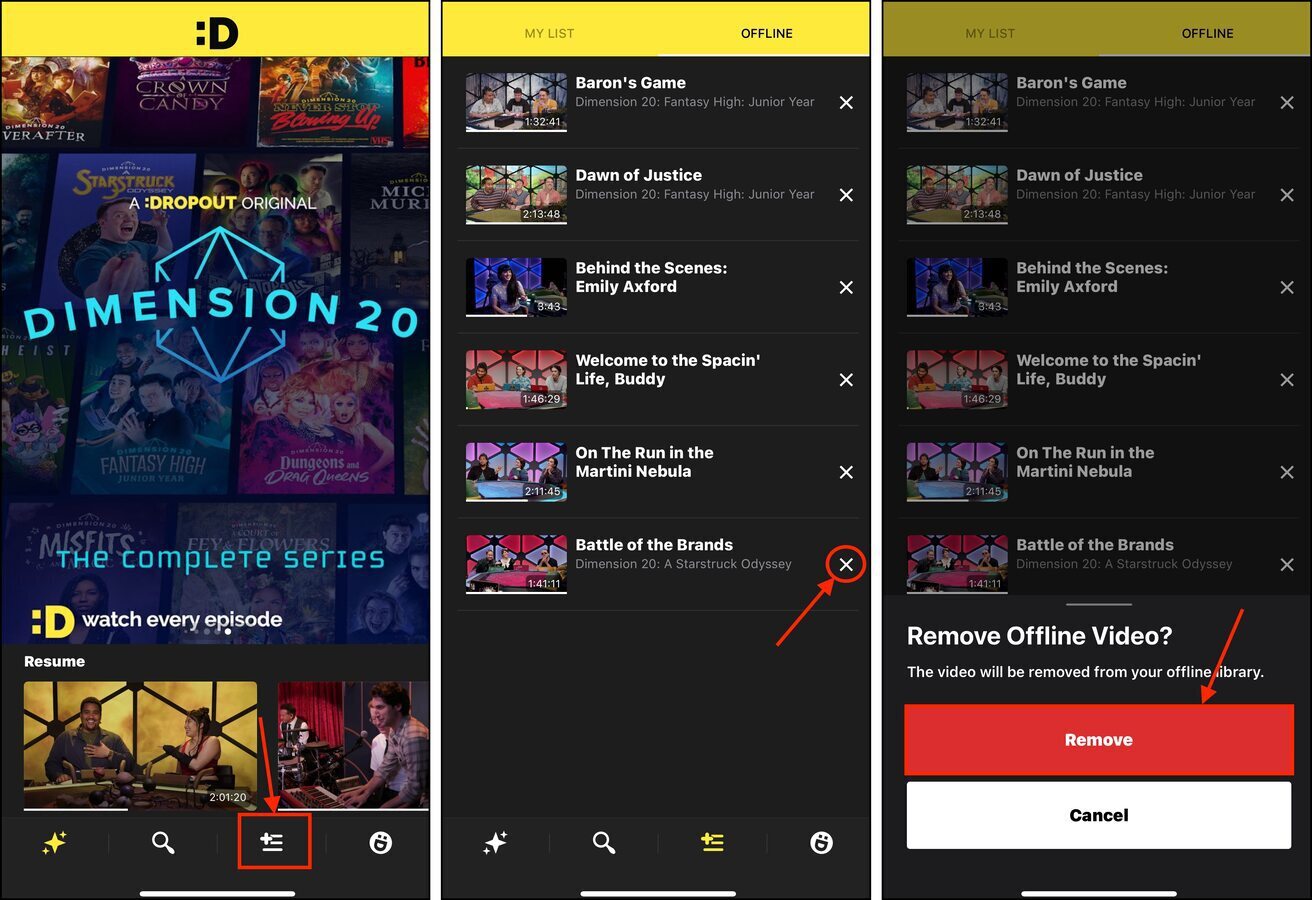
Step 1. Open the Dropout app (or whatever app you want to clean) and locate your media library.
Step 2. Navigate to your Downloads.
Step 3. Tap the X or delete button beside the media you want to remove.
Step 4. Finally, tap the Remove button to confirm the action.
Once you’ve deleted the media, you can still stream it—you just can’t view it offline anymore.
Method 4: Purge Messaging App Attachments
Messaging apps, like Telegram, Discord, and even the native iOS Messages, allow you to send files as attachments. The maximum file size for individual attachment varies per app. But they can quickly add up, increasing the app’s footprint.
We’ll show you how to eliminate attachments from the iOS Messages, which are sometimes automatically downloaded by the app (so you don’t have to load them while reading the messages).
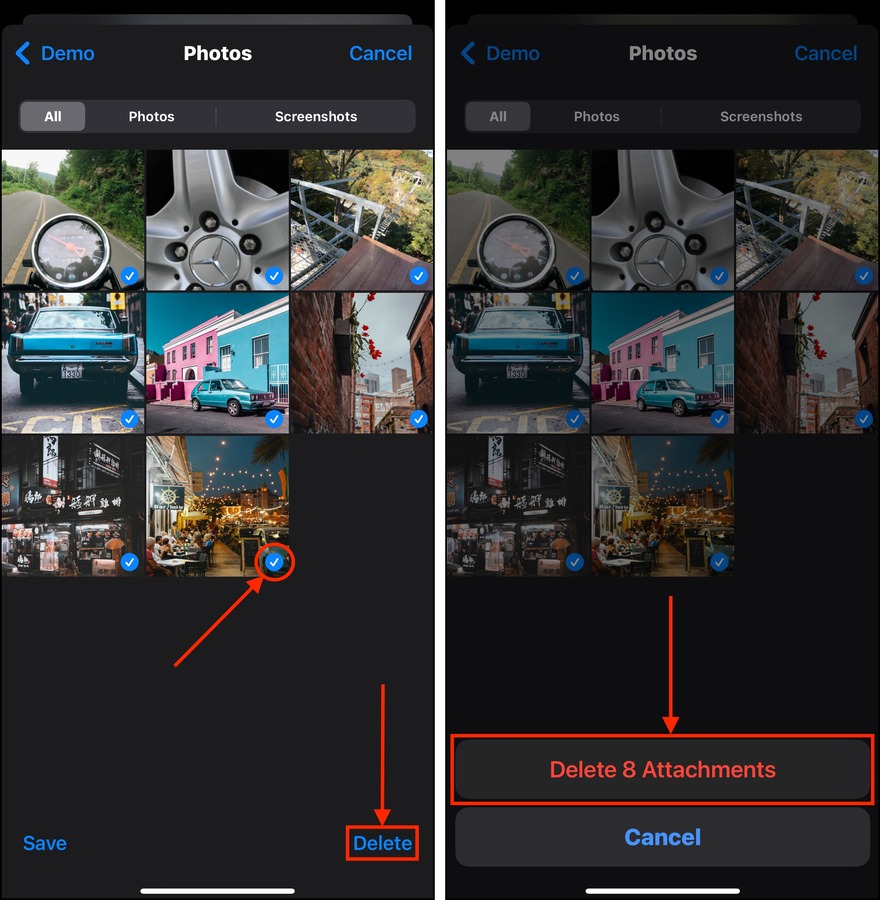
Step 1. Open the Messages app and select a conversation that contains the attachments you want to remove.
Step 2. Tap on your contact’s user icon at the top of the menu.
Step 3. In your contact’s main menu, tap the See All button next to the gallery of attachments.
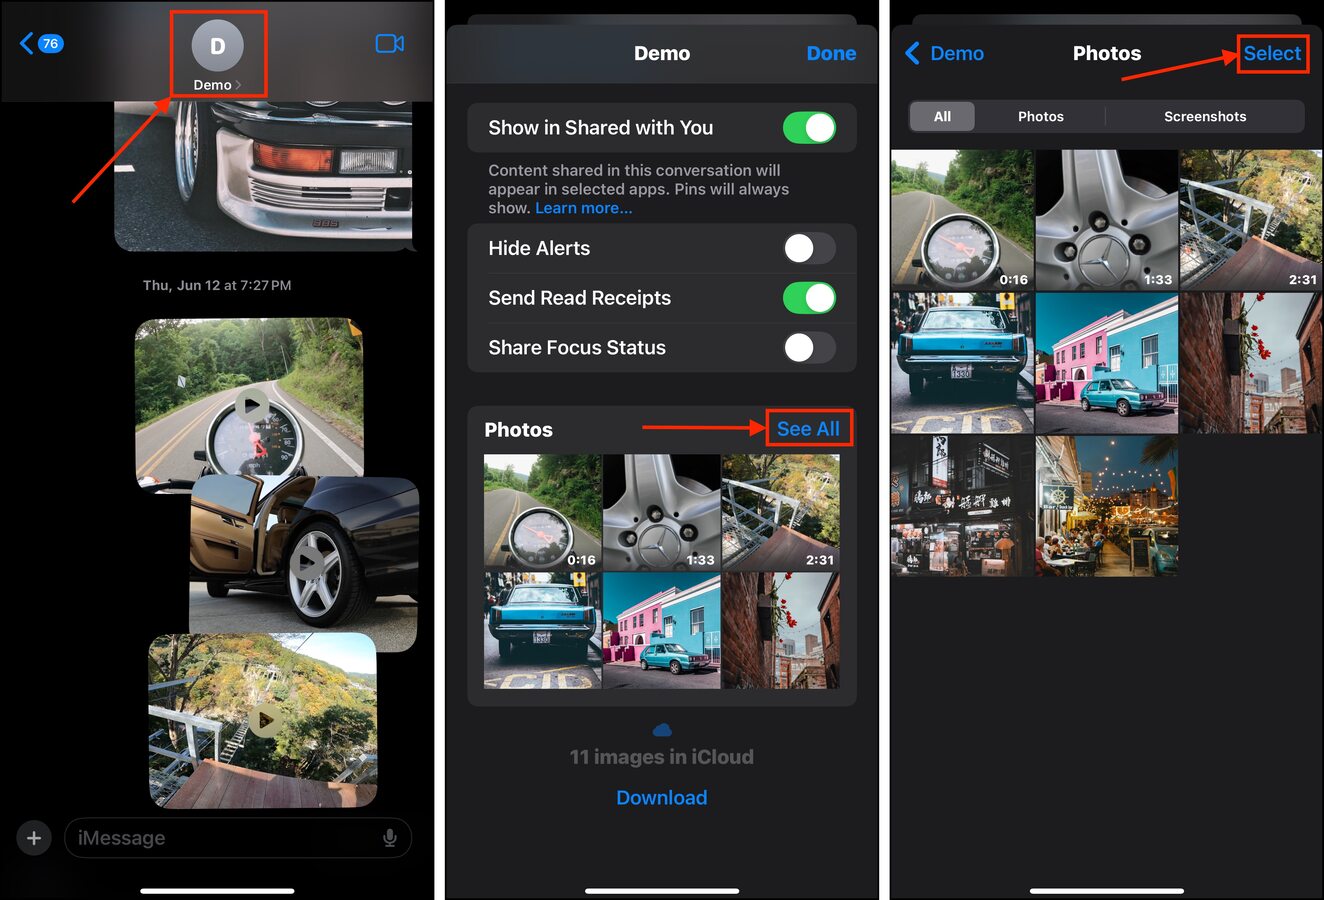
Step 4. Tap Select in the top right corner of the attachments menu.
Step 5. Tap the attachments you want to remove and tap Delete.
Step 6. Finally, tap Delete Attachment to confirm the action.
Method 5: Delete Attachments from Your Notes App
Aside from messaging apps, many content creation apps also allow you to import external media as attachments. For example, the iOS Notes app allows you to attach external media, such as camera roll images, to each note. We’ll show you how to get rid of them:
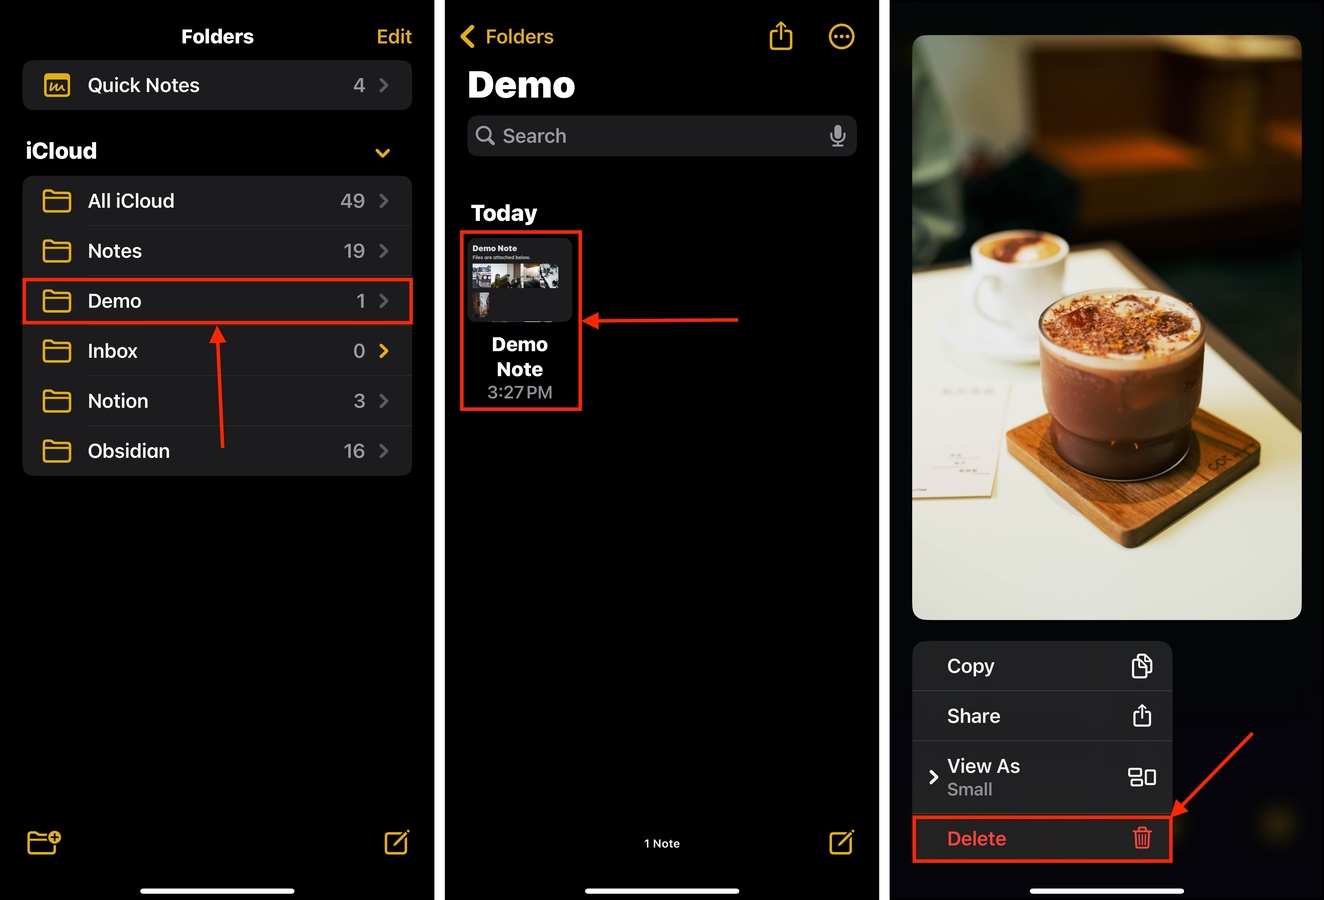
Step 1. Open the Notes app.
Step 2. Choose a folder you want to review. You can also select the All iCloud or Notes to see all notes in one place.
Step 3. Open a note with attachments (you can usually spot them in the note previews)
Step 4. You can either erase the attachments by using the backspace button on your virtual keyboard, or you can tap and hold each attachment and choose Delete.
Method 6: Clean All Browser Caches
Browsers notoriously collect a lot of cache data due to the variety of website assets you encounter while browsing the internet. For example, website headers of websites you often visit are saved so you don’t have to load them each time.
Browser apps are usually designed to clear their caches automatically, but certain issues can interfere with this process. As a result, the cache is continuously filled up with temporary files for websites that you may never even visit again.
Step 1. Open the Settings app.
Step 2. Scroll down to the bottom of the Settings menu and tap Apps.
Step 3. Find Safari from the list of apps. You can use the search bar to locate it faster. Once you find it, tap it.
Step 4. In Safari’s menu, find the HISTORY AND WEBSITE DATA section. Then, tap Clear History and Website Data.
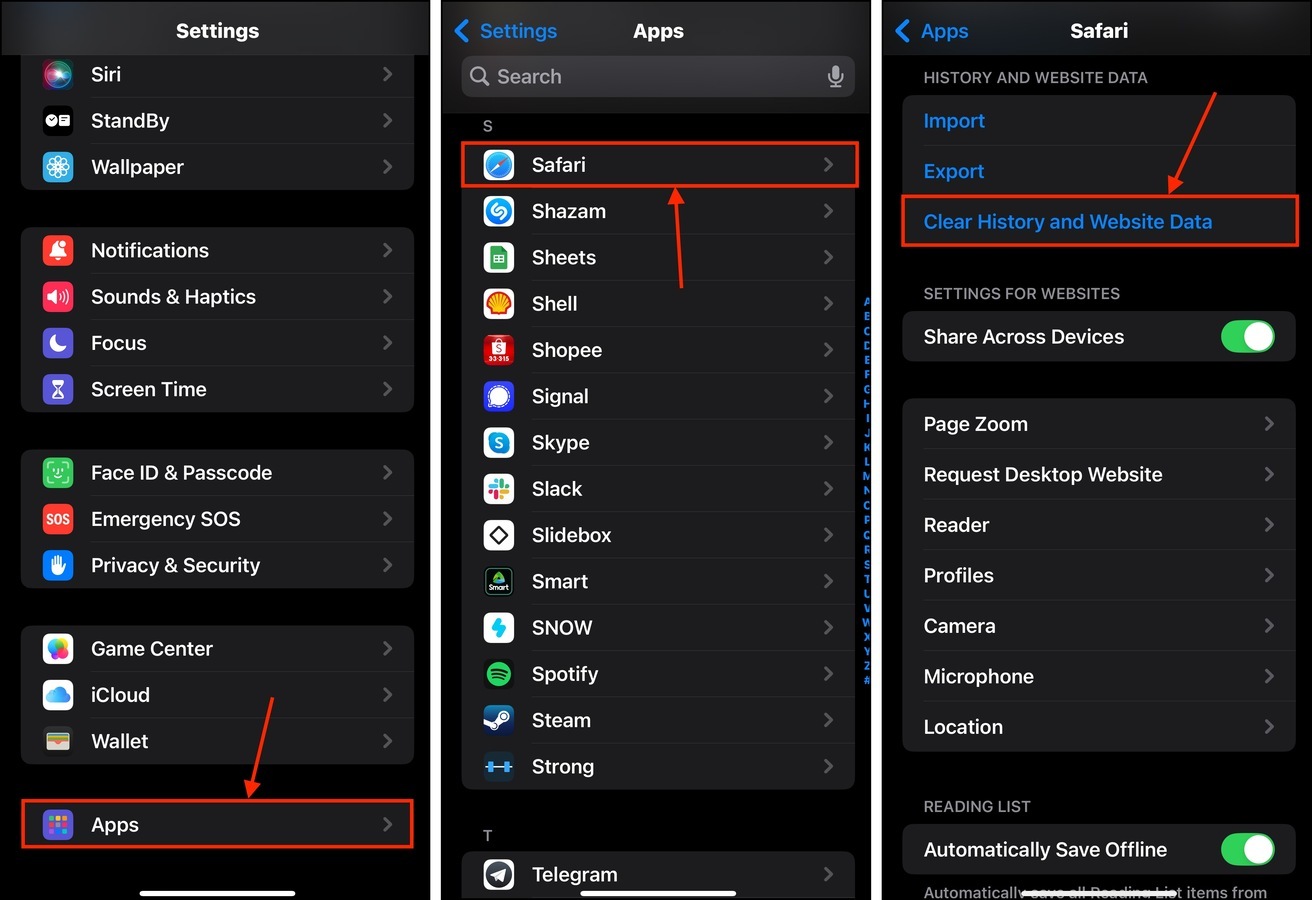
You can choose the time range of the data you want to clear, as well as which profiles you want to include in the purge.
Method 7: Delete App Data From iCloud
If you’re easily running out of iCloud storage even if you don’t have a lot of photos and videos on your device (or maybe you don’t even use iCloud for your photos), an app might be using it to store backups or synced files. Here’s a quick guide to remove them:
Step 1. Open the Settings app and tap your Apple ID.
Step 2. In the Apple Account menu, select iCloud.
Step 3. Find the Saved to iCloud section. Then, tap the See All button beside it.
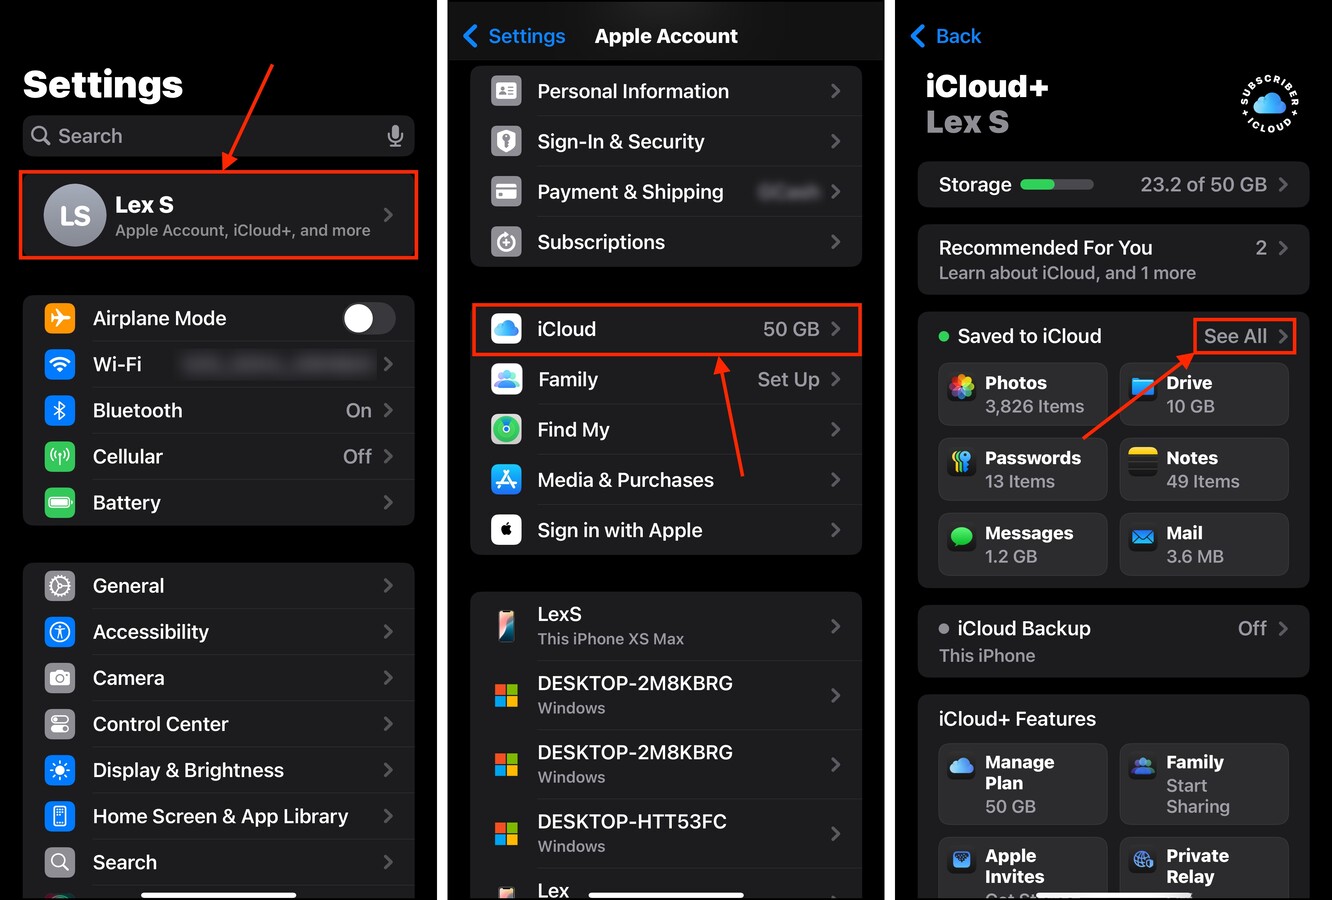
Step 4. Beside each app whose data you want to remove from iCloud, slide the toggle switch to the off position (it should be greyed out). For native apps like Health (let’s use that as an example), expand their menu for additional options.
Step 5. In the Health menu, tap Manage Storage.
Step 6. Finally, tap Delete Data From iCloud.
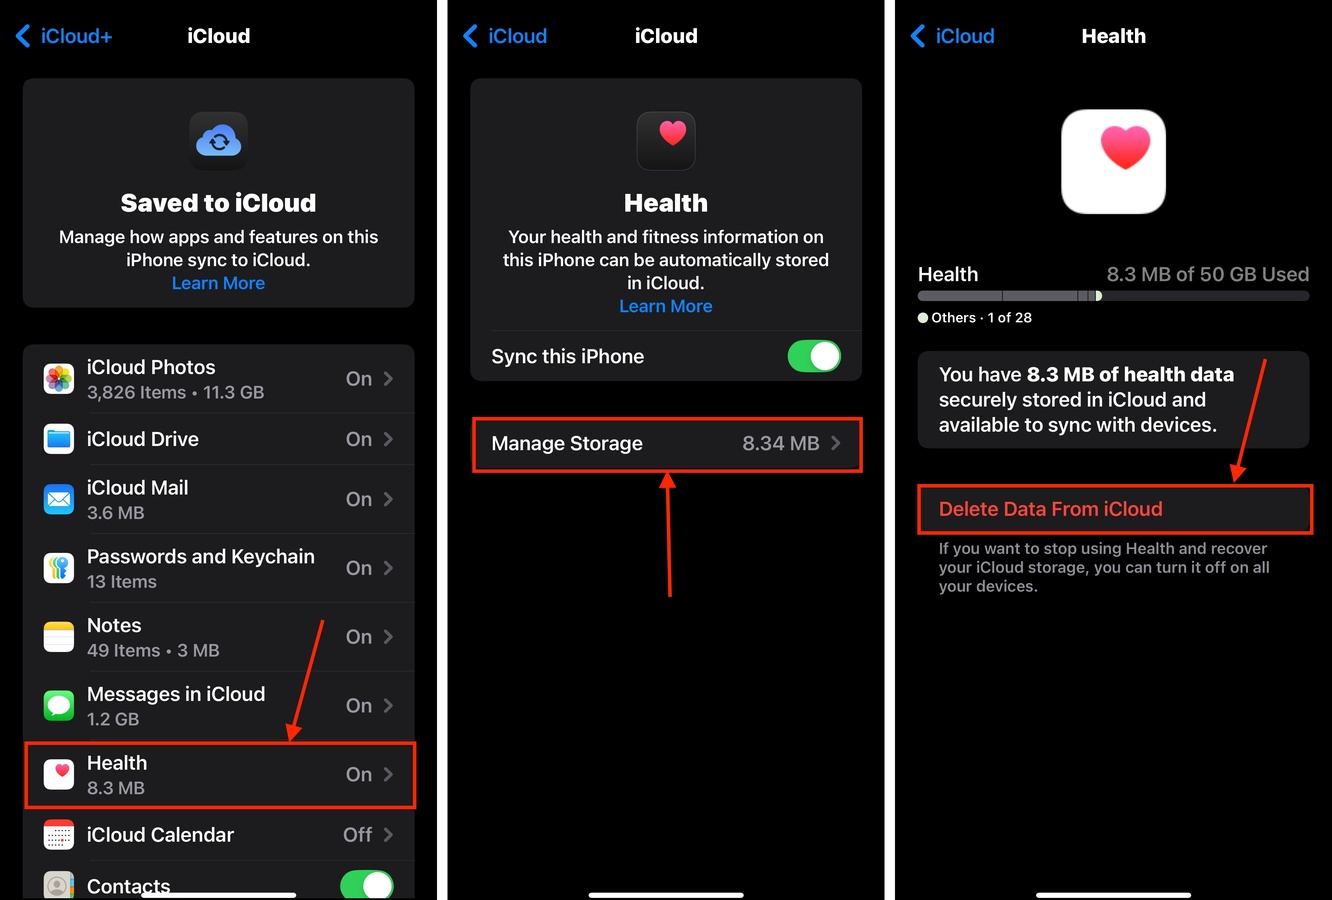
When you delete app data from iCloud, there’s usually no way to get it back. Make sure you’re clearing up the right app!
Tip: Disable the Auto-Download Feature
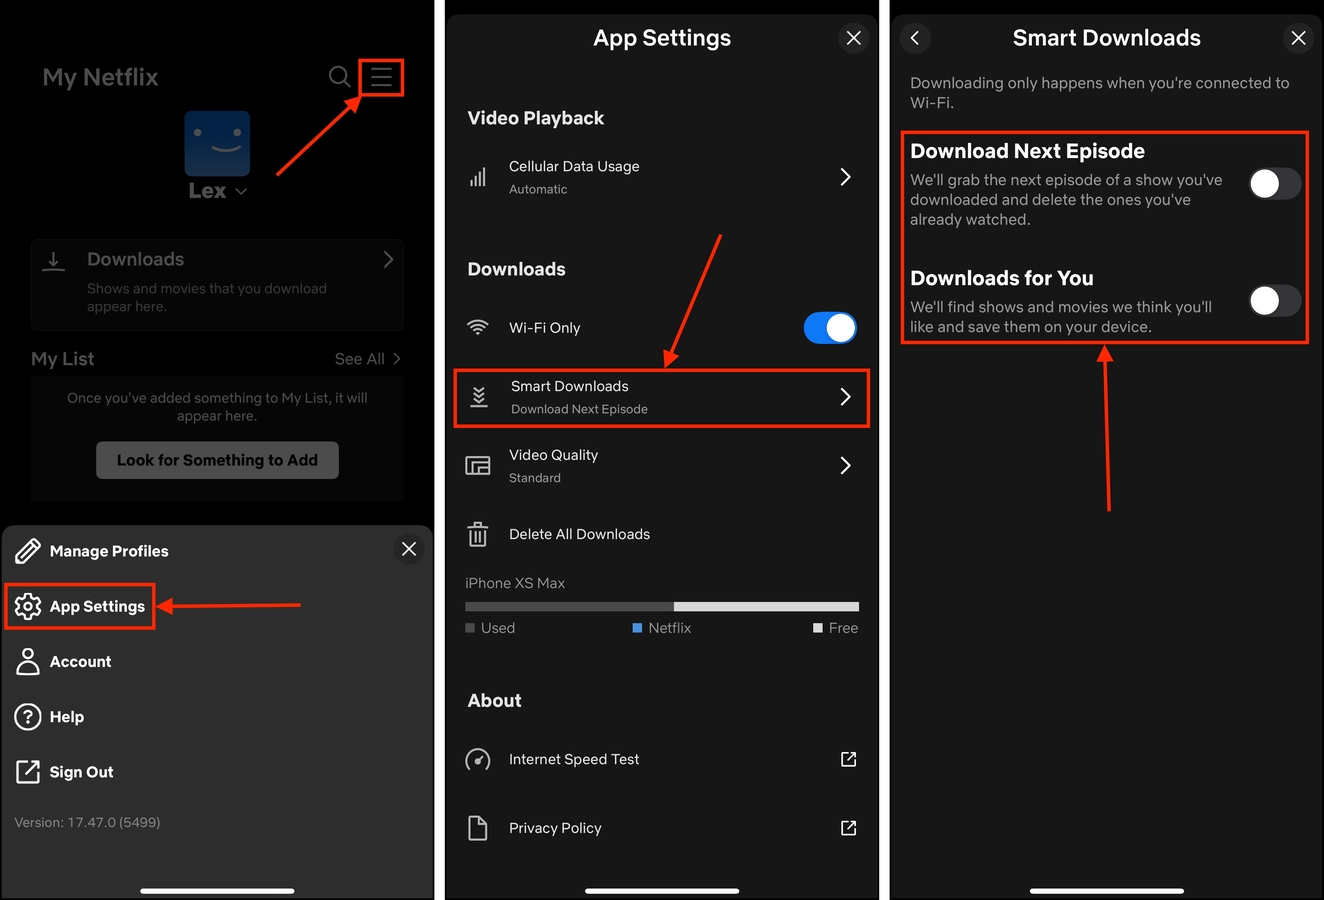
Aside from allowing you to download media, many third-party streaming apps also provide an auto-download feature. Like its name describes, enabling auto-download allows the app to save media to your storage on your behalf.
For example, Netflix provides 2 types of auto-download settings—one for downloading the next episode of a series you’re currently watching, and another for Netflix’s recommendations for you. Here’s how to disable them both:
Step 1. Open the Netflix app. In the main menu, tap My Netflix in the lower right corner of your screen.
Step 2. Tap the hamburger menu and select App Settings.
Step 3. In the Downloads section, tap Smart Downloads.
Step 4. Disable the Download Next Episode and Downloads for You features by sliding their toggle switches to the off position (on the left).
Want to Clean Up More Space Without Deleting Files?
If you’re still running out of space but can no longer delete any of your files, we have a guide that specifically helps with that! Check out our post on how to free up iPhone storage without deleting anything–aside from the techniques mentioned in this guide, we also cover a bunch of expendable data that you didn’t know was clogging up your system.


