
Want to clean up your photos? With so many different media types and utilities in the Photos app, this task can become more confusing than it should be–especially if you have thousands of media items in your library.
To help you cover absolutely everything in your library, we created this in-depth guide that you can follow from start to finish to get rid of every single piece of photo clutter (completely for free)!
Table of Contents
6 Ways to Clean Up Unwanted Photos on Your iPhone
In the sections below, we’ll demonstrate 6 different ways to clean up photos on your iPhone. Each method helps you eliminate different types of photo clutter, so we recommend going through all of them to make sure you don’t miss a spot.
Method 1: Use a Third-Party iPhone Cleaning App
The most convenient way to clean up your photo library is by using a third-party iPhone cleaner. Unlike the native Photos app, which was designed for general library management, iPhone cleaners are specifically built to find and eliminate junk from your device efficiently.
For this specific task, we recommend an app called Clever Cleaner: AI Cleanup App. It’s completely free (no ads!) and it’s only focused on photo library cleanup rather than the entire device. It has several very useful tools that make cleanup so much easier.
Namely, it can help you manage all your duplicate and similar photos, heavy media files, screenshots, and Live Photos, with useful features like bulk deletion, intelligent sorting and filtering, and more.
It also has a feature called Swipe, which lets you view your library as a slideshow and use left and right swipe gestures to delete or keep them—which is a much more intuitive way to take action on individual images compared to how the Photos app functions. Here’s a quick look at its features:
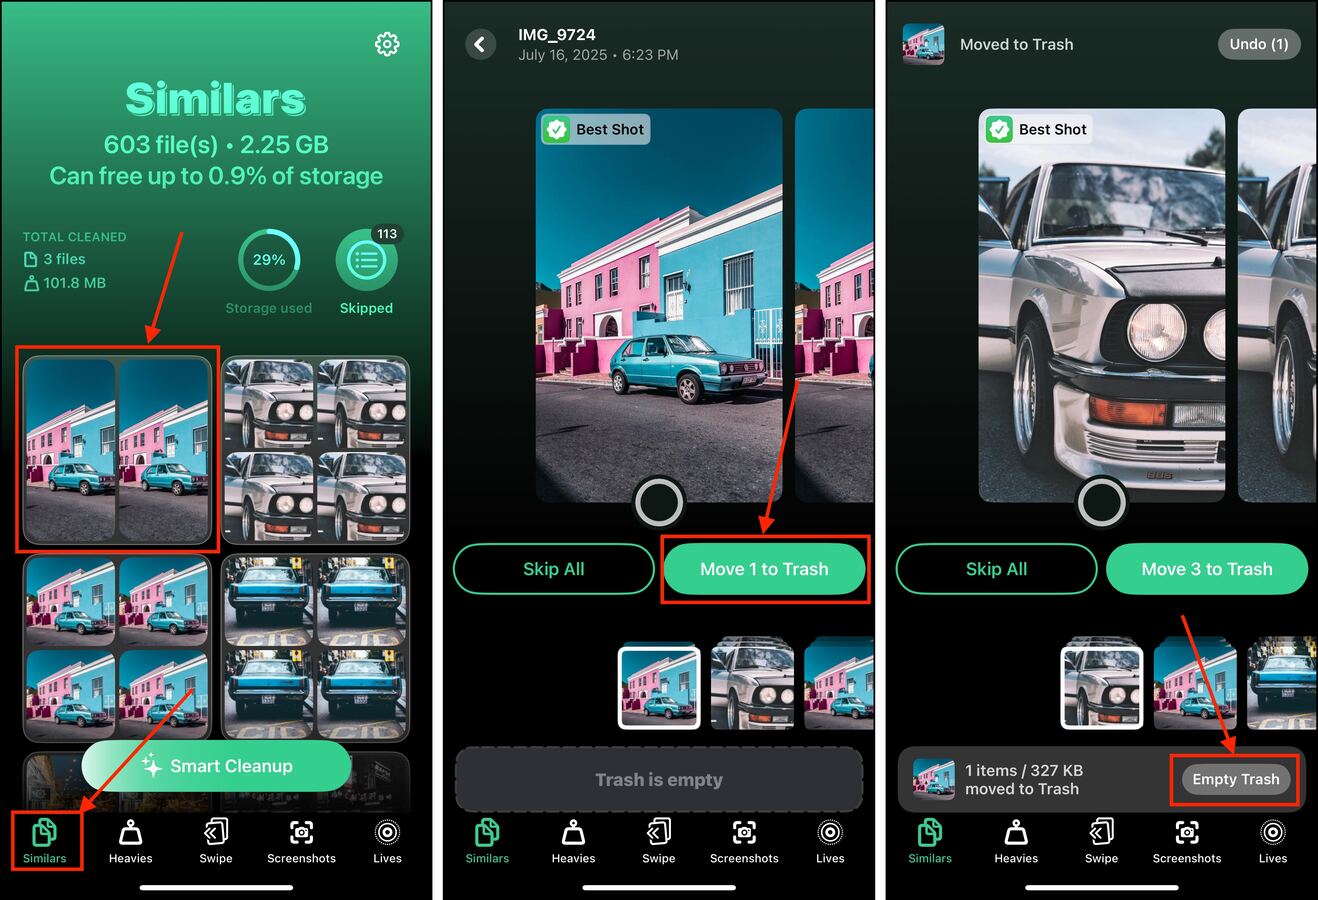
Step 1. Download and install Clever Cleaner: AI Cleanup App from the App Store. Make sure to permit Full Access to your photo library.
Step 2. Open Clever Cleaner and choose one of the tools from the bottom menu, depending on what you need to clean up. Once you’ve opened a specific tool (e.g., Similars), tap a media item or cluster to review it.
Step 3. For the Similars tool, Clever Cleaner automatically identifies the best photo among the set and selects the rest for deletion (but you can also make your own selection if you prefer). Tap Move to Trash.
Step 4. Finally, tap Empty Trash in the dialogue pop-up that appears at the bottom of the screen.
Method 2: Utilize the Photos App’s Duplicate Detection Tool
Duplicates are the most common type of clutter on iPhones and waste so much space when left unchecked. They are usually the result of downloading images multiple times, redundant backups, and saving the same image from various messaging apps or social media feeds.
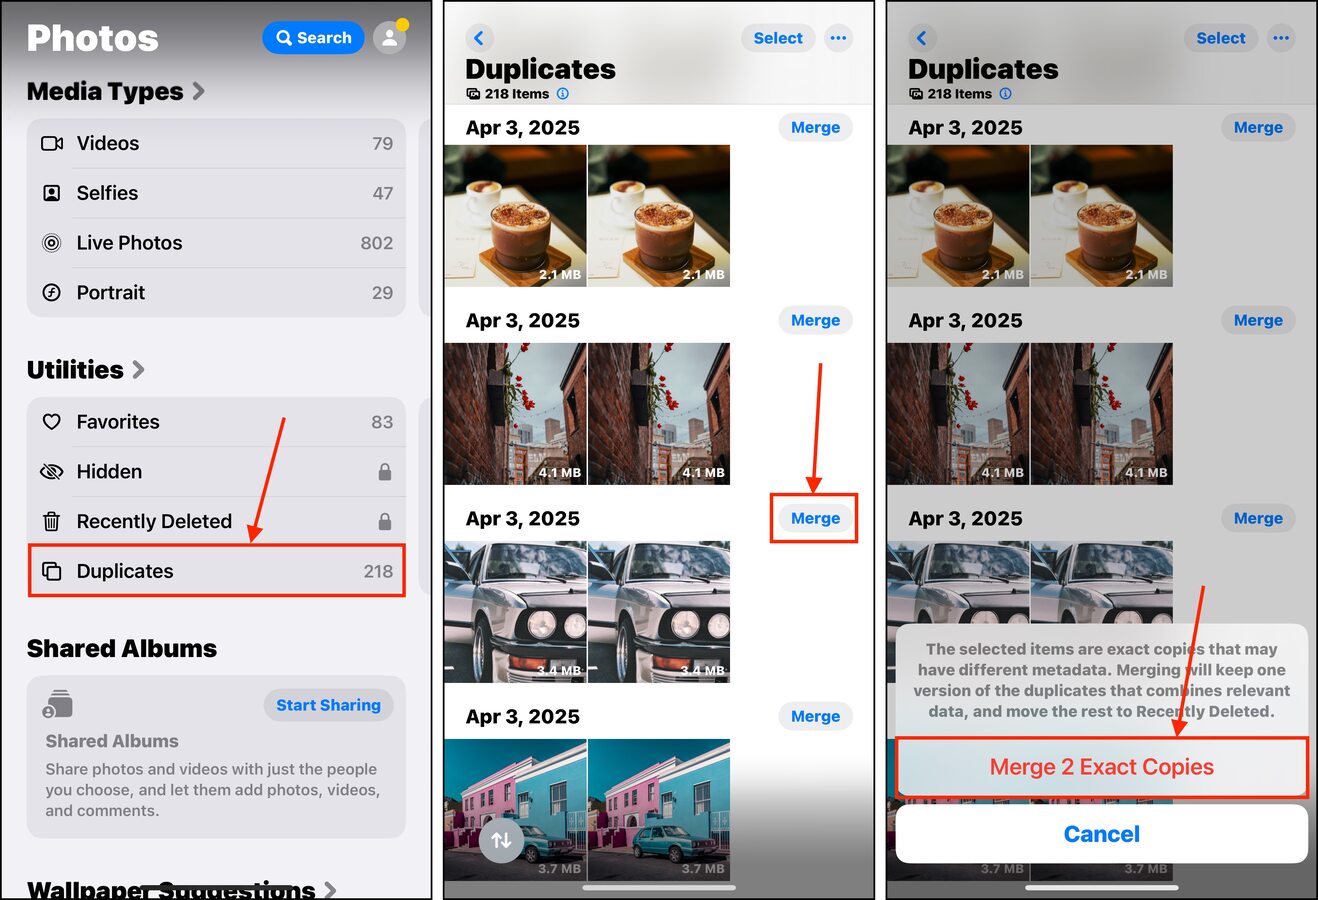
Fortunately, the Photos app has a built-in feature called the Duplicates album, which automatically compiles duplicate photos for you and gives you access to the Merge tool.
Aside from getting rid of the extra copies, the Merge tool combines all the metadata from the different photos into one image (which is important for things like tags, filters, search keywords, etc.).
Step 1. Open the Photos app and scroll down all the way to the Utilities section. Then, tap Duplicates.
Step 2. Tap the Merge button beside the set of duplicates you want to clean up.
Step 3. Finally tap Merge Exact Copies to confirm the operation.
Method 3: Selectively Eliminate Clutter Using the Utilities Feature
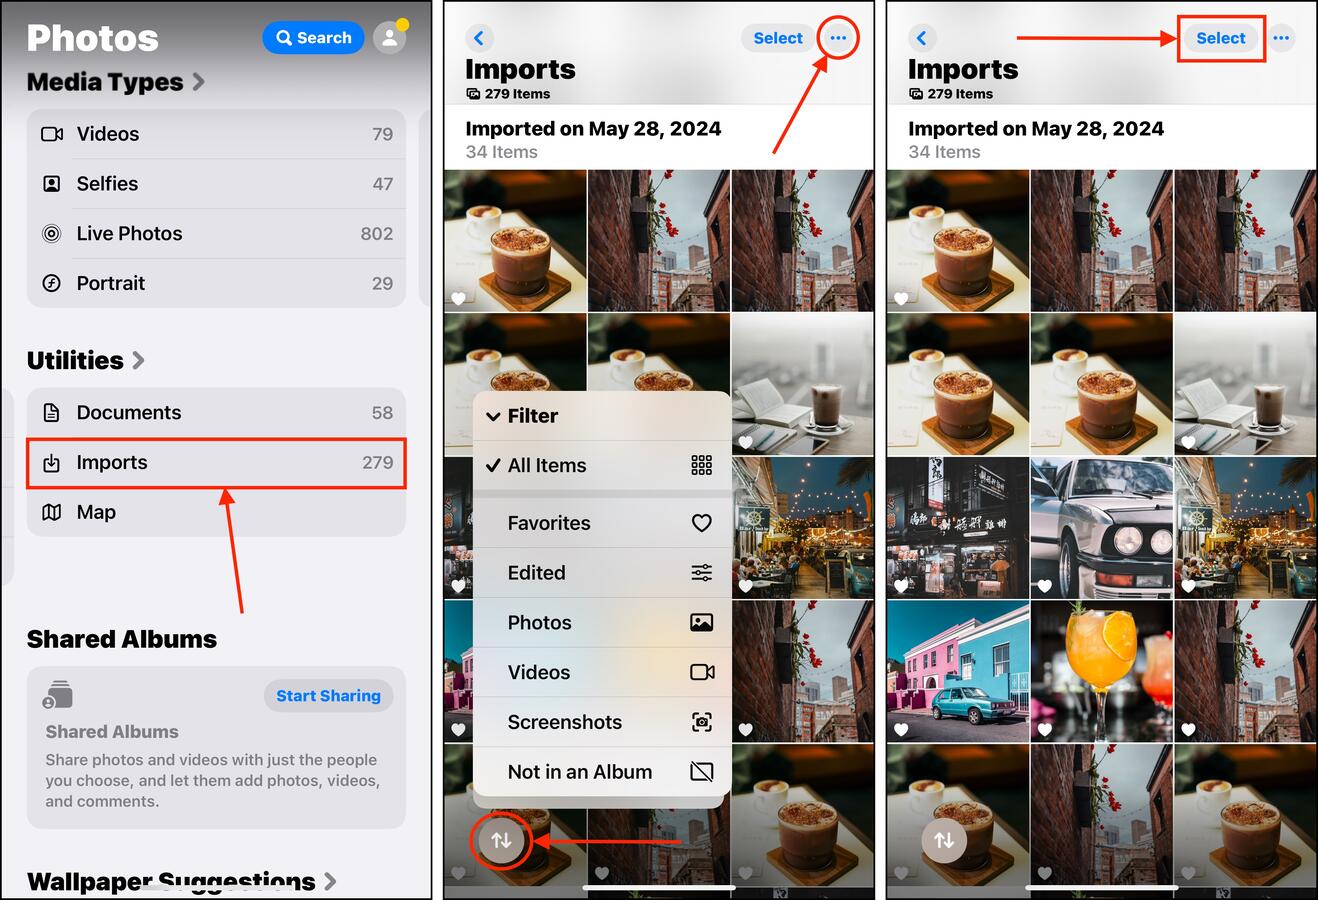
The Photos app on your iPhone has a useful section called Utilities, which automatically categorizes photos based on their contents. Using AI, iOS tries to identify Receipts, Illustrations, QR Codes, Imports, Documents, and other “utilitarian” categories. This is a great place to check for general usage clutter, like expired QR codes, old receipts, photos you had to import for work, etc.
Step 1. Open the Photos app and scroll down to the Utilities section. Choose one of the categories and tap it (e.g., Imports).
Step 2. If you want to narrow down the selection further, you can use the Filters tool to choose specific media types or conditions, as well as the Search tool (found in the meatball menu) to specify parameters like date range, subject descriptors, keywords, etc.
Step 3. Tap Select in the top-right corner of the screen.
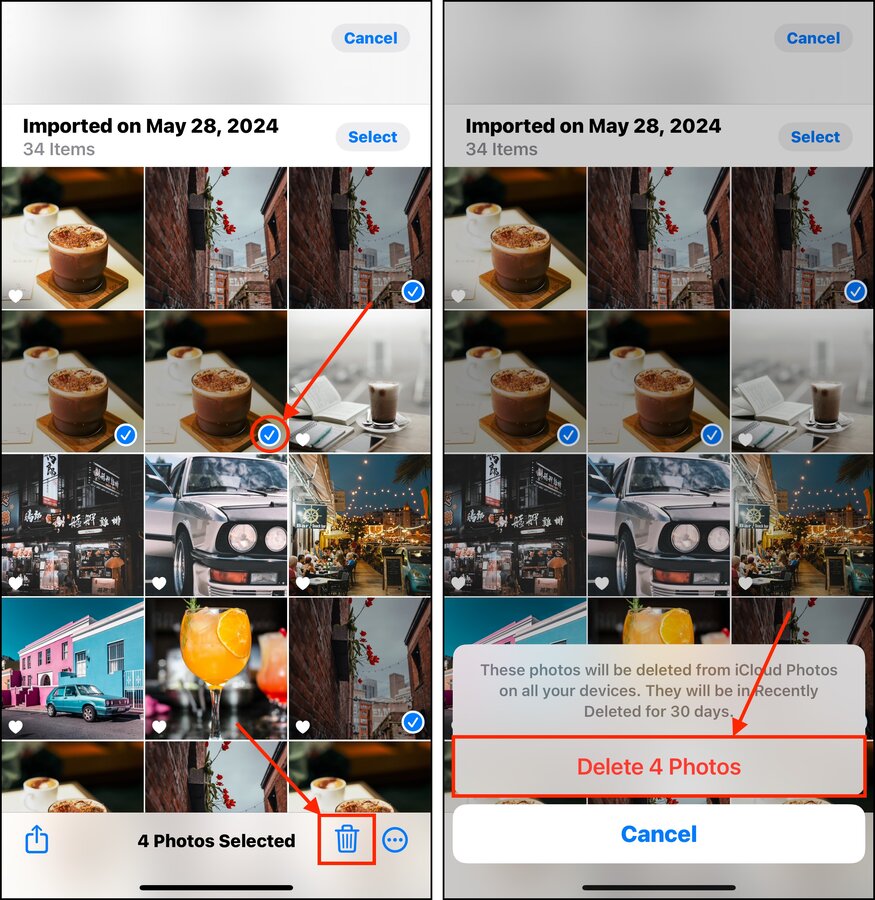
Step 4. Choose the images you want to delete. Then, tap the Trash icon in the bottom-right corner of the screen.
Step 5. Finally, tap Delete Photos to confirm the action.
Make sure to go through each of the different categories in the Utilities menu—they all use the same interface and follow similar steps.
Method 4: Delete or Shrink Your Bursts
Burst Photos are clusters of up to dozens of individual pictures that were rapidly captured one after the other (using the Burst Mode feature in the Camera app). Aside from deleting entire Bursts, you can delete the individual pictures within those clusters.
This way, you can either shrink your Bursts down to fewer photos or leave only one image from the cluster (which then becomes a “normal” photo). Here’s how it works:
Step 1. Open the Photos app.
Step 2. Scroll down to the Media Types section and select the Bursts tool.
Step 3. Choose the Burst cluster you want to review.
Step 4. Tap Bursts in the top left corner of the image preview.
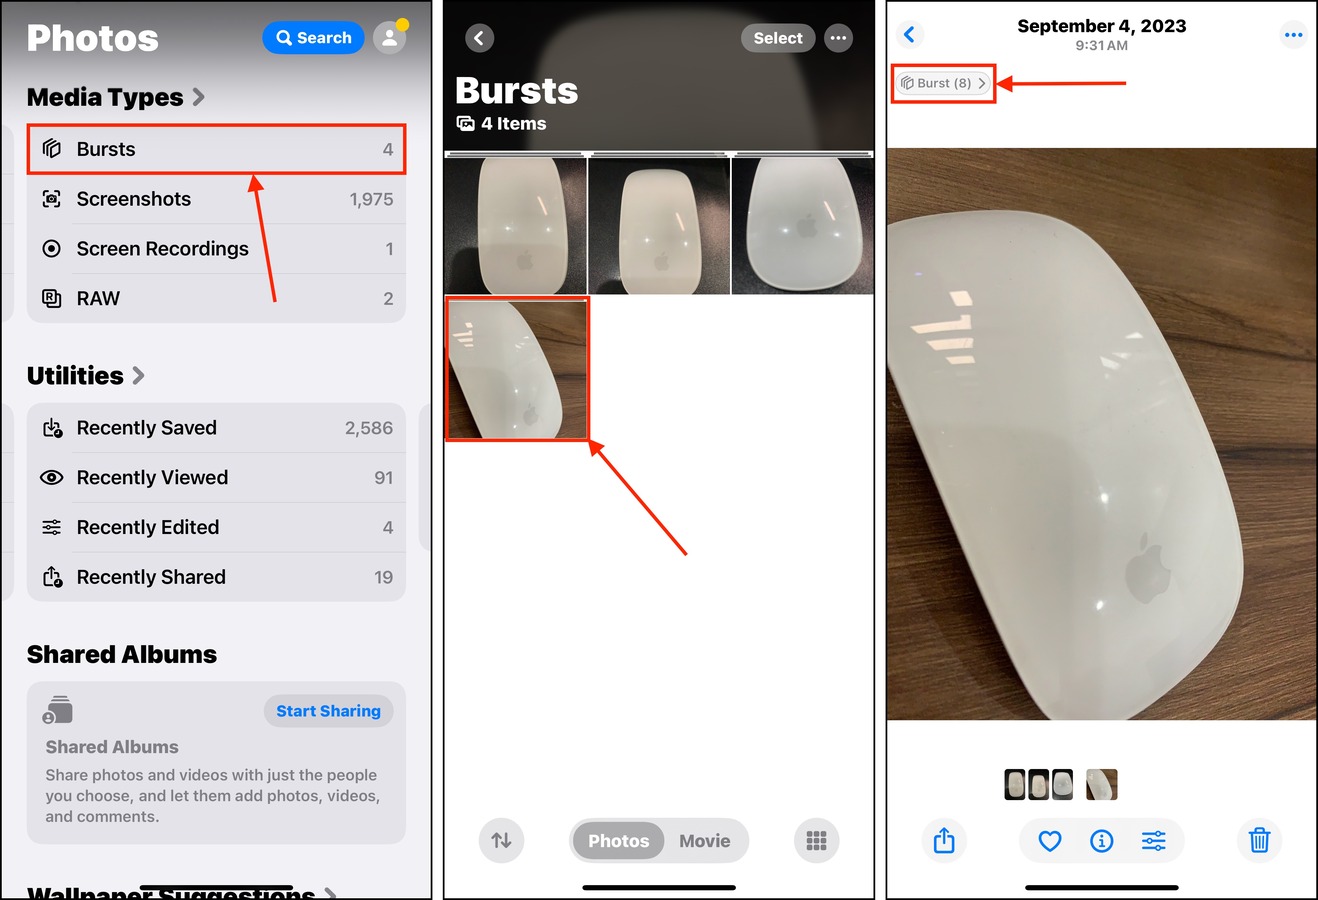
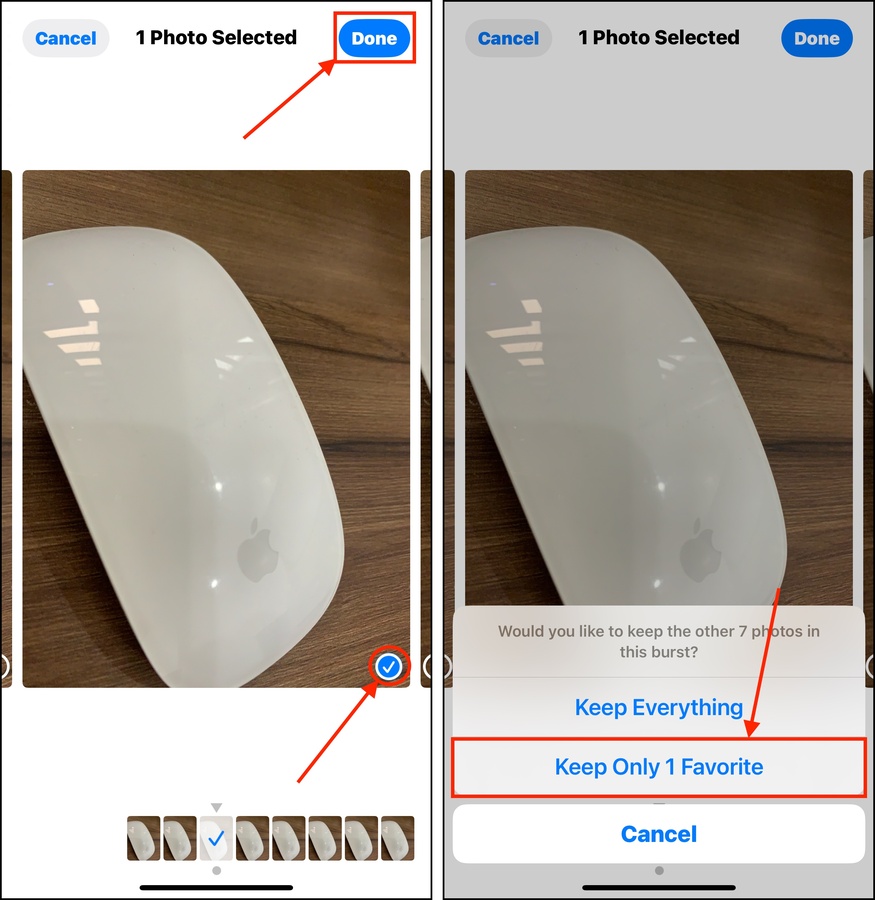
Step 5. Select one or more images among the set that you want to keep. Then, tap Done.
Step 6. Finally, tap Keep Only Favorites to delete the rest of the cluster.
If you want to delete entire Bursts instead of individual images within each cluster, go back to the main Bursts menu, tap and hold a cluster you want to eliminate, and tap Delete from the context menu.
Method 5: Eliminate Specific Clutter Using the Search Tool
Another way to get rid of unwanted photos in our library is to use the advanced search tool in the Photos app. It allows you to use different keywords to define your search, which lets you browse photos with additional context.
The idea is to combine different keywords based on “memories”—when and were you likely to have captured a lot of clutter? Maybe you went to a beach party and have dozens of pictures of the same starfish. Or you took several photos of a specific statue from different angles when you were traveling last year. For these scenarios, you could use keywords like “beach”, “starfish”, or “statue.”
We’ll show you exactly how it works:
Step 1. Open the Photos app and tap the magnifying glass in the top-right corner of the main menu.
Step 2. Use the text field to type different keywords that act as parameters to help you narrow down your search. For example, you can combine date and subject keyword parameters, like “Cars” + “2025” or “Cars” + “Favorites” Once you’ve got your list, tap Select beside the Results header.
Step 3. Tap the photos you want to delete and tap the Trash icon. Make sure to confirm the action if prompted.
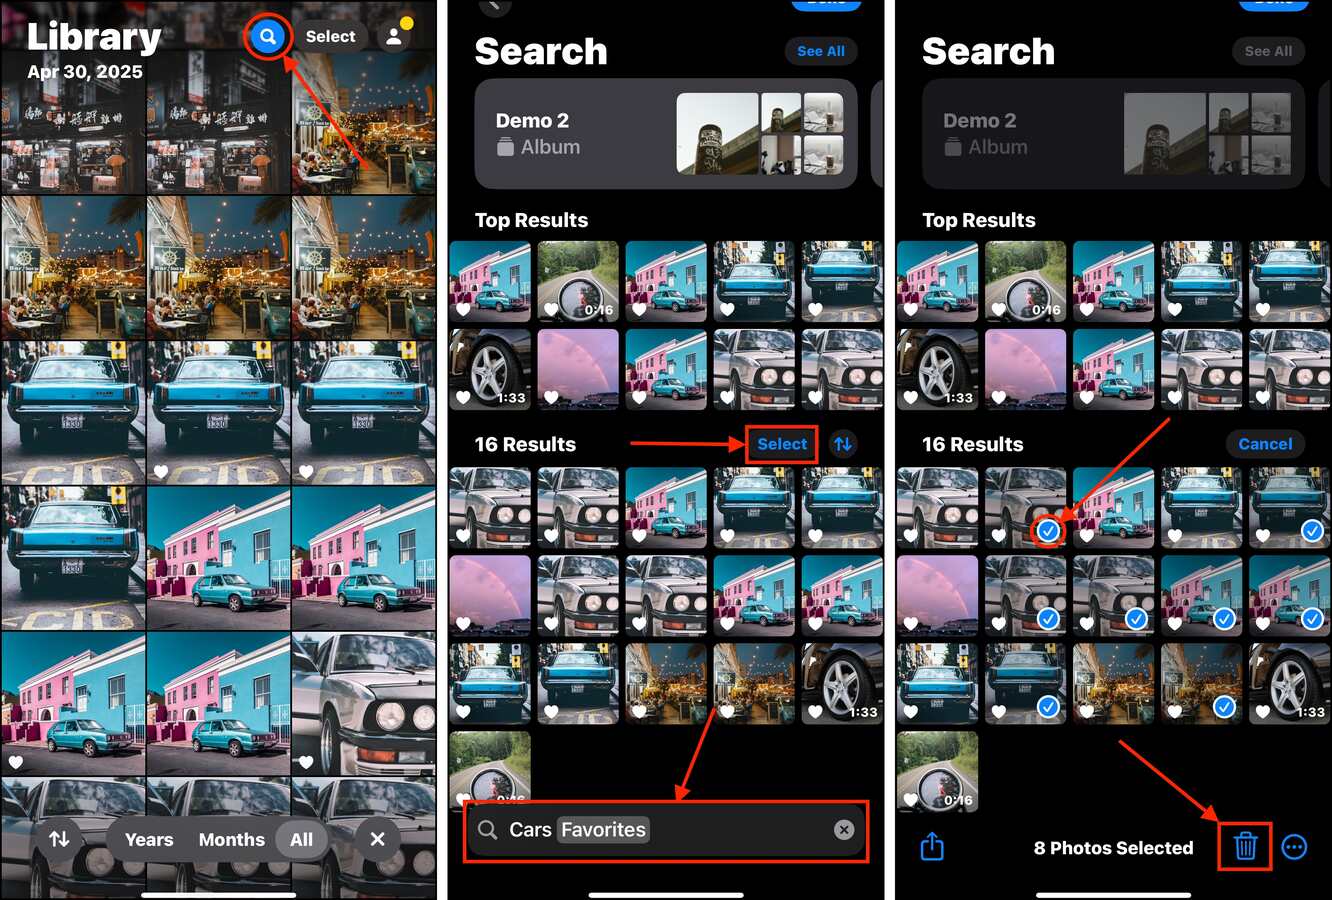
You can continue adding keywords to narrow down your list further. We also recommend trying different combinations of keywords, as iOS won’t always get it exactly right.
Method 6: Delete Live Photos or Convert Them to Still Images
Live Photos appear as single media items, but they are actually a bundle of two separate files: a still image and a short video clip. If you decide that you don’t need the video clip part, you can use the Photos app to save only the still image. Aside from tidying up your library, this is also a great way to free up storage space.
Step 1. Open the Photos app.
Step 2. Scroll down to the Media Types section and choose Live Photos.
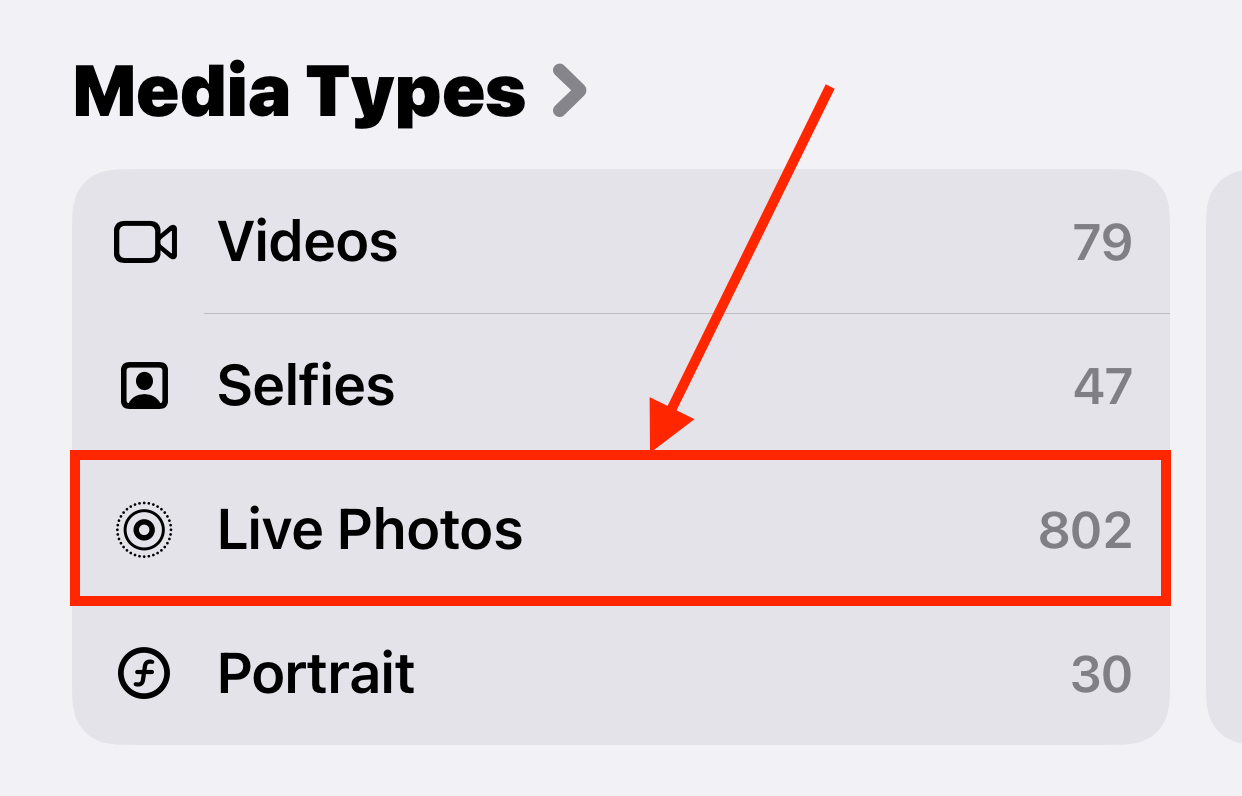
Step 3. Tap Select in the top-right corner of the screen.
Step 4. Select the Live Photos you want to clean up. At this point, you can tap the Trash icon to delete them. But if you want to extract still images, tap the meatball menu instead and select Duplicate.
Step 5. When prompted, tap Duplicate as Still Photo. Once you’ve saved the still images of your Live photos, you can freely delete the Live Photo.

Want Some Photo Organizing Tips?
The Photos app has a lot of useful features that make it much easier to keep your library tidy and organized, helping you avoid clutter in the first place. And because recent iOS updates have added even more features to Photos, there’s a big chance you aren’t aware of them all.
Once you’re done deleting unwanted photos, check out our guide on how to organize thousands of photos–we cover the Photos app’s useful organizing tools, like tags and folders, and we also show you how to create backups that don’t result in duplicates.


