
Is your iPhone full of junk? Ours too! All smartphones accumulate mountains of clutter eventually–all we can do is get better at cleaning it up.
The problem with iPhone clutter is that it’s scattered all over the device in different forms. For example, some junk is made up of files downloaded inside an app, while others come as obsolete email attachments.
So, we analyzed the most prominent junk-generators on the iPhone and came up with this guide to help you get rid of as much clutter as possible. Here are 8 ways to clean junk files on an iPhone.
Table of Contents
What are Junk Files on iPhone?
So what exactly are junk files? There’s no data type literally called a “junk file”, but it’s an umbrella term for the various miscellaneous files that apps, browsers, and iOS itself store on your iPhone.
These files are usually really important to some processes when they were first created, but many of them become useless later. That’s why it’s generally safe to remove junk files on your iPhone, such as clearing cache data.
Here are the different junk files you’ll be purging with the help of this guide:
- App caches: Many apps store temporary or cache data to improve performance. For example, it may store certain assets from a game you play often so it doesn’t have to load from scratch next time. This data can build up over time.
- Temporary files: Temporary files on your iPhone are data that are needed by an app or process at a certain time and are deleted later. Bugs, app crashes, etc. may cause temporary files to not be deleted, taking up precious storage space.
- Downloaded files: Users often forget to delete files downloaded from the internet, email attachments, and messenger apps, which tend to accumulate over time.
- Browsing data: Safari and other web browsers store data, such as browsing history, website assets (for faster loading), cookies, and other cached files. This is meant to improve performance, but clearing this data may sometimes be better.
- Residual data: When you delete an app, certain data may be left behind – such as user preferences, caches, saved files, etc.
- System junk: iOS itself may generate junk files, like system logs, diagnostic files, and other unnecessary data. These also build up over time.
- Unnecessary personal data: You may have input duplicate contacts by mistake or have unnecessary image or video files (such as Burst mode photos).
Should I Delete Junk Files?
Before we dive into the guide, we’ll brief you on some of the immediate benefits of clearing up junk files. We’re not just trying to convince you to do it—this also provides some context on how iOS works under the hood and can help you better understand your device.
- More storage space: Junk files take up surprisingly more space on your iPhone than you realize. On some devices, deleting junk can free up dozens of gigabytes of storage.
- Improved Performance: By freeing up storage space, clearing up junk can improve your iPhone’s performance by giving iOS more elbow room to store temporary files. If your iPhone’s storage is full, it may struggle to run apps and load files quickly, and you may experience lag and delays.
- Troubleshooting: Cleaning up junk files can help get rid of data that are known to cause issues. For example, outdated cached browser data might conflict with the new code on an updated website.
- Privacy & security: Among regular clutter, junk files can also store fragments of sensitive information, such as user data and personal notes. Getting rid of now makes them more likely to be overwritten and thus harder to retrieve.
- Enhanced stability: There may be bugs or vulnerabilities associated with your iPhone’s junk data, especially if they were produced by poorly programmed software. Clearing this data will protect your data and stabilize your iPhone’s system.
How to Clean Junk Files on an iPhone
In this section, we’ll cover 8 ways to get rid of junk files on an iPhone. Each method helps you delete a specific type of junk file, so we recommend you go through them all.
Method 1: Clear Your iPhone’s Browser Cache Data
Browser caches act as temporary storage for web data. Its purpose is to hold web assets so you don’t have to load them every single time you visit a website, thereby increasing page load speed.
However, browser caches can sometimes end up storing and deploying obsolete data—which causes conflicts (e.g., a website updated its frontend design but your browser cache keeps loading the old one).
On top of errors, cached files can also take up gigabytes worth of space with web data you might not even need anymore. We’ll show you how to get rid of it.
Step 1. Open the Settings app.
Step 2. Scroll down to the very bottom of the main menu and tap Apps.
Step 3. In the Apps menu, find and tap Safari.
Step 4. Scroll down Safari’s settings menu until you locate the HISTORY AND WEBSITE DATA section. Tap Clear History and Website Data.
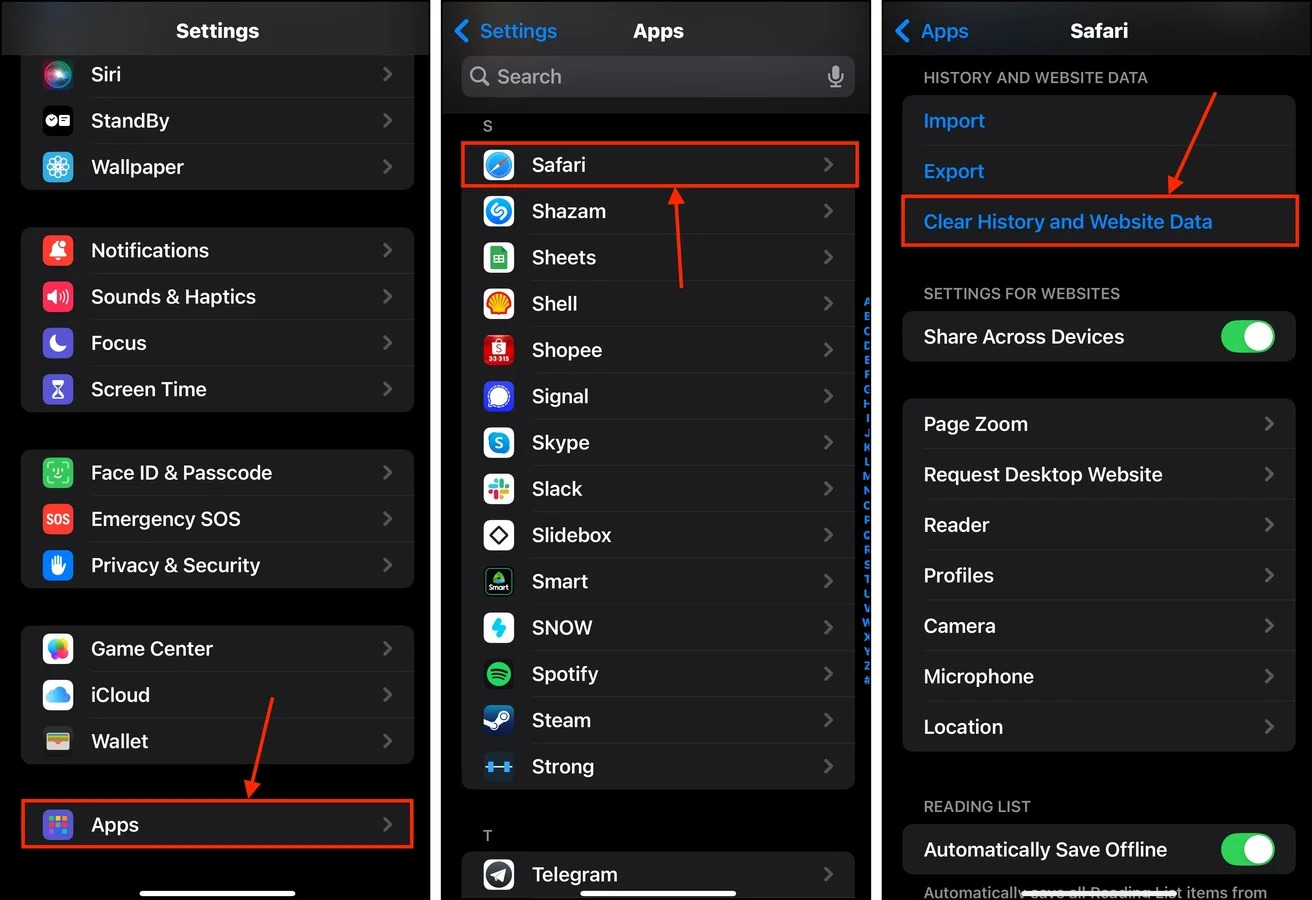
You can specify the duration that covers the cache data to be deleted. Data can also be deleted by profile.
Method 2: Offload Seldom-Used Apps
Modern apps can take up dozens of gigabytes each—and many of them get larger in size as the developers roll out more updates. If you have apps installed on your iPhone that you barely use (or can be replaced by doing the same task on a computer or through a browser), get rid of them by offloading them!
Offloading an app removes the installation files and the app data itself, while retaining your user data. This means that you get to reclaim the storage space the app consumed, but you can easily pick up where you left off once you download it again.
Step 1. Open the Settings app.
Step 2. Tap General.
Step 3. In the General menu, select iPhone Storage.
Step 4. Scroll down until you see the list of apps. Tap one you’d like to offload.

Step 5. Tap Offload App.
Step 6. A confirmation prompt should appear from the bottom. Tap Offload App again to proceed.
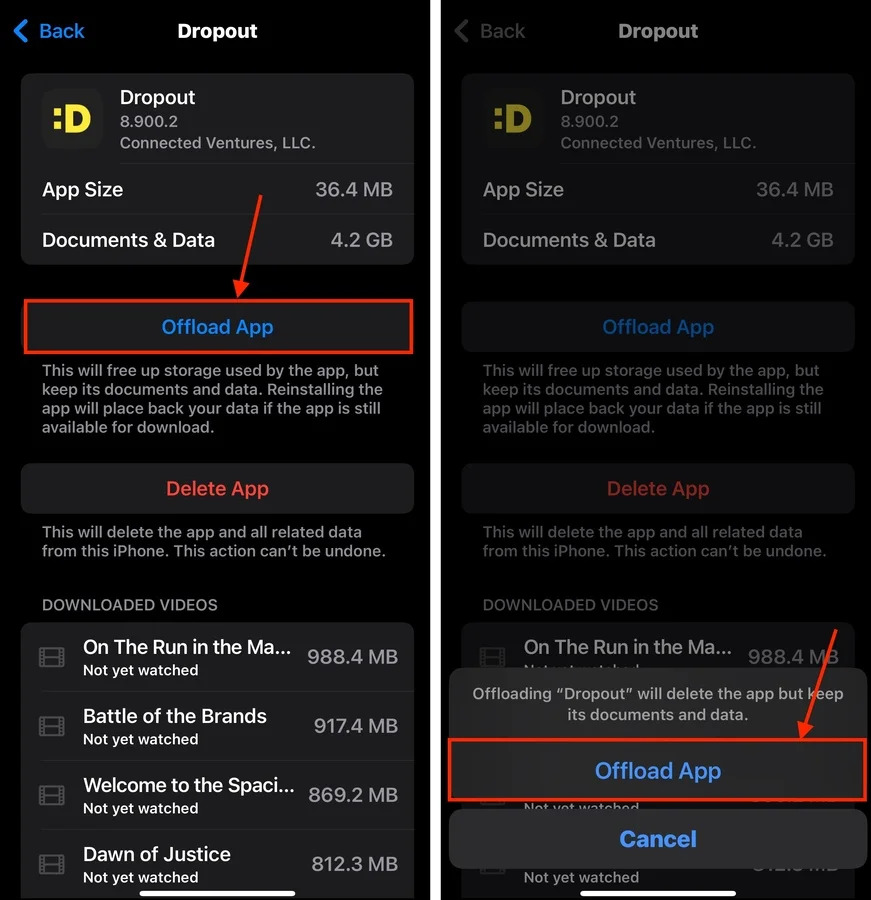
Unlike deleted apps, offloaded apps don’t disappear from your iPhone home screen—they just appear greyed out.
Method 3: Clean Up the Files App
The Files app is like a mobile version of Finder. It lets you browse files and folders like a computer directory, making it useful for finding and removing clutter. Specifically, you can use the Files app’s Sorting and Grouping functions to browse intelligently.
Step 1. Open the Files app.
Step 2. Tap Browse on the bottom menu. Then, from the list of locations, tap On My iPhone.
Step 3. Tap the meatball menu button in the top-right corner of the screen. Select View Options from the context menu.
Step 4. Specify the conditions that will allow you to remove clutter most efficiently. For example, you can sort them by Size and prioritize the largest files and folders.
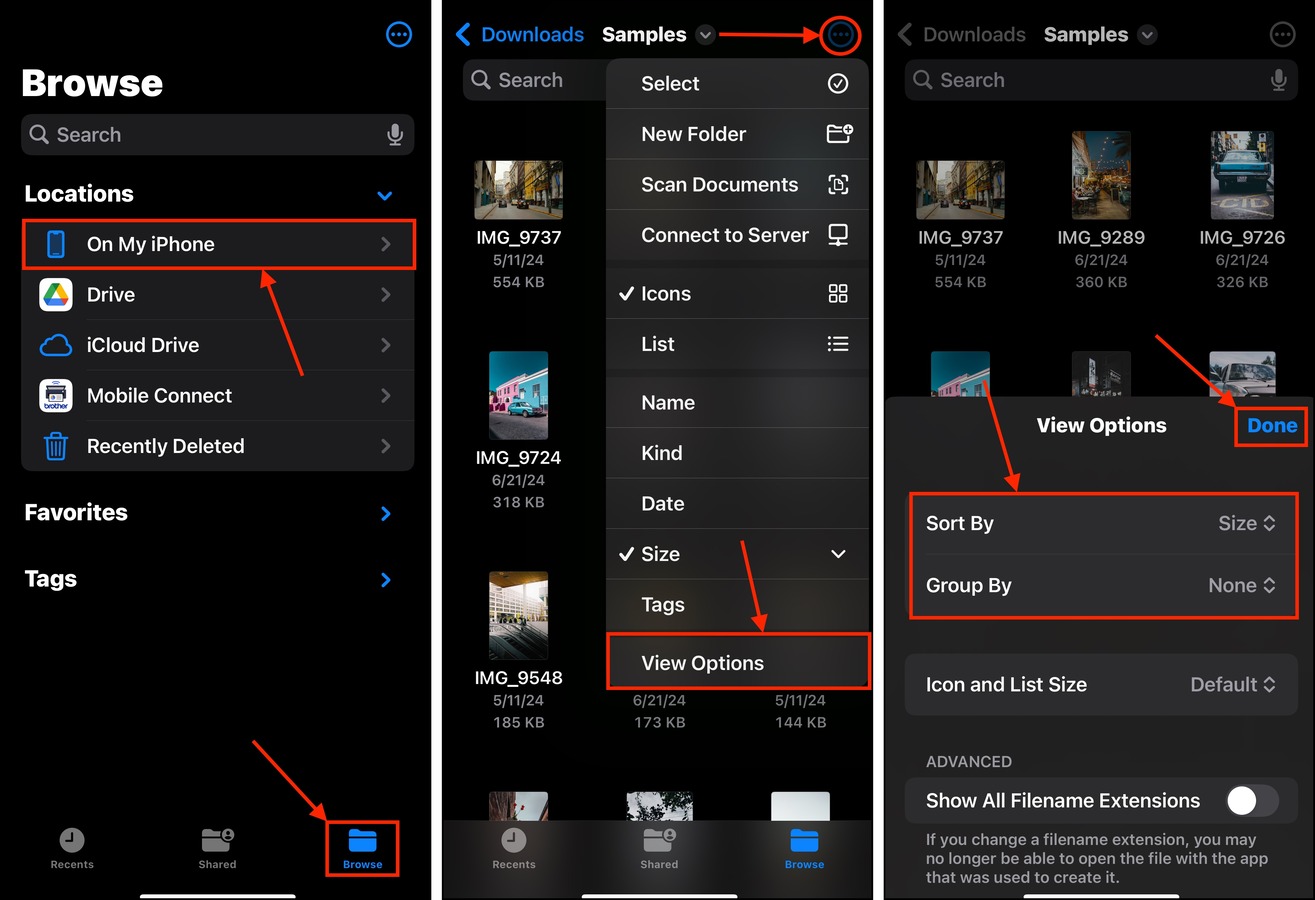
Step 5. When you locate any file you want to delete, tap the meatball menu button again and choose Select.
Step 6. Tap the files and folders you want to delete. Then, tap the trash icon at the bottom of the menu to delete your selection.

Method 4: Use a 3rd-Party Cleaner App
If you have hundreds of user files accumulated on your device, manual cleanup might be near impossible. Consider using a third-party app to automate the process.
We’ll be featuring one of our favorites, Clever Cleaner: AI Cleanup App. It’s a completely free photo library cleaner—with no ads, no trials, and no limits. It can help you quickly get rid of photo and video clutter, providing a superior cleanup experience compared to the native Photos app.
Aside from similar and duplicate photos, Clever Cleaner also compiles screenshots, Live Photos, and “Heavies” (your largest media files). Here’s a quick demo:
Step 1. Download Clever Cleaner: AI CleanUp App from the iPhone App Store.
Step 2. Open the Clever Cleaner app and give it access to your photo library.
Step 3. From the bottom menu, select the data type you want to review. We’ll choose Similars for this demonstration. Then, tap Smart Cleanup.
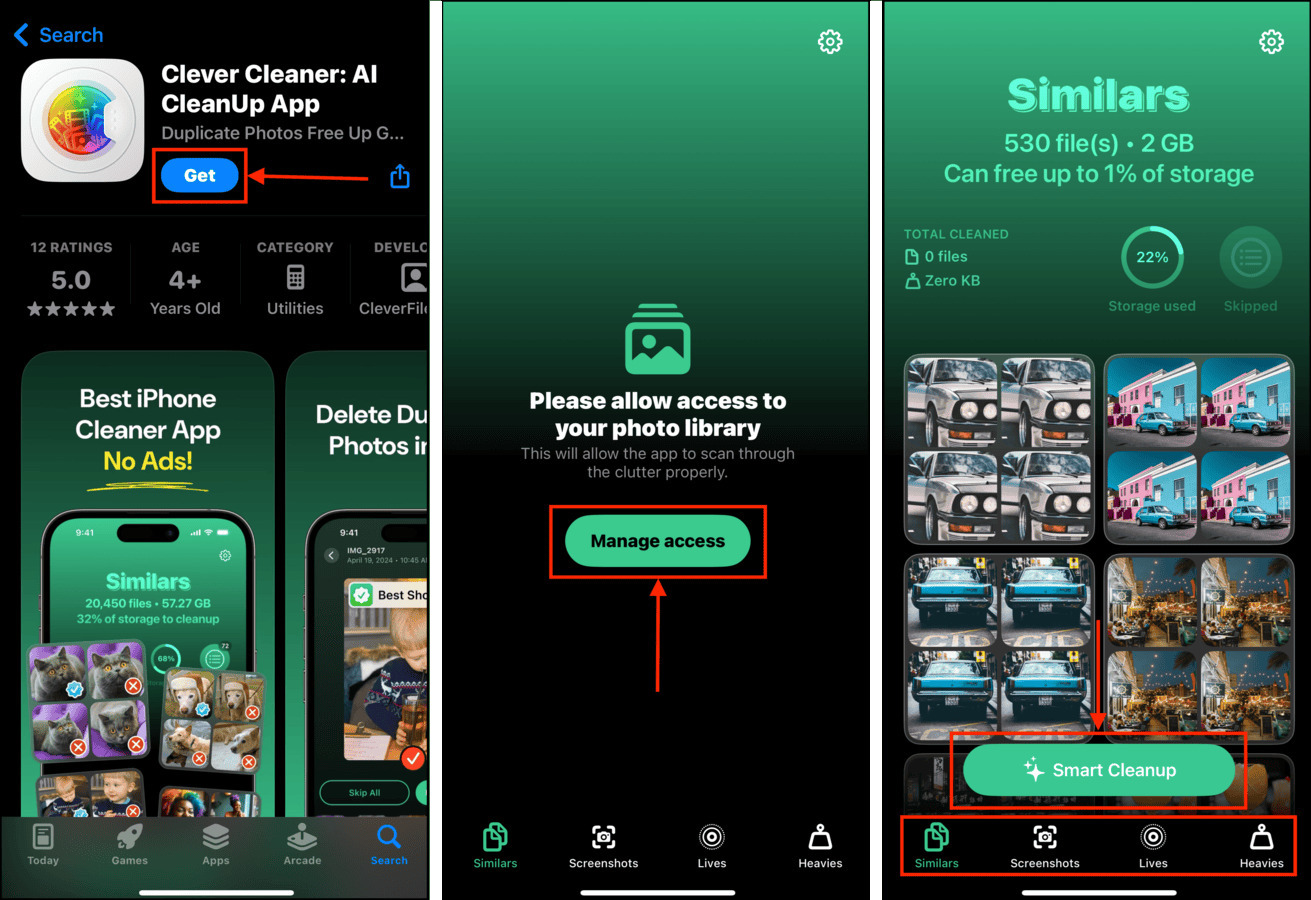
You can also avoid Smart Cleanup altogether and clear out your clutter manually instead, made easier with Clever Cleaner’s organization and sorting tools.
Method 5: Remove Email Attachments
Mail apps typically keep attachments in the cache after you’ve viewed them at least once—this makes it faster for you to view them again at a later time. While efficient, this process also makes it possible for obsolete attachments to be stored in the cache because iOS doesn’t know that you don’t need them anymore.
Fortunately, you can “manually” clear old attachments in the cache by removing the associated mail account and adding it again. When you add your account again, the mail app should only cache recently viewed attachments.
Step 1. Open the Settings app.
Step 2. Scroll down to the very bottom and tap Apps.
Step 3. Find and select the Mail app.
Step 4. In the Mail app’s settings menu, tap Mail Accounts.
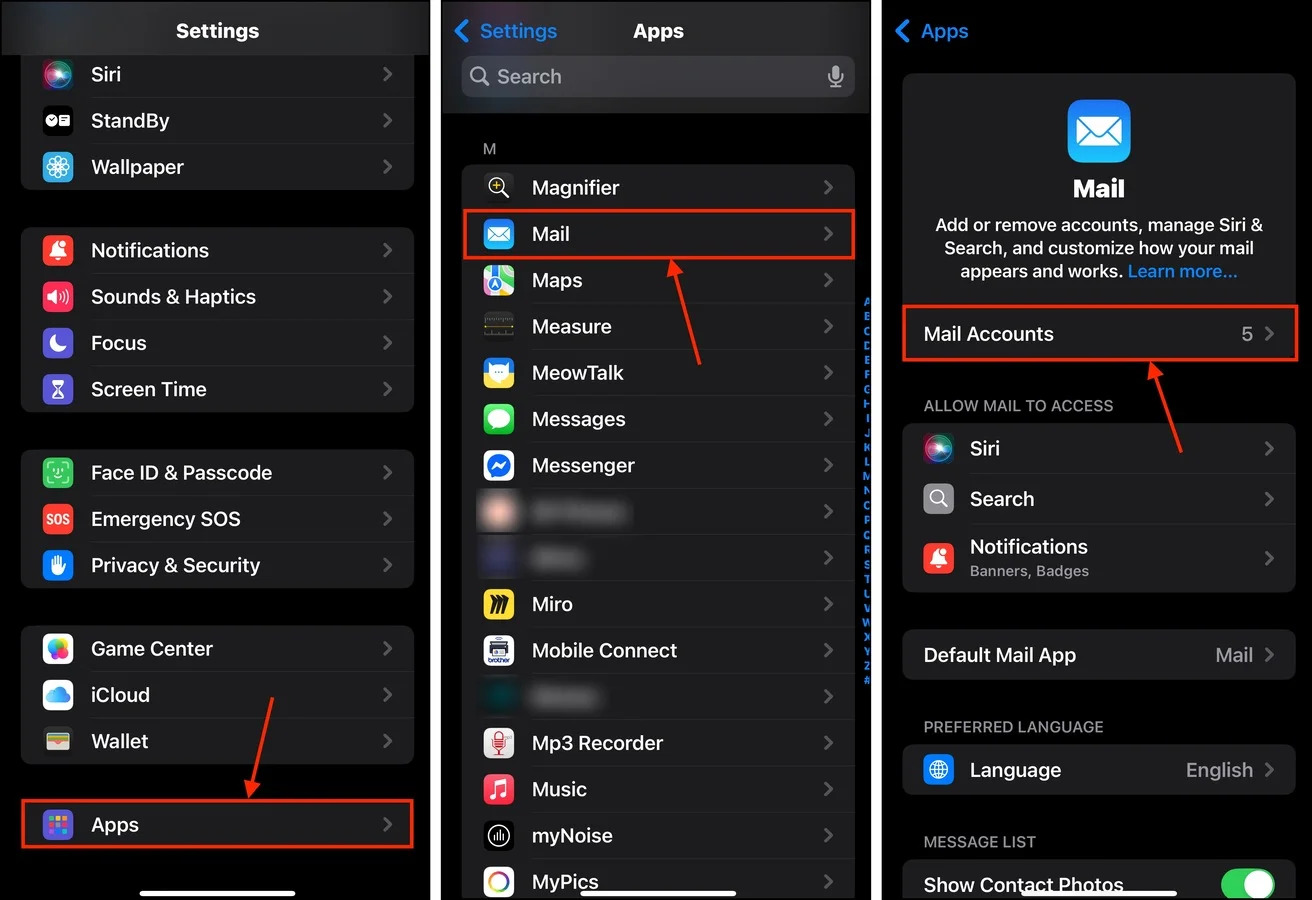
Step 5. Select the account containing the attachments you want to remove from your device.
Step 6. Tap Delete Account.
Step 7. In the confirmation prompt that appears, tap Delete from My iPhone to proceed.
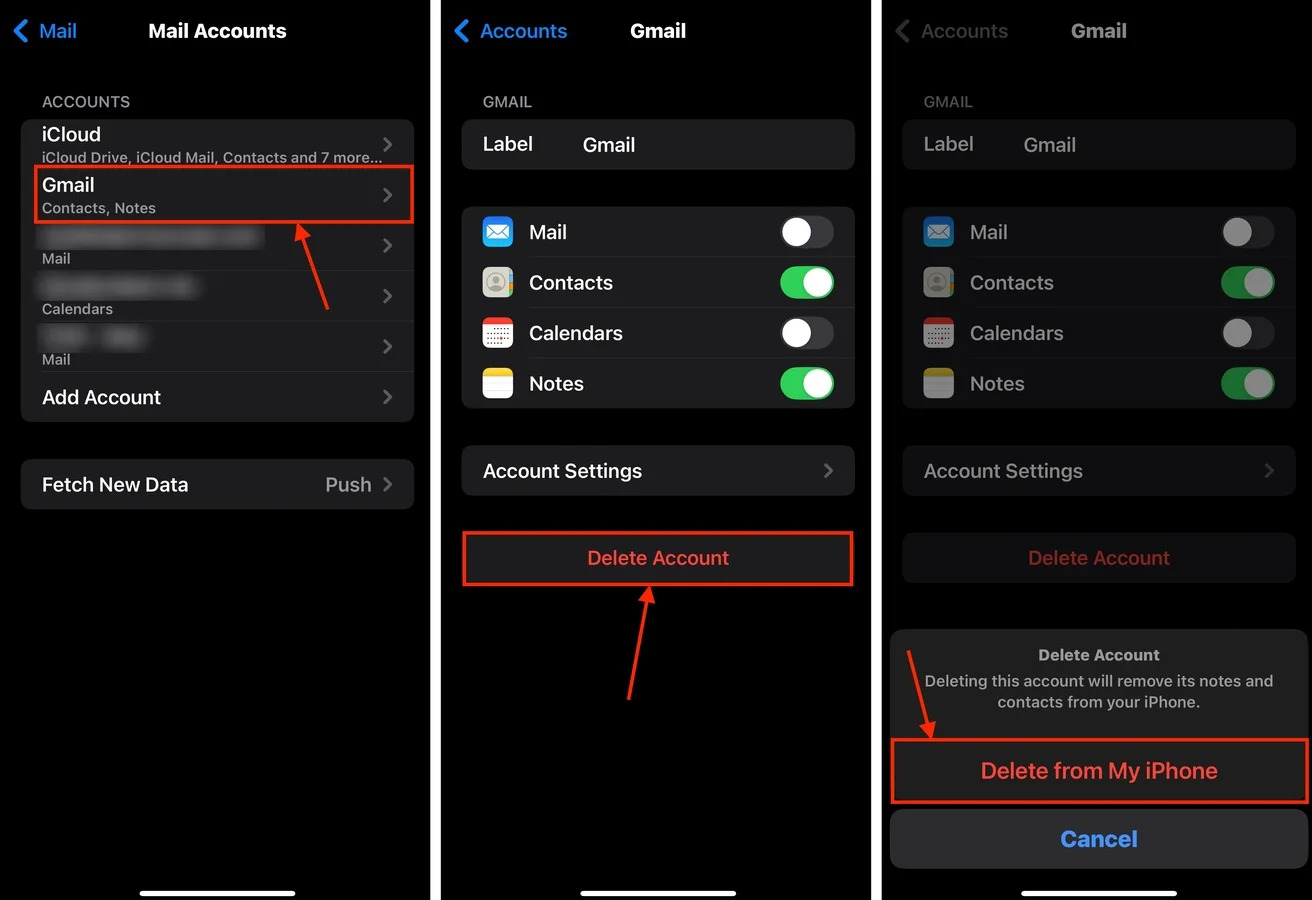
After deleting your Mail account, you can immediately add it back. And even though your attachments should be cleared from the cache, you can open the accompanying mail and download the file again if needed.
Method 6: Delete Downloaded App Media
Media streaming apps often have the ability to download media so users can view or listen to them later. However, this can quickly eat through your storage space if you forget to delete them later.
But unlike locally captured or downloaded media, you won’t find the files in your Photos app library. In most cases, you can only delete them from within the app itself. We’ll demonstrate this process with the media streaming app Dropout, but the steps should be similar across the board for this method.
Step 1. Open the app you used to download the media you want to delete. Then, locate your in-app media library.
Step 2. Select the media items you want to remove. Then, tap Delete or its equivalent.
Step 3. Confirm when prompted.
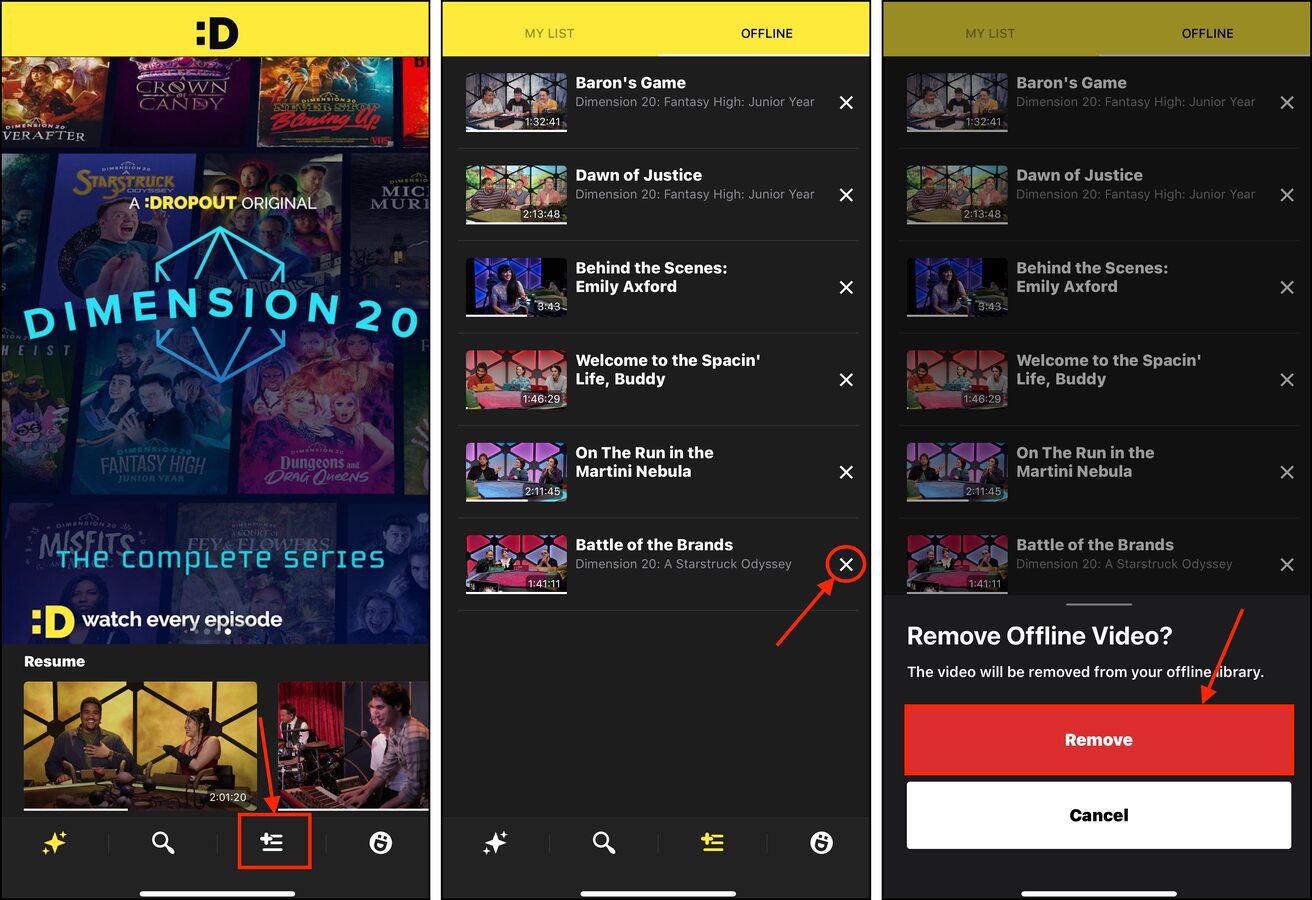
Not only should your general iPhone storage gain free space, but you should also notice the size of the app itself shrink in the iPhone storage settings menu.
Method 7: Delete App Caches
Like browsers, apps use a cache system to improve performance. Many app assets can be stored in the cache for faster load times—such as thumbnails, audio files, video clips, app configurations, logs, and more.
All of that adds up over time, especially if the app itself is not good at regulating its own cache. Fortunately, many apps provide a feature for clearing cache data, which we’ll demonstrate in the short guide below.
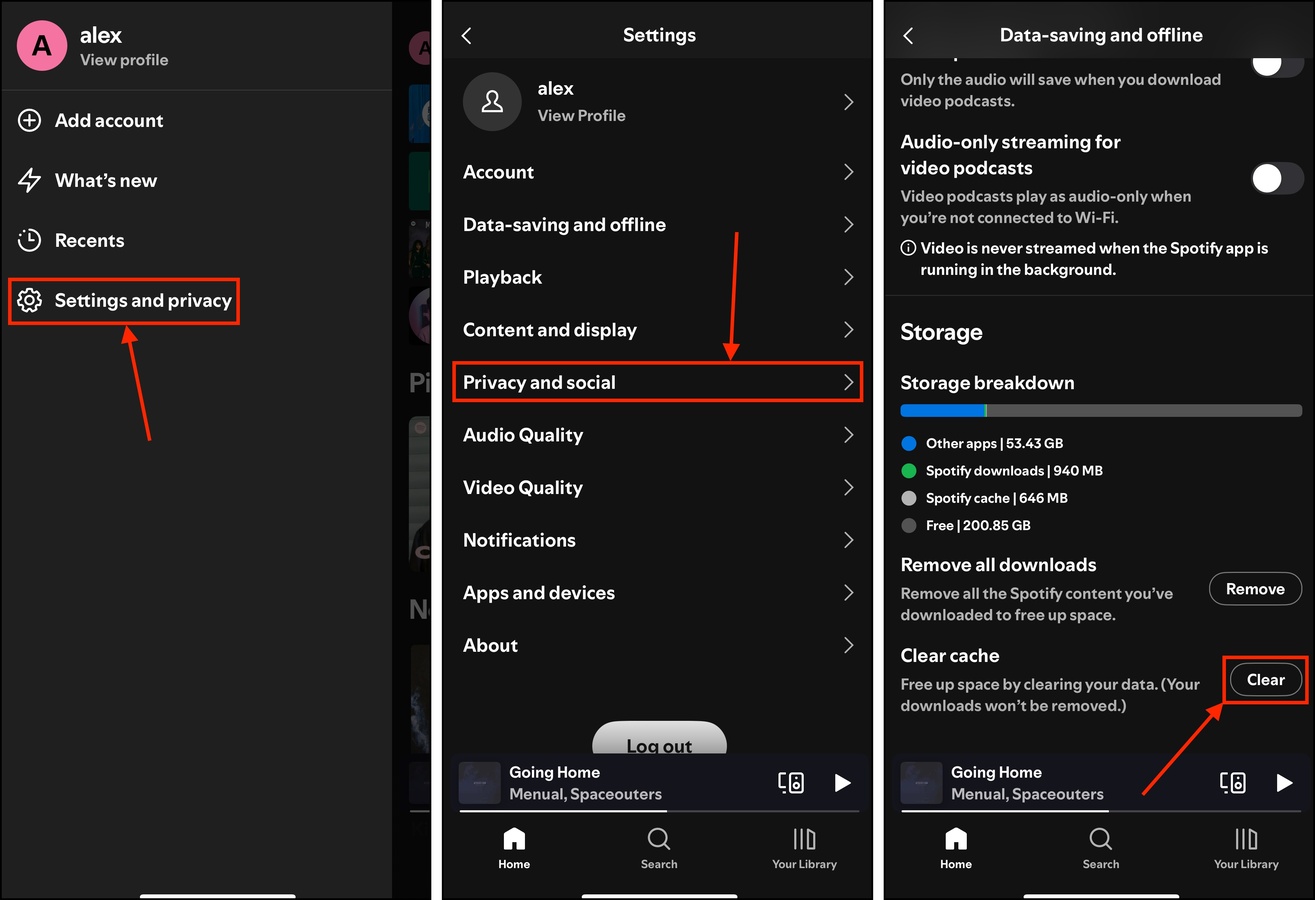
Step 1. Open your app–we’ll open Spotify. Tap your profile icon in the top-left corner. Then, choose Settings and privacy.
Step 2. In the Settings menu, select Data-saving and offline.
Step 3. Scroll down to the bottom of the menu and tap Clear.
Method 8: Remove Old iOS Update Files
Whenever you update iOS, the update’s installation files are first downloaded to your iPhone. If the update was only partially downloaded or was not successfully installed, the files might linger on your device as clutter. This also happens in case iOS is unable to delete the installation files even after a successful update.
Here’s how to get rid of them:
Step 1. Open the Settings app.
Step 2. Tap General.
Step 3. In the General menu, select iPhone Storage.
Step 4. Scroll down to the list of installed apps. If you have an old iOS update, you’ll find it here. Tap it.
Step 5. Tap Delete Update.
If this rogue update file was the result of a botched update attempt, try updating now. You’ll have a better chance of succeeding.
Keep That Cleaning Spree Going!
Don’t fight the cleanup bug! A clean iPhone is a happy (and well-performing) iPhone, which is why we have so many cleaning and organizing guides on the blog. Once you’ve successfully purged your iPhone of junk files, we recommend learning how to clear your iPhone’s system data.
Done deleting? Consider learning how to organize thousands of photos on your iPhone next.
Not only does cleaning and organizing your iPhone make it easier to find your digital stuff, but it can help you instantly free up loads of space, improve performance, and troubleshoot errors. So make it a habit!
FAQ
A junk cleaner on your iPhone is an app that can automatically delete unnecessary data, such as duplicate contacts and similar photos and videos. They usually have safeties in place, such as prompting users to confirm any action beforehand. They may also have extra features that help users maintain their devices, such as home screen status widgets.
To clear all your junk files, do the following:
- Clear Safari history by going to Settings > Safari > Privacy & Security > Clear History & Website Data
- Delete unused apps from the home screen (tap + hold > click the x button) or by enabling Offload Unused Apps when the setting is available in General > iPhone Storage > Recommendations
- Manually delete your files from the Files app
- Use 3rd party cleaner apps to clean up duplicate contacts, photos, and videos, or delete them manually
To clear your iPhone cache and junk files, try to get rid of the following:
- Browser history and cache data
- Unused apps
- Personal files in the Files app (including downloads from email attachments and messenger apps)
- Duplicate contacts
- Similar/unwanted photos and videos
There are multiple apps on the App Store that can clean iPhone junk. In fact, there are 2 types of apps: (1) apps that only support 1 data type (like contacts) and (2) apps that can support multiple data types (contacts, images, videos, etc). Many of them are paid, so make sure to read the descriptions on the App Store carefully!
- Browser history & data – Clear your browser history and cache data. In Safari, you can access this in Settings > Safari > Privacy & Security.
- Unused apps – Delete apps you don’t need by tap + holding them in your home screen and tapping the x button.
- Personal files – Delete personal data you don’t need anymore. Go through the Files app as well as the Contacts app and Photos app.


