
Live Photos can take up a lot of storage, which can go to waste if you don’t need the feature in the first place; for example, maybe you just want to take a photo of some clothes in a shop you want to buy later.
The problem is that Live Photos is enabled by default. And even if you turn it off manually, it restarts itself whenever you open the Camera app. In this guide, we’ll show you how to prevent this behavior and turn off Live Photos permanently.
Table of Contents
How Do I Turn My Existing Live Photos into “Normal” Pictures?
This guide aims to teach you how to permanently turn off Live Photos, so you can avoid taking more of them in the future. We have a completely separate guide for turning existing Live Photos to “normal” images—check out our article on 6 different ways to convert Live Photos to still images using your iPhone or Mac.
If you want to skip the guide, you can download an app called Clever Cleaner: AI Cleanup App. It’s completely free (with no limits), and it has a feature that helps you get rid of Live Photos on your iPhone by compressing them and turning them into static images instead. It can even compress multiple Live Photos at once, making it extremely convenient to use.
4 Ways to Permanently Turn Off Live Photos on Your iPhone
In this section, we’ll teach you all 4 ways to permanently disable the Live Photos feature for your iPhone camera. These methods use several different approaches, so we recommend trying them all to figure out which solution is best for your photography-related needs and habits.
Method 1: Enable the Preserve Settings Feature for Live Photos (Then Turn it Off)
The most straightforward way to turn off Live mode on your iPhone permanently is to use the Preserve Settings feature in the Camera settings. This feature literally “preserves” any settings you changed in the Camera app. Even if you close the app and open it again, you’ll use the same settings as last time.
This includes the Live Photos feature, which normally starts itself every time you open the Camera app. As long as you stop Live Photos while Preserve Settings is enabled, Live Photos will stay off.
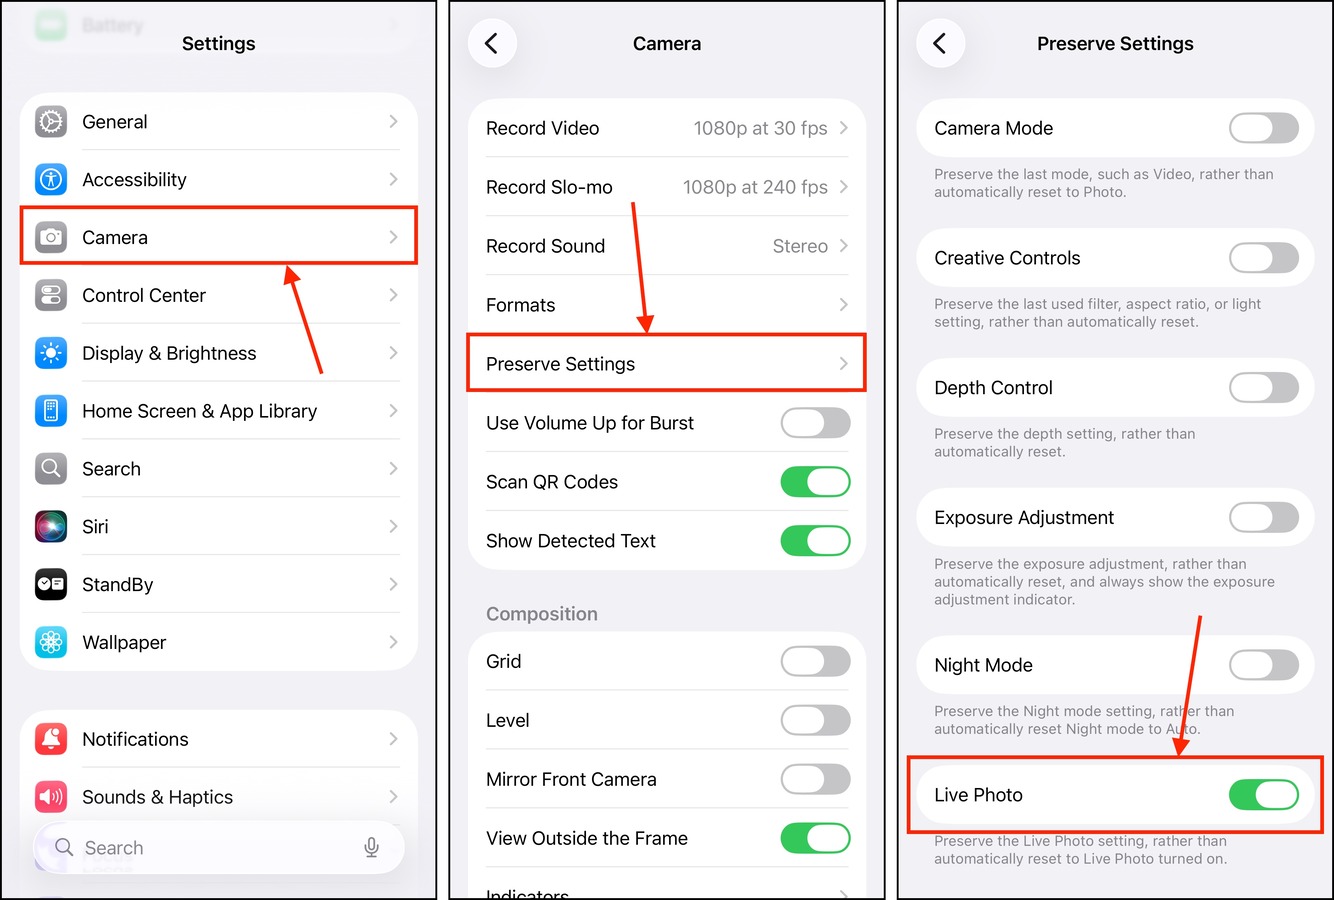
Step 1. Open the Settings app.
Step 2. Scroll down to the second section of the Settings menu and tap Camera.
Step 3. In the Camera menu, select Preserve Settings.
Step 4. Beside the Live Photos setting, slide the toggle switch to the ON position (it should turn green). This means that our settings for Live Photos will be saved.
Step 5. Open the Camera app.
Step 6. In the top right corner of the screen, tap the menu button.
Step 7. Make sure LIVE is turned off—the icon should be colored gray.
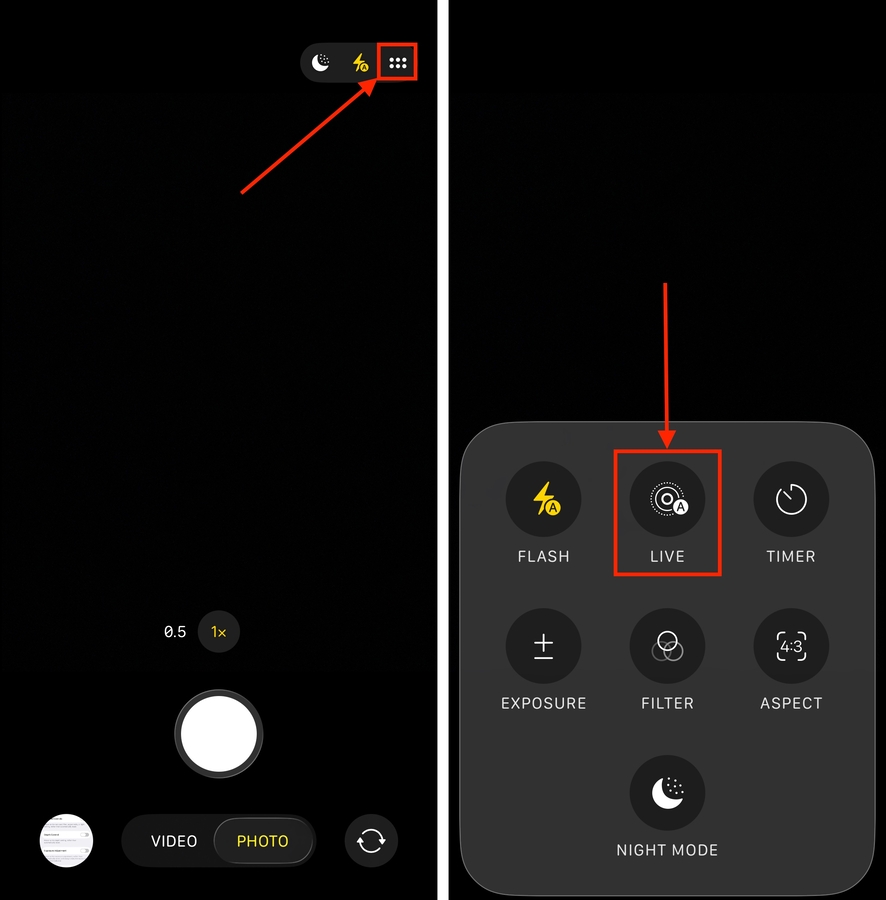
Make sure that you shut off Live Photos on your iPhone before you close the Camera app. If you turn it on before closing the app, that setting will be preserved instead.
Method 2: Capture Photos Using the ProRAW Format
A good way to take high-quality photos without having to actually turn off Live on your iPhone camera is to use Apple’s ProRAW format for your images. When you’re shooting in ProRAW, Live Photos becomes completely unavailable as an option—you simply can’t capture RAW and Live photos at the same time, due to the long exposure time required by RAW photos.
Here’s a quick guide on how to enable the ProRAW format in the Settings app, how to utilize it in the Camera app, and how to make sure this format is chosen by default whenever you begin a shoot.
Step 1. Open the Settings app.
Step 2. Select the Camera option.
Step 3. In the Camera menu, tap Preserve Settings.
Step 4. Activate the toggle switch beside the Apple ProRaw or ProRAW & Resolution Control setting (depending on your device’s model).
Step 5. Back in the Camera menu, tap Formats this time.
Step 6. Enable Apple ProRaw or ProRAW & Resolution Control.
After modifying your settings, a new format option will appear when you use your camera. Simply tap JPEG or HEIC at the top of your screen, then tap RAW.
Method 3: Activate Night Mode on Your iPhone’s Camera
If you don’t have the ProRAW format available for your iPhone camera, or you want to take photos in a dark environment, you can enable Night Mode instead. Like capturing in RAW, using Night Mode allows you to shoot high-quality still images without having to turn off Live pictures on your iPhone.
And like RAW photos, Night Mode photos require a longer exposure time. This makes it impossible to capture a Live photo at the same time, which is why Night Mode disables it automatically.
Step 1. Open the Settings app.
Step 2. Select the Camera option.
Step 3. In the Camera menu, select Preserve Settings.
Step 4. Beside the Night Mode setting, slide the toggle switch to the ON position. It should turn green.

Step 5. Open the Camera app.
Step 6. In the top right corner of the screen, tap and hold the moon icon.
Step 7. Choose the Max option.

Your iPhone is now permanently in Night Mode (at least until you toggle it off), which removes the ability to take Live Photos by default. Just note that the seconds for Max exposure will automatically adjust depending on the environment’s lighting.
Method 4: Use a Third-Party Camera App
If you don’t want the Live Photos feature to even be present whenever you use your iPhone camera, you can use a third-party camera application instead.
Apps like Halide Mark II, Pro Camera by Moment, and Photon Camera (among others) are alternatives to the native Camera app. They help you take super high-quality photos with their own unique features—like manual controls, precise focus tools, histograms, and more. However, they typically do not include Live Photos, Burst Mode, and other iOS-specific camera features.
This is a great option if you want to maximize your iPhone’s camera, but you don’t like the existing features that come with iOS.

Have You Also Considered Compressing Your iPhone Videos?
In the same way that not every single photo you take needs to be a Live Photo, not all your videos need to use the highest quality settings. Super high-quality iPhone videos can use up 400 MB of storage space per minute–not exactly a requirement if you just want to send your mom a video of your cat sitting on the couch like an old man.
If you have videos on your iPhone that you can’t delete, but are taking up too much space due to their quality settings, check out our guide on how to compress iPhone videos for free. We’ll show you how to use native and third-party tools to shrink your videos and free up loads of storage space instantly.


