
Need to compress a video on your iPhone so it takes up less storage space (and is easier to send to contacts)? There are several ways to compress videos and otherwise reduce their file size directly on your iPhone, and we compiled all of them for you in this guide.
In the sections below, we’ll show you different ways to compress iPhone videos using built-in and third-party tools that are completely free of charge. We’ll also briefly cover what “compression” actually means, as well as show you how to reduce the default file size for iPhone camera videos.
Table of Contents
What is Video Compression?
In this section, we’ll briefly explain what compression means and how it works in relation to iPhone videos and saving storage space. This provides a bit of context behind the methods included in the guide.
- Traditional compression: The technical term “compression” refers to the process of systematically removing data from a video file. Without going too in-depth, it only removes data that is deemed unnecessary or that wouldn’t be visually noticeable. The goal of this process is to shrink video size on an iPhone without affecting its visual quality.
- General compression: Compression, in general, means reducing a file’s size so it takes up less space. Aside from the traditional process of video compression, there are other ways to make a video smaller (e.g., choosing a lower resolution). This can reduce a video’s size on your iPhone even more when combined with traditional compression, but note that visual quality will be more obviously affected.
The methods we cover in this guide focus on performing traditional video compression, so you retain as much quality as possible. However, some methods provide other ways to make video files smaller on your iPhone—keep an eye out if you want more options.
6 Ways to Compress a Video on iPhone for Free
In this section, we’ll show you how to compress a video on an iPhone using 6 different methods. All of them are totally free and don’t require a computer. However, note that each method approaches “compression” a bit differently. So, we recommend trying them all or, at least, reading about each method so you know your options.
Method 1: Use a Cleaner App
Certain cleaner apps have a cleanup module specifically for videos, and compression is a common feature. We have a specific app recommendation for this method called Clever Cleaner: AI Cleanup App, which is completely free with no ads (not a free trial).
It has several features that can help you efficiently clean your duplicate and similar photos, screenshots, Lives, and, most importantly, “Heavies.” The Heavies feature presents your videos in order of file size and allows you to compress videos on your iPhone one by one or conveniently delete them to free up space.
What we like about this tool is how simple it is to use—you get 3 compression options: Optimal, Medium, and Max. All you have to do is choose which option results in your ideal file size with acceptable quality loss (which is pretty negligible). This method is a great option if you want to further clean up your library and save even more storage space using Clever Cleaner.
Step 1. Download and install Clever Cleaner: AI Cleanup App from the App Store. Then, open the app and allow Full Access to your library.
Step 2. On the bottom menu, select Heavies. Then, tap the video you want to compress.
Step 3. Choose one of the compression presets beneath the scrub bar: Optimal, Medium, or Max. The app will show you the resulting file size for each option. Once you’ve made your selection, tap Compress.
Step 4. Finally, choose whether you want to delete the original video or keep it alongside the compressed video (both will be saved in your library).
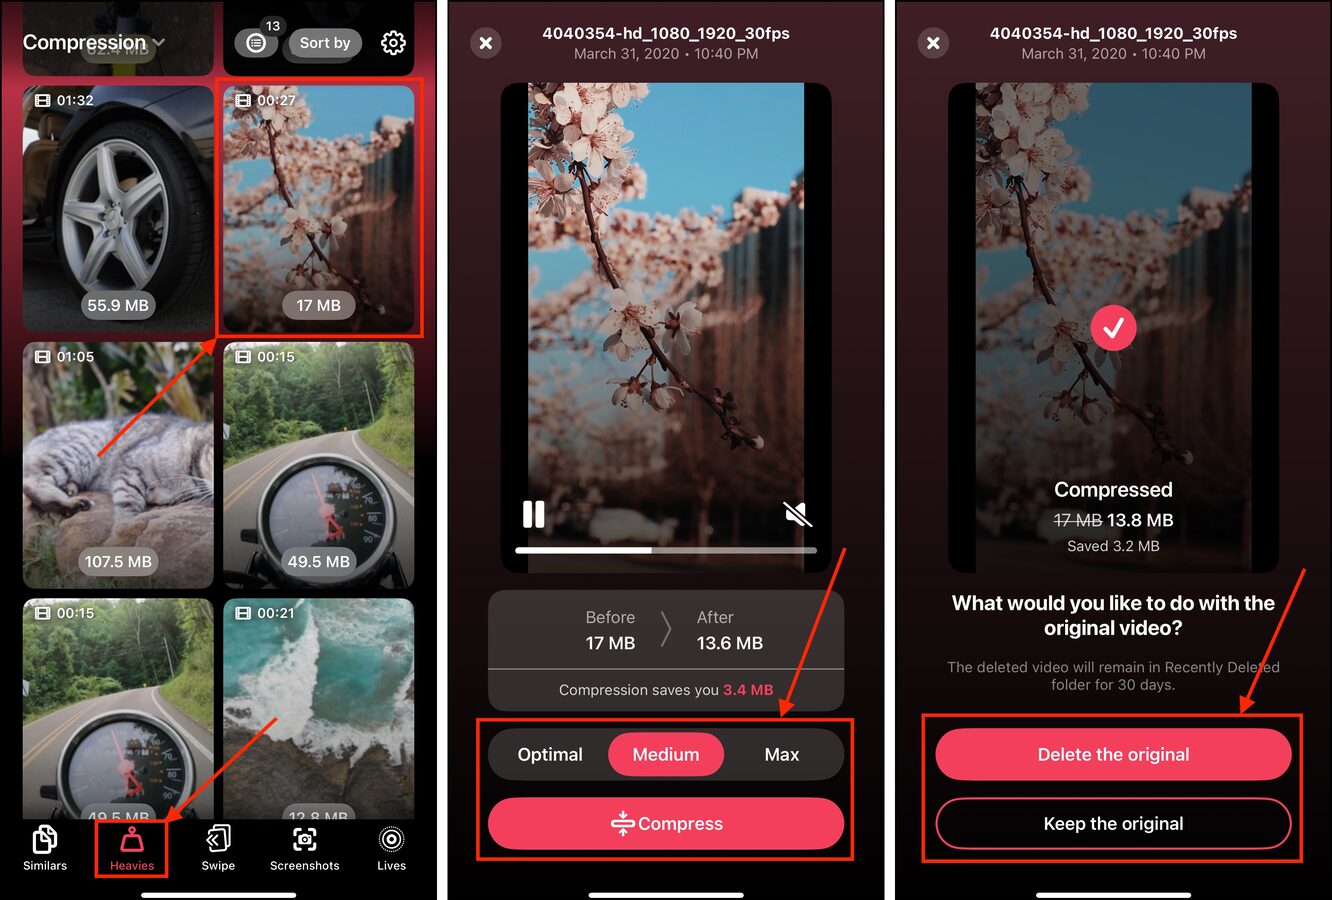
If you choose to delete the original video, make sure to purge it from the Recently Deleted album in the Photos app as well!
Method 2: Install a Dedicated Compressor App
Aside from cleaner apps, there are apps that are solely dedicated to compressing videos on iPhone with various customization options. There are many to choose from in the App Store; most allow you to compress individual videos for free, while bulk compression is either limited or locked behind a paywall.
We’ll be using an app called Compress Videos & Resize Video, which lets you customize your video’s frame rate and dimensions on top of compressing it. This can result in an even smaller file size, which is great for saving space on your iPhone or sending it to a contact.
We recommend this method if you want more control over the compression process, and if you don’t mind downloading an app dedicated solely to video compression (e.g., you need to compress videos often for storing or sharing).
Step 1. Download Compress Videos & Resize Video from the App Store. Then, open the app and make sure that you Allow Full Access.
Step 2. Tap Select Videos to Compress.
Step 3. Browse your albums and locate the video you want to compress. Then, tap Next in the top right corner of the screen.
Step 4. Utilize the sliders under Frame Rate and Video Dimensions to configure the compression operation. Tap Compress.
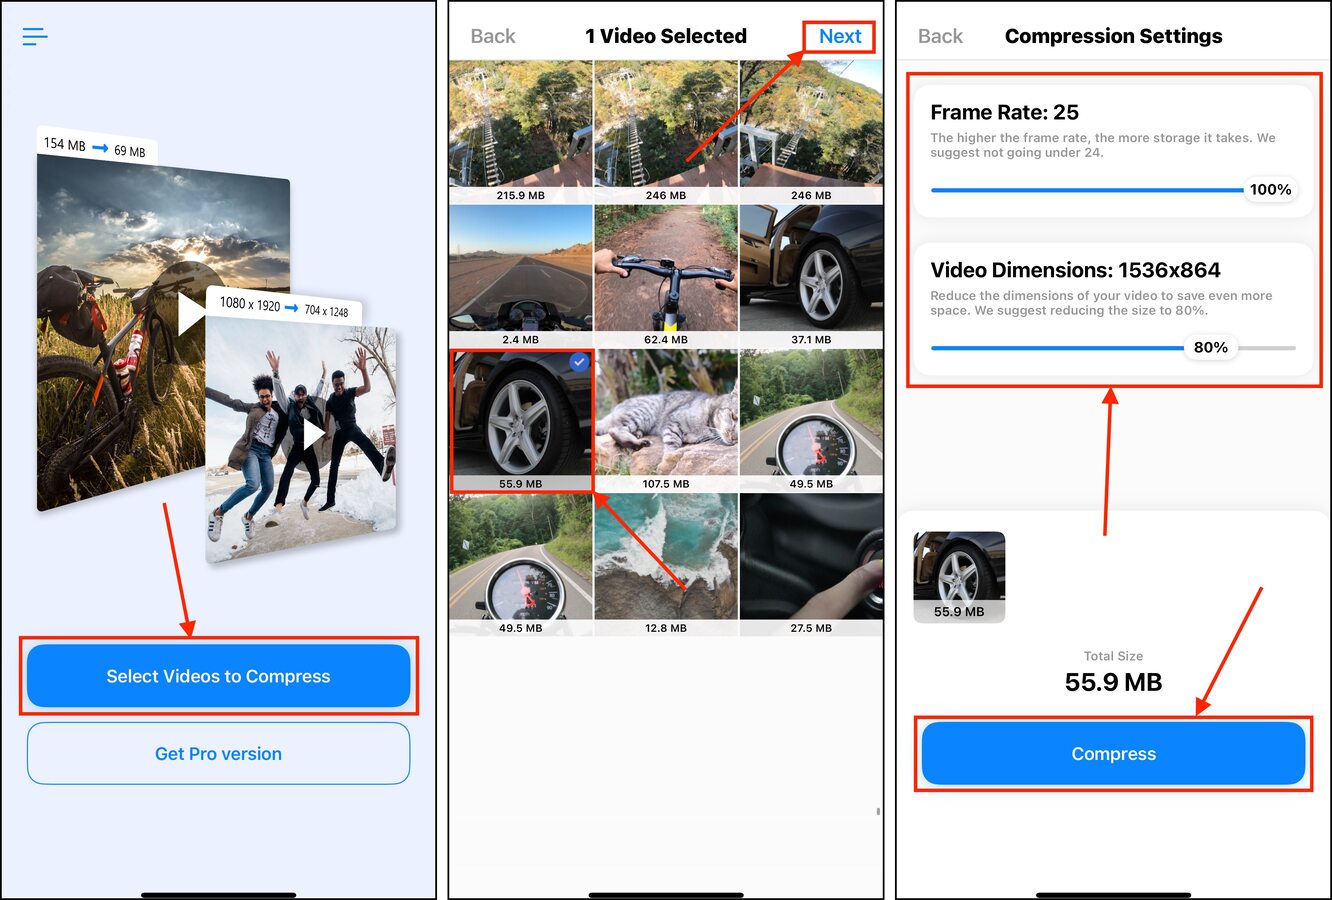
Once compression is done, you can choose whether to keep the original video or delete it. You’ll find the new version in your library and in its own album called Compressed Videos (which is automatically created by the app when you run it).
Method 3: Utilize Video Compressor Web Apps
There are several very convenient websites that host video compression tools online. All you have to do is upload your video to the website; it applies the compression for you behind the scenes, generating a new copy of the file you can download.
We’ll be using a free site called 8mb.video for this demonstration, which has different file size options you can choose from. But there are many options you can find online, so feel free to browse other sites.
Step 1. Open any browser app and navigate to 8mb.video.
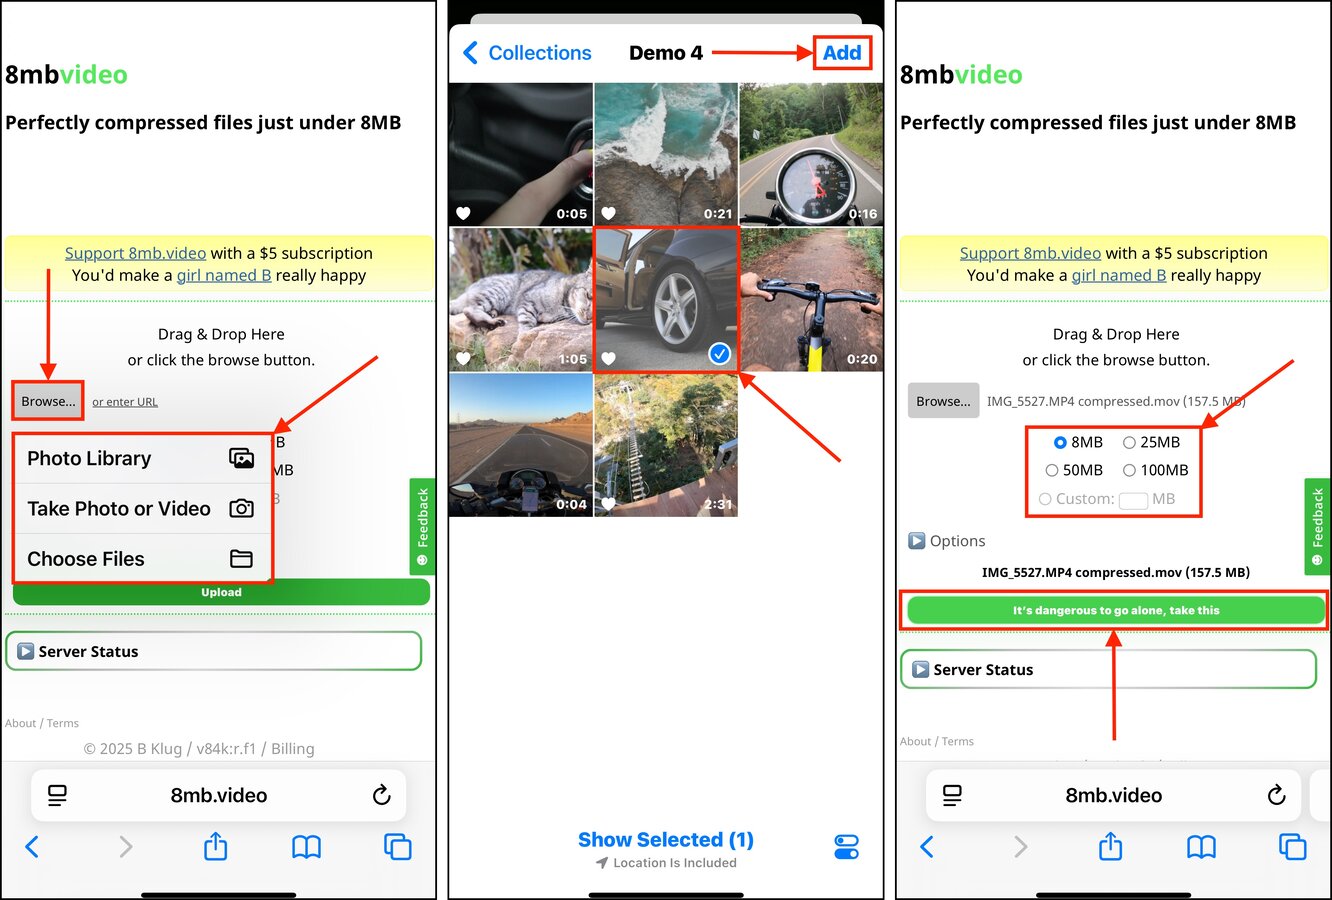
Step 2. Tap Upload and choose Photo Library (or Choose File if the video’s not in your Photos app).
Step 3. Select the video you want to compress. Then, tap Add.
Step 4. Tap the green button (it usually says something silly) to begin the upload and compression process. Once it’s done, tap the link under the preview, beneath the word Download.
You’ll find the compressed video will be saved in the Downloads folder in the Files app (note that some browsers generate their own Downloads folder). Don’t forget to delete the original video from your library to free up storage space.
Method 4: Enable iCloud’s Optimization Setting
iCloud has a handy setting called Optimize iPhone Storage. When enabled, iOS creates lower-resolution copies of the photos and videos in your library. Their higher-resolution copies are then stored in iCloud, which are downloaded automatically when you attempt to view them.
This method applies to your entire library at once, without you having to do any work after enabling the setting. It also works on new photos and videos as you save them, so you can set it and forget it!
Step 1. Open the Settings app and tap your Apple ID.
Step 2. In your Apple Account menu, tap iCloud.
Step 3. Find the Saved to iCloud section and select Photos.
Step 4. Enable the Sync this iPhone setting and make sure Optimize iPhone Storage is selected.
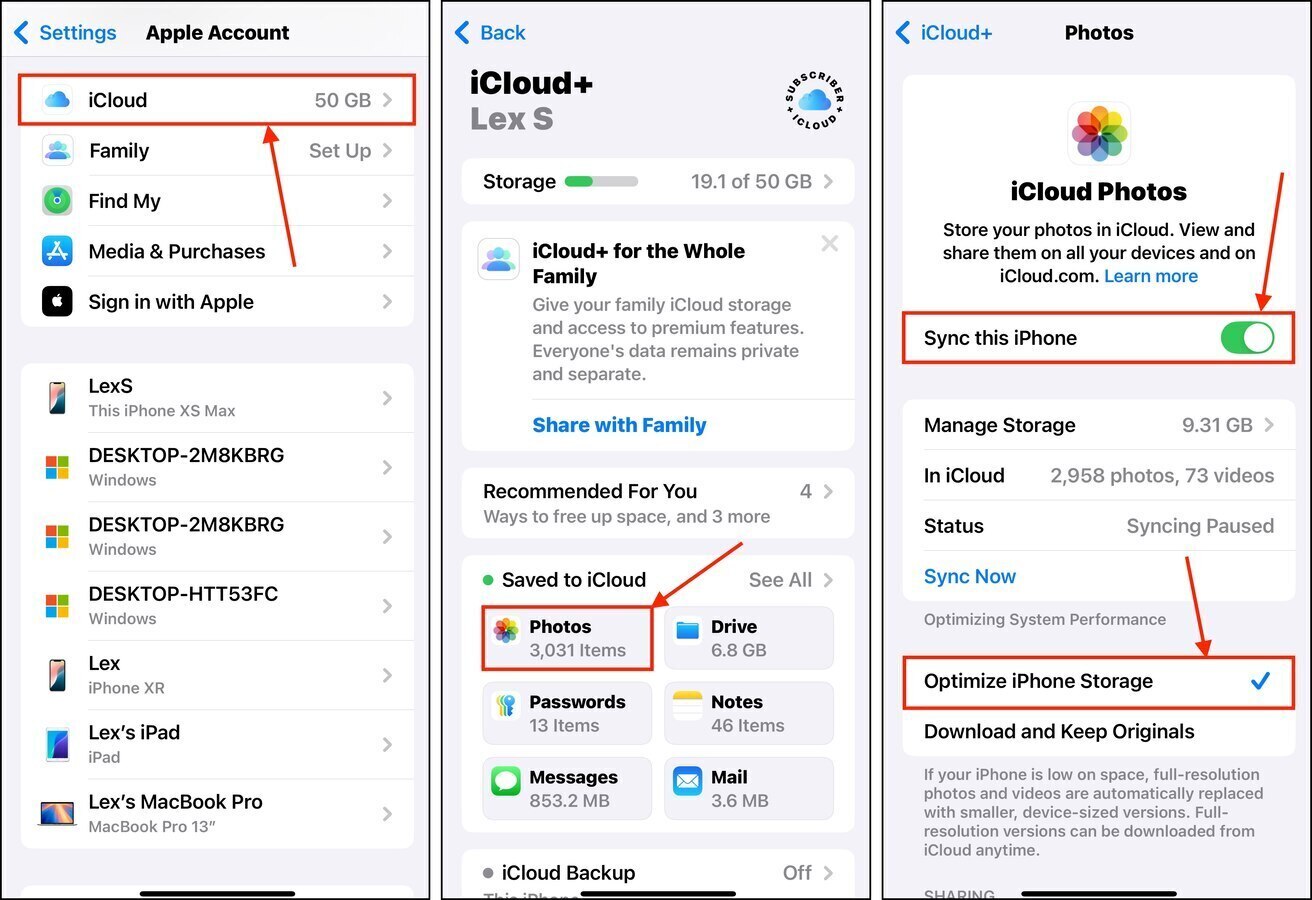
Once Sync this iPhone and Optimize iPhone Storage are enabled, iOS will automatically start the sync and upload processes. We recommend keeping your device charged and locked for a few minutes to an hour, depending on the size of your library.
Method 5: Send the Video to Yourself (or Someone Else)
Several communication apps, like mail providers and messengers, automatically compress video attachments as you send them. The level of compression depends on the app you’re using—for reference, we’ll be demonstrating this method using WhatsApp Messenger.
This is a great way to easily share videos with others (without them taking forever to load the clip), as well as simply having a smaller version of your video if you send it to yourself.
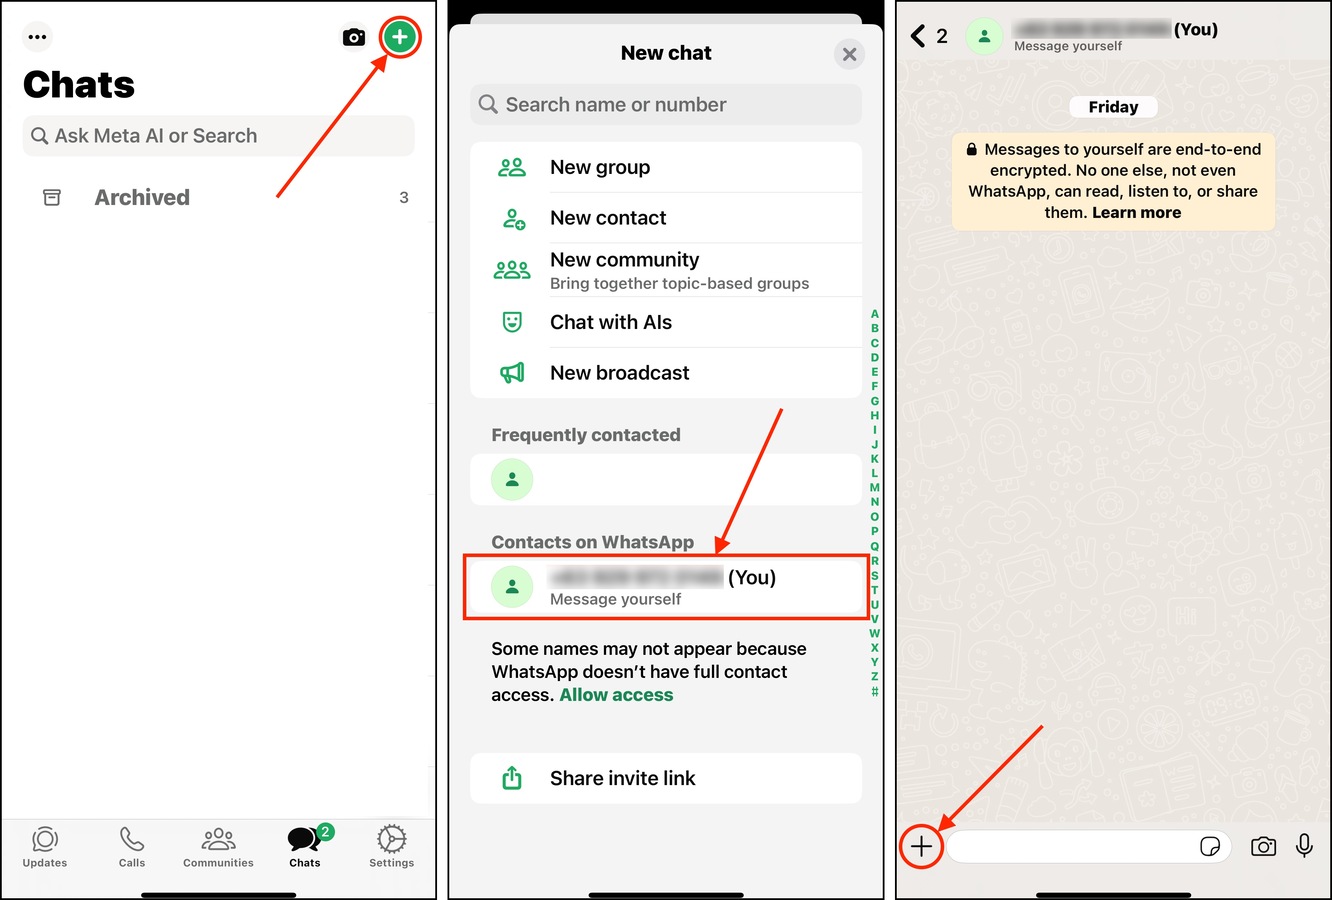
Step 1. Open WhatsApp and open the Chats menu. Then, tap the green + button in the top right corner of the screen to open a new chat.
Step 2. In the New Chat menu under Contacts on WhatsApp, tap Message yourself (or select the contact you want to share the video with).
Step 3. Beside the text field at the bottom, tap the + button.
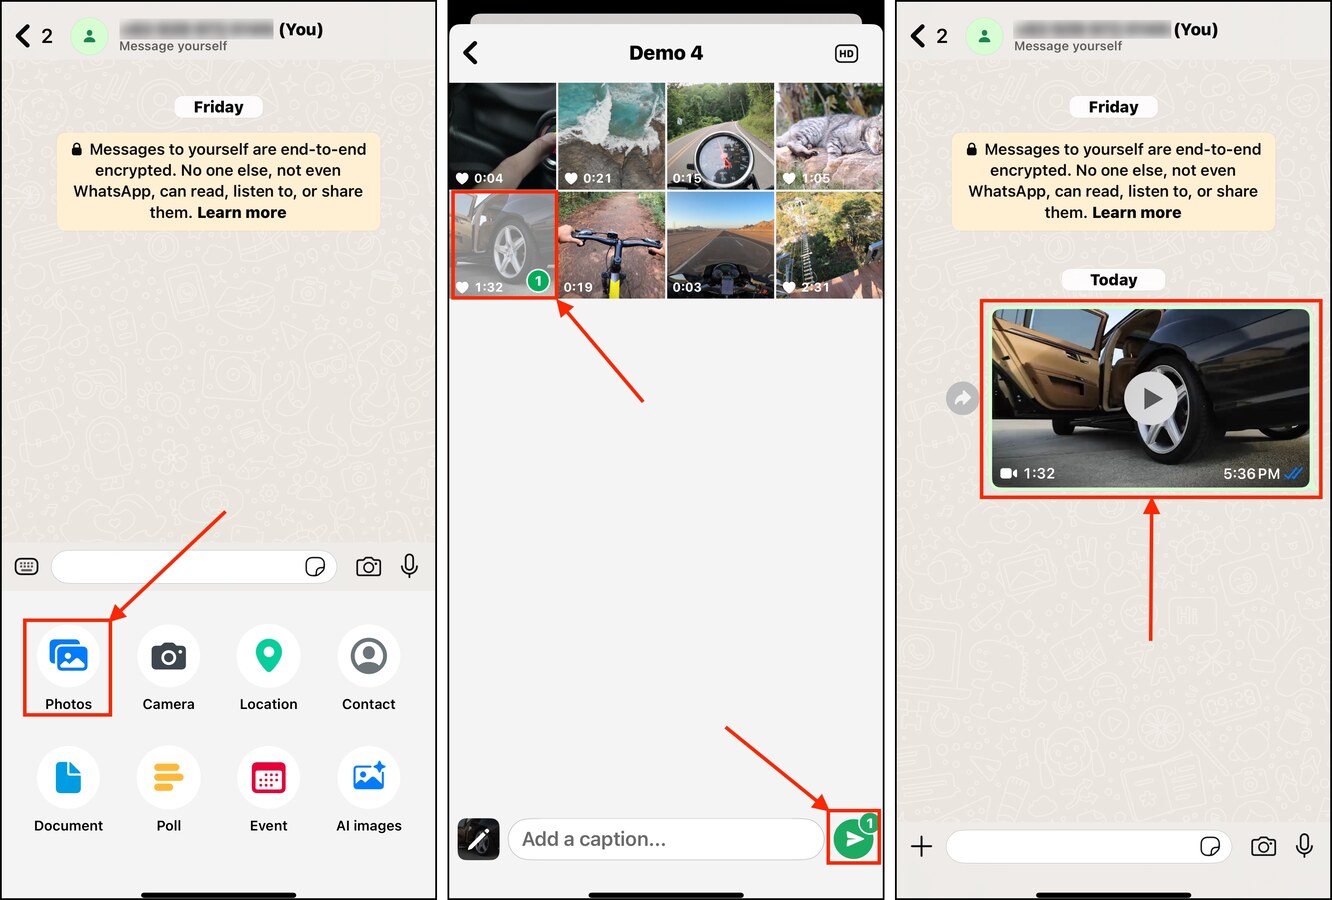
Step 4. Tap Photos.
Step 5. Locate the video you want to “compress.” Then, tap it once and tap the Send button.
Step 6. After the video has been successfully sent, return to the chat window. Then, tap the newly sent video to open it.
Step 7. Tap the Share button in the bottom left corner of the screen.
Step 8. Finally, tap Save.
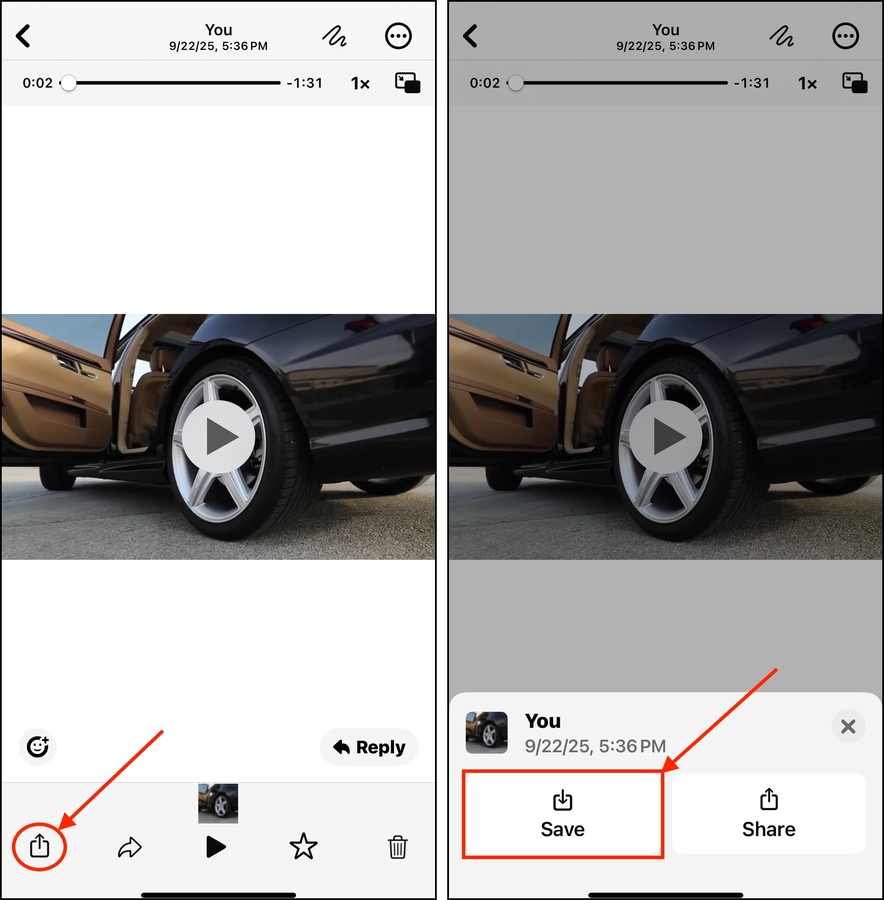
The new video will be saved in the Videos album in the Photos app. You can use the Info button to check its file size and compare it to the original.
Method 6: Export Your Video With an Editing App
Certain iPhone video editing apps have an option to reduce a video’s size on your iPhone during the export process. Our example for this demonstration is iMovie, which can export videos in several resolutions. The lower a video’s resolution, the smaller its file size becomes.
While this isn’t the same as “traditional” video compression, it’s also a valid way to downsize a video on your iPhone (as long as you can tolerate the loss in quality or smaller size).
Step 1. If it’s not already installed on your device, download iMovie from the App Store. Then, open iMovie and grant Full Access to your library.
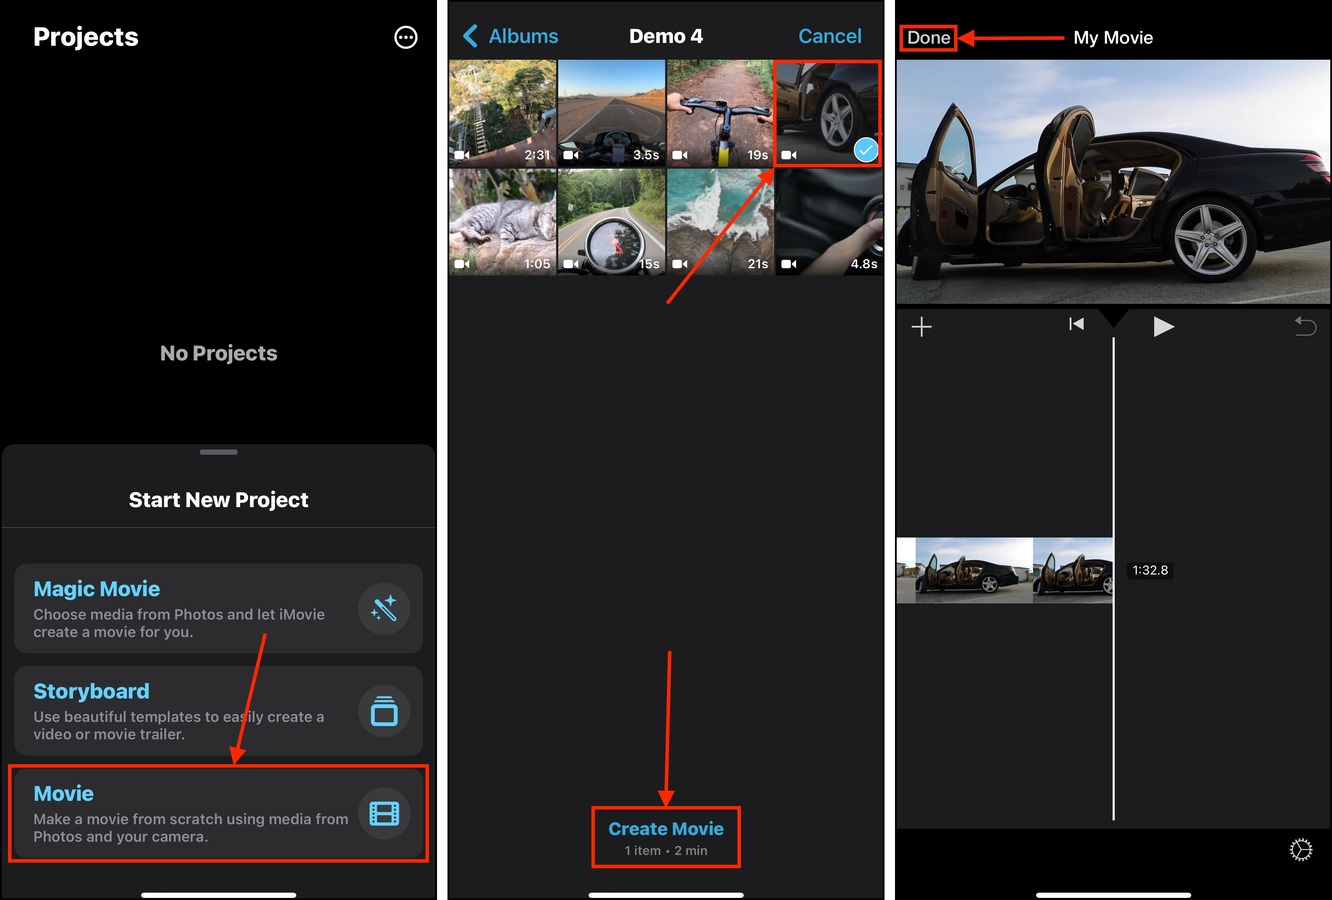
Step 2. Slide up the Start New Project menu and select Movie.
Step 3. Choose the video you want to compress and tap Create Movie.
Step 4. In the top left corner of the screen, tap Done.
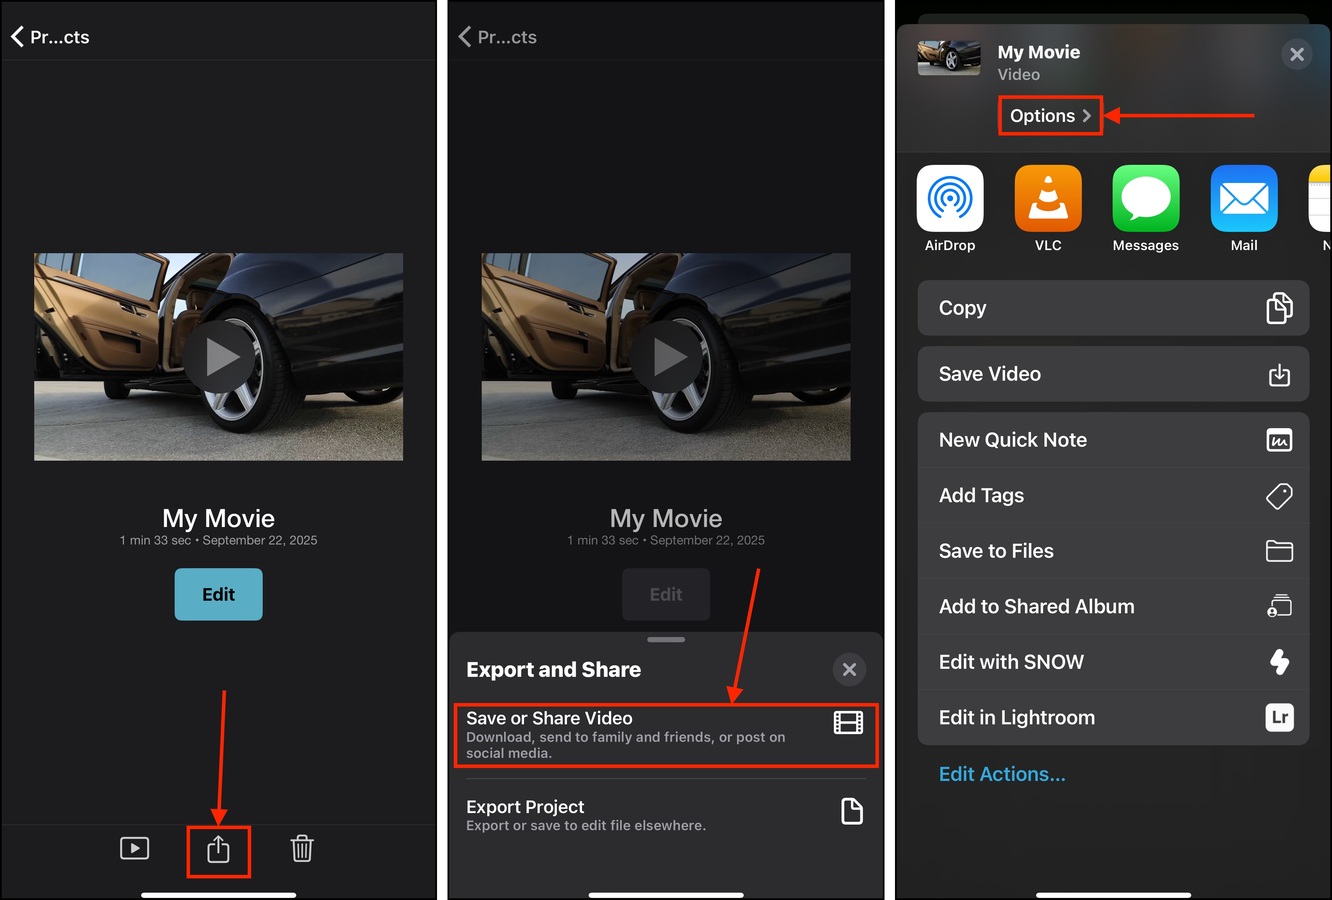
Step 5. On the bottom of the video’s movie project menu, tap the Share button.
Step 6. Select Save or Share Video.
Step 7. Under the name of your movie, tap Options.
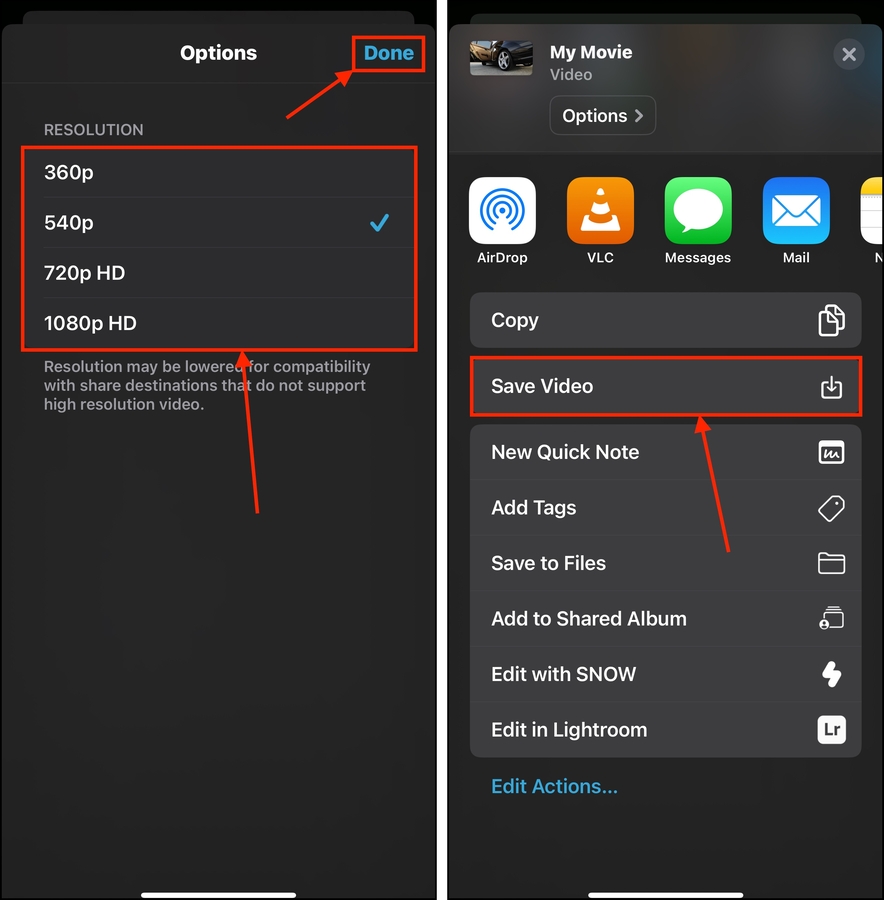
Step 8. Select the lowest resolution acceptable to you. Then, tap Done.
Step 9.Finally, while still in the save menu, tap Save Video.
iMovie will save your movie as a new video in your Photos library, alongside the original video.
Bonus Tip: How to Reduce Your iPhone’s Default Video Quality
You can avoid having your iPhone videos take up so much space in the first place by choosing a lower default quality for video capture. This way, you don’t need to repeatedly compress videos on your iPhone after recording. This option can be found in your camera’s menu in the Settings app. We’ll show you how it works:
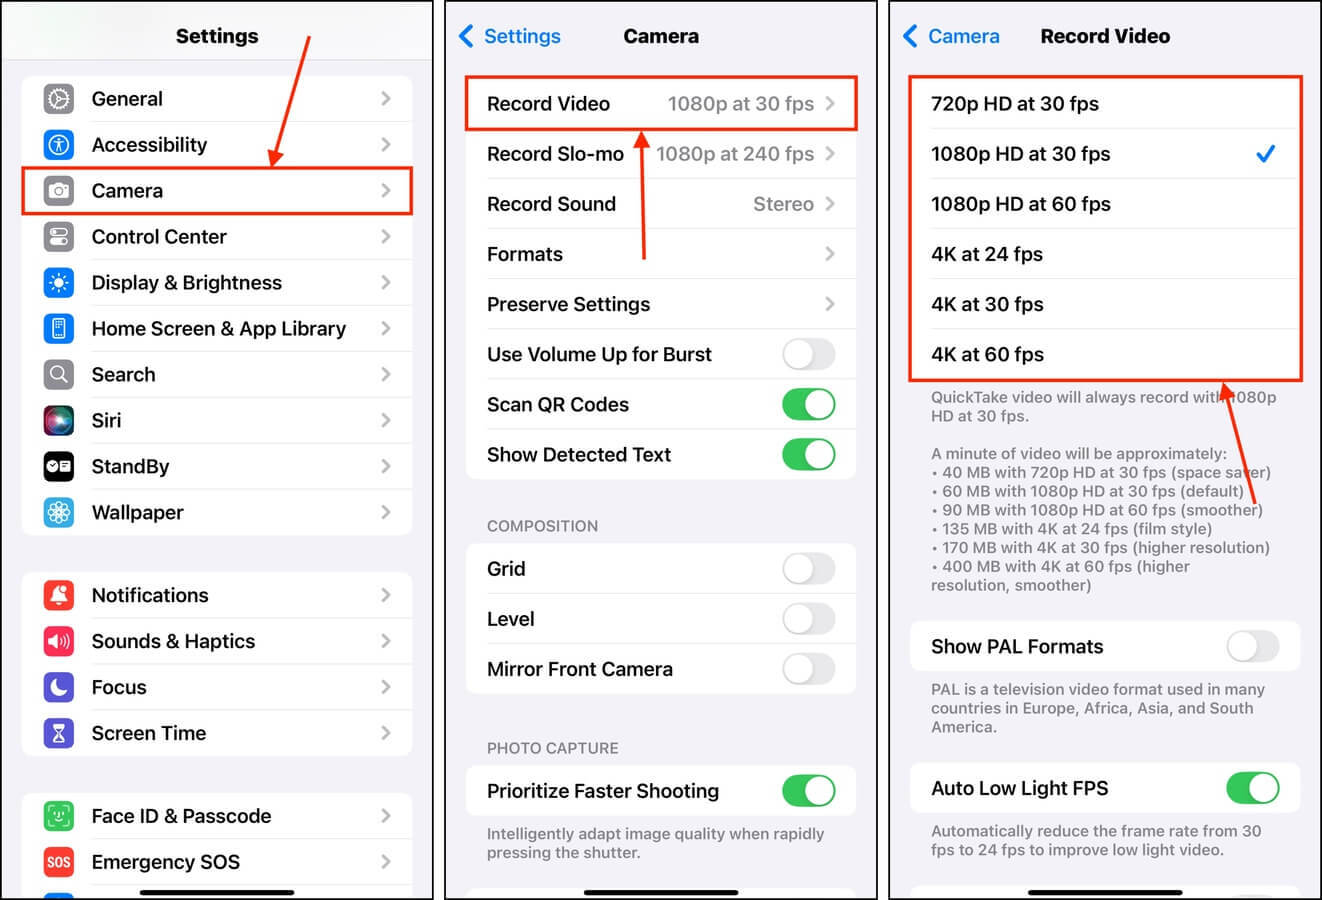
Step 1. Open the Settings app and tap Camera.
Step 2. In the Camera settings menu, select Record Video.
Step 3. Choose the quality setting you want for your camera videos. The lower the quality, the smaller the resulting file size.
You can also change the quality settings for slo-mo videos if you use them. Just go back to the Camera settings and choose Record Slo-mo, which will present a similar list of options.
Cleaning Up Your iPhone Videos? Here’s Another Guide!
Aside from applications (and very specific types of files), videos take up the most storage space on your iPhone. Aside from compressing your videos, another effective way to clean up your library is to get rid of very large videos that you don’t need anymore.
This sounds simple in theory, but the default Photos app doesn’t have a feature to arrange videos by file size. This makes the cleanup process harder than it should be. We show you how to get around this limitation in our guide on deleting large videos on iPhone–check it out!


