
Deleting downloaded files on an iPhone is easy, but it can be confusing if you aren’t familiar with how and where iOS stores them. In reality, downloaded files can end up in completely different locations on your device. If you don’t know where to look, you’ll end up wasting a lot of time.
So, we wrote this guide to help you skip the process of hunting them down and to show you exactly where your downloaded files go–and most importantly, how to delete them.
Table of Contents
Where are Downloaded Files Stored on an iPhone
“Downloaded files” is a general term that describes all data saved to your device that originated from somewhere else. For example: saving an image from a website or downloading a message attachment.
They also come in different forms and can be produced by many different types of apps, so there’s no singular location that stores them all. Instead, here’s a breakdown of all the locations on your iPhone where downloaded files usually go, depending on what they are and where they came from:
- Downloads folder (Files app): The Downloads folder in the Files app (under either On My iPhone or iCloud) stores files downloaded from Safari web browser by default. It’s also presented as an option when you manually save files from different apps.
- Individual directories (Files app): Aside from default folders (e.g., Desktop, Documents, Downloads, etc.), the Files app also holds directories created by the user or by other apps. You can also sometimes manually select these folders as save locations whenever you download files, depending on the app you use to download them.
- In-app storage: Certain apps—especially those that stream media—store downloads directly within the app itself. You can’t access them from anywhere else, but they take up storage space on your device through the app’s own footprint.
- Attachment storage: Apps that process attachments—like Mail and Messages—usually have specific memory assigned to sent and received files. Managing these files or attachments is done from within the app.
How to Delete Downloads from iPhone
In this section, we’ll demonstrate 6 different ways to delete downloaded files on your iPhone. To properly cover the generic scope of “downloaded files”, our list covers a variety of data types from different sources. We recommend going through them all, one by one, to make sure you don’t miss a spot!
Method 1: Delete Downloaded Files in the Files App
The Files app is a handy file browser that allows you to view and directly interact with the files and folders on your iPhone. It’s here that you can find downloaded files from many browser apps, messaging apps, and other third-party programs.
Step 1:Open the Files app and tap Browse on the bottom menu. Then, select On My iPhone or iCloud Drive, depending on where the downloaded files were saved.
Step 2:Tap the Downloads folder or check out the directories assigned to specific apps and view their downloaded files (e.g., GarageBand for iOS).
Step 3:Tap and hold the file and folder you want to delete. Then, tap the Delete button in the context menu that appears.

Alternatively, you can tap the meatball menu (top-right corner) and tap Select. This will allow you to select multiple files at once—then, tap the trash icon to delete them.
Method 2: Delete Safari Downloads (Using the Files App)
In this section, we’ll show you how to delete downloads on Safari via the Files app. Unlike third-party iOS browsers like Chrome and Firefox, Safari files are directly saved in your iPhone’s Downloads folder.
Step 1: Open the Files app and tap Browse on the bottom menu. Then, tap On My iPhone.
Step 2: Tap Downloads.
Step 3: Tap and hold the downloaded file or folder that you want to delete. Finally, select Delete from the context menu.

Method 3: Remove Downloaded Media From the Photos App
The Photos app has a Smart Album called Recents. In this album, you can usually find media items that you recently downloaded from social media or an email. Fortunately, like other albums, you can delete media items directly from Recents.
Step 1:Open the Photos app, go to the Albums tab, and select Recents.
Step 2:Do one of the following to delete one or more photos:
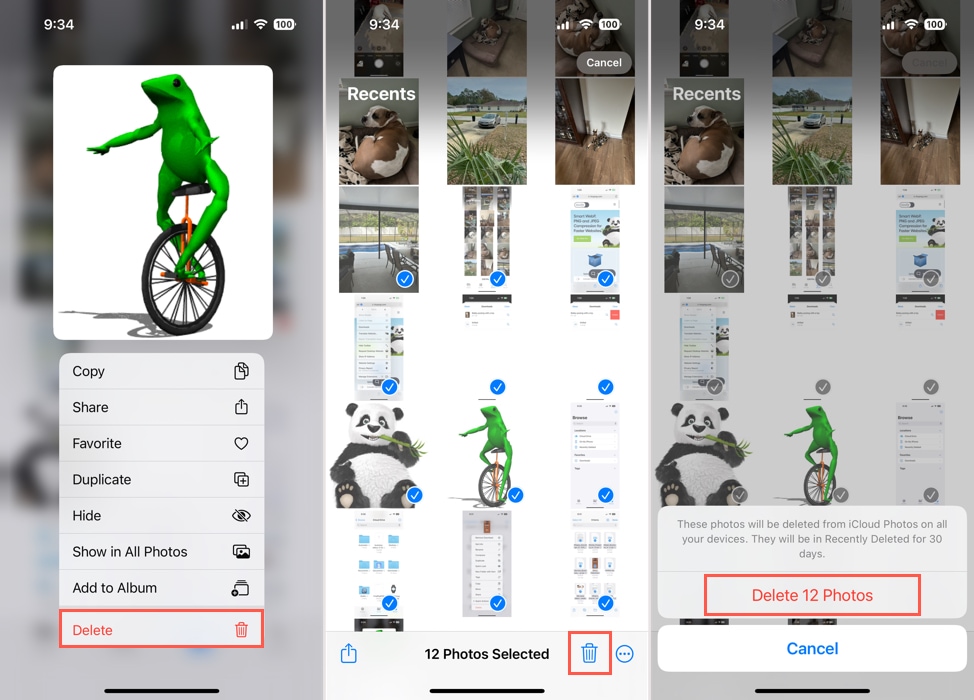
- To remove one photo, long-press it and pick Delete.
- To remove several photos, tap Select at the top and mark the pictures. Then, tap the Delete icon at the bottom.
Step 3:Whether you delete one photo or many, you’ll be asked to confirm. Tap Delete Photo or Delete X Photos in the pop-up window at the bottom.
If you delete a photo accidentally, you can restore it. Return to the Albums tab, scroll down to Utilities, and open Recently Deleted to recover your photo.
Method 4: Delete Downloads in the Messages App
When you receive items like pictures, files, or documents via text message, you can delete those directly in Messages.
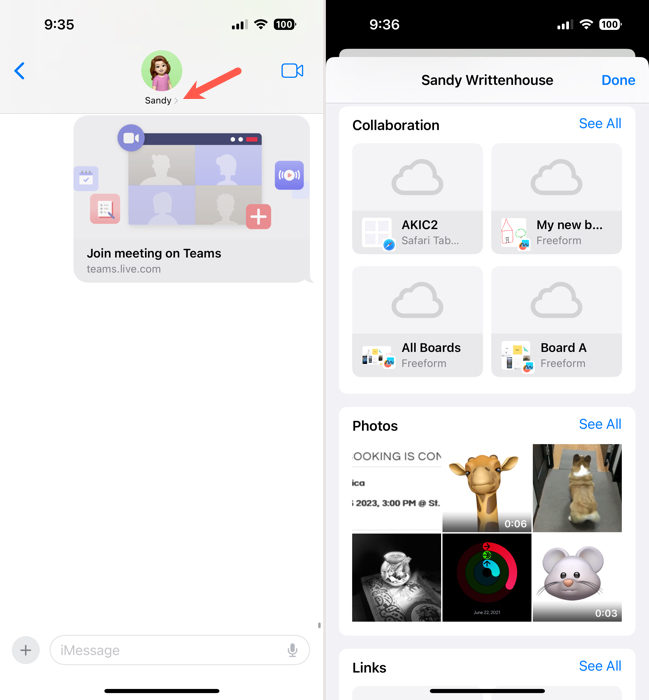
Step 1:Open the Messages app and select a conversation with a download you want to delete.
Step 2:Tap the name or group at the top to display the Information screen.
Step 3:Move down to see shared items categorized by Collaboration, Photos, Links, Documents, and more, depending on what you’ve received.
Do one of the following to delete the items:
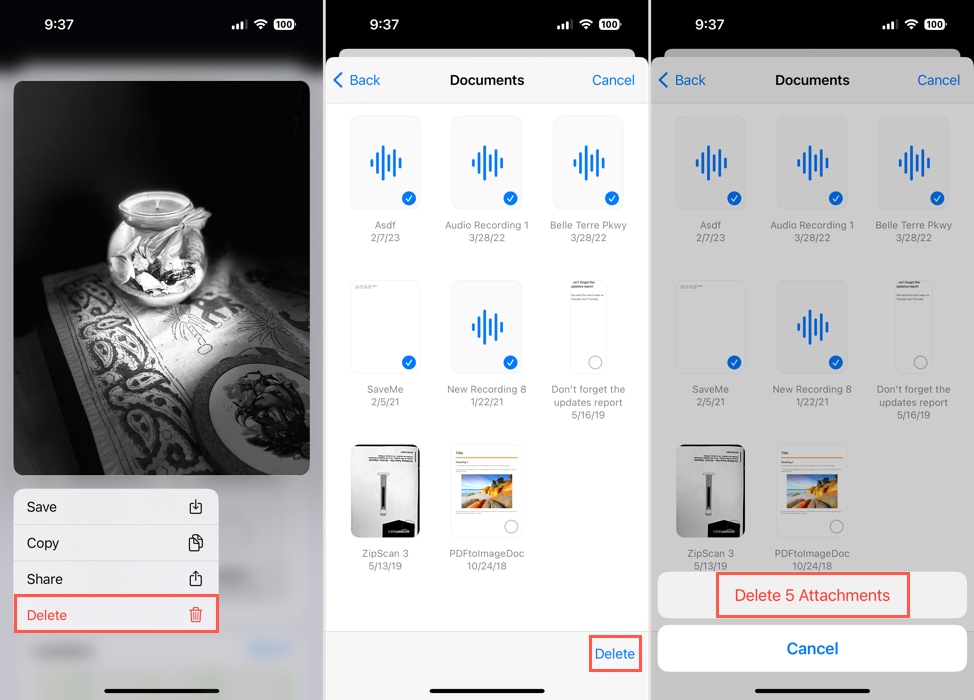
- To remove one item, long-press it and pick Delete.
- To remove multiple items, tap See All for the category and then Select on the top right. Mark the items you want to remove and choose Delete on the bottom right.
Step 4:Whether you delete one item or several, you’ll be prompted to confirm. Tap Delete Attachment or Delete X Attachments in the pop-up window at the bottom.
Tap Done on the top right when you finish, and you’ll return to the conversation.
Method 5: Delete Downloads in the Music App
If you download songs and albums from the Music app to your iPhone, those items can consume more space than you realize. Luckily, you can delete downloaded files on iPhone including songs and albums but still access them in your Library.
Step 1:Open the Music app, head to the Library tab, and pick Downloaded.
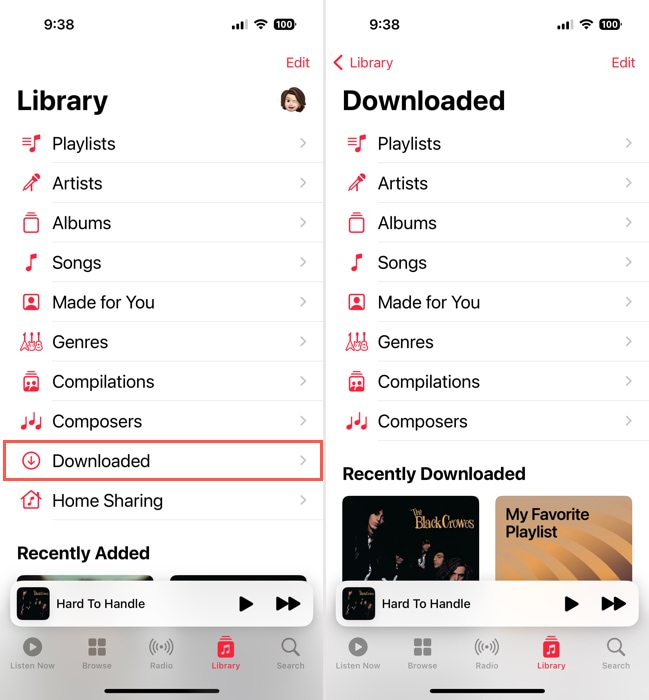
Step 2:You’ll see all songs, albums, and playlists you’ve downloaded in these same-named categories. Simply choose a category and you’ll see the down arrow near the title indicating you’ve downloaded it to your device.
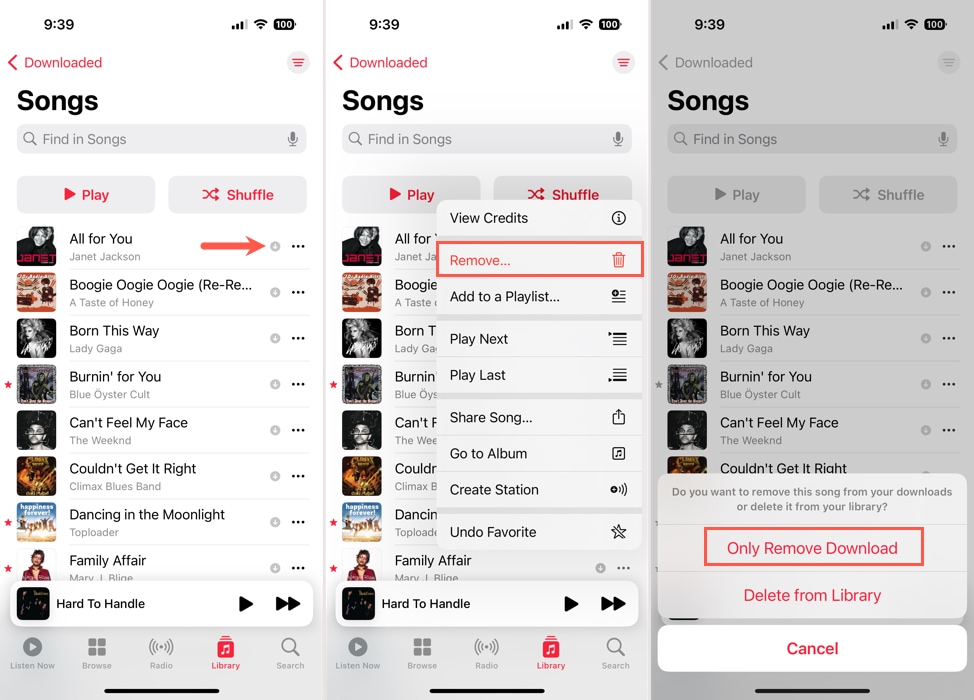
Step 3:As an example, if you choose Songs, those you’ve downloaded display a down arrow to the right of each title. Tap the three dots next to the arrow and pick Remove.
Step 4:Select Only Remove Download in the pop-up window at the bottom. If you prefer to remove the song from your Library completely, you can choose Delete from Library instead.
Continue this process to delete additional downloads in the Music app.
Method 6: Delete In-App Downloads
Many third-party apps—especially video and music streaming apps—allow you to download media to your iPhone so you can access them even if you’re offline.
In most cases, you can only access and delete the downloaded media directly from within the app it originated from. Here’s a quick demo of deleting downloaded shows from an app called Dropout—the steps will look very similar to how most modern streaming apps work.
Step 1: Open the app whose downloaded files you want to delete.
Step 2: Navigate to the media section called “Downloads”, “Saved Videos”, “Offline Viewing”, or similar.
Step 3: Select the downloads you want to delete. Then, tap the Delete button (which may look like a trash icon or the word Delete itself).

How to Clear Download History on iPhone
Aside from deleting downloaded files, you can also delete your download history. This can help reduce minor clutter, remove sensitive information, troubleshoot weird errors (in some cases), and avoid redownloading the same file by accidentally tapping it.
The process is slightly different depending on which browser you’re clearing up. We’ll show you how to do it with Safari, Chrome, and Firefox for iOS.
Safari
To clear your download history on Safari for iOS:
Step 1:To automatically clear your download history in Safari, open the Settings.
Step 2:Select Safari and tap Downloads in the General section.
Step 3:Use the drop-down box at the bottom to choose how often to Remove Download List Items. You can pick from After One Day or Upon Successful Download to automatically clear the list.
After you make your selection, tap the Back arrow on the top left to exit.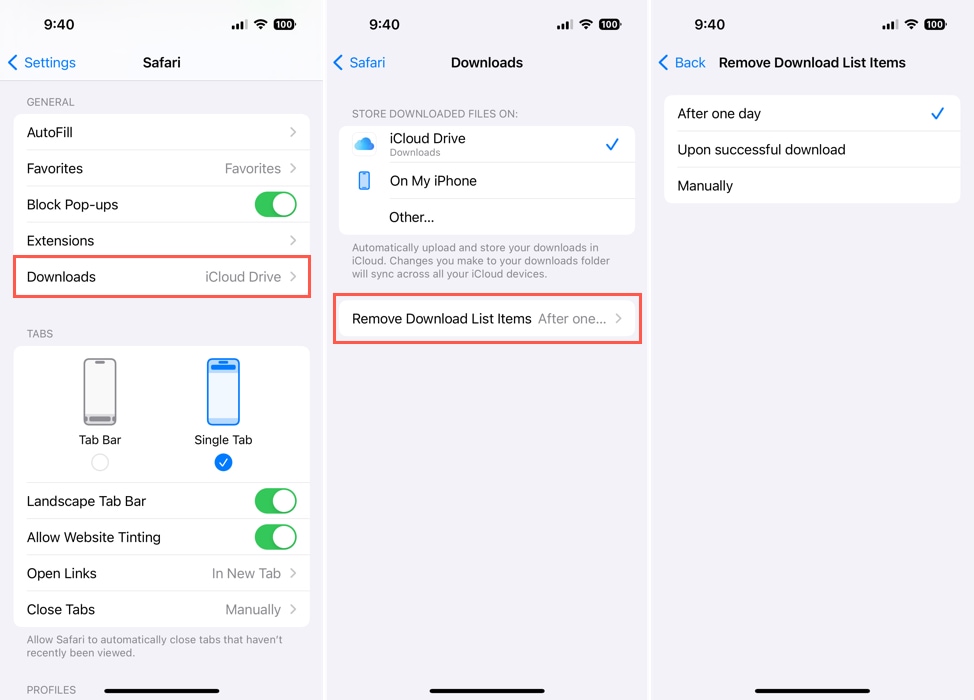
Maybe you use a different web browser on your iPhone. Two other commonly used browsers are Google Chrome and Mozilla Firefox. If you use one of these instead of or in addition to Safari, you can get rid of downloads and clear the history just as easily.
Google Chrome
To clear your download history on Google Chrome for iOS:
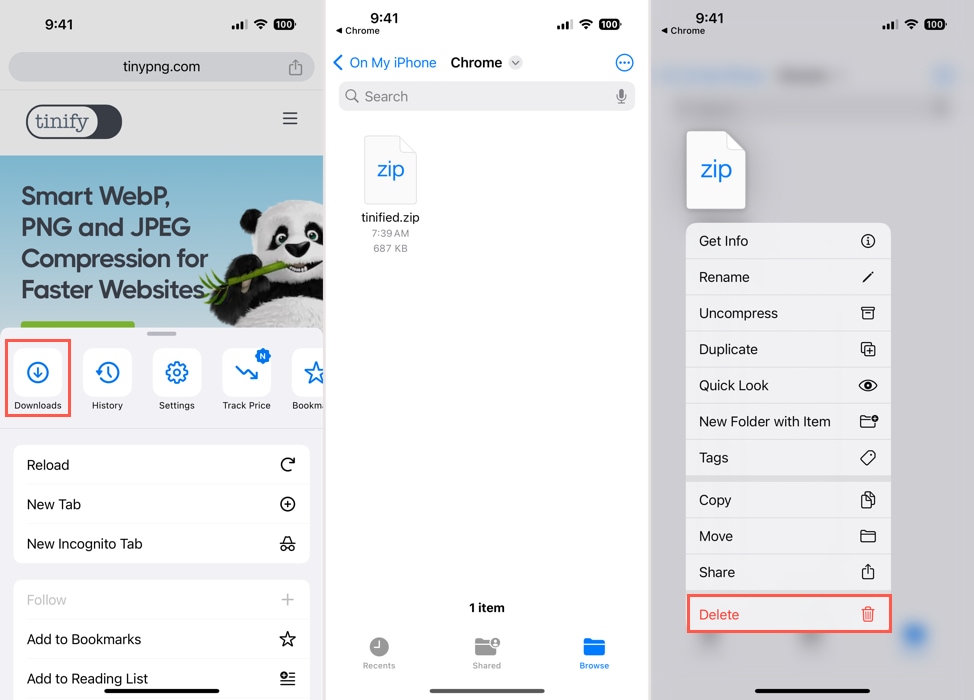
Step 1:Open Chrome and tap the menu icon (three dots) in the lower right corner.
Step 2:Select Downloads.
Step 3:You’ll be taken to the Chrome folder in the Files app where you can manage your downloads.
- To remove one item, long-press it and tap Delete.
- To remove several items, tap the three dots on the top right and pick Select. Mark the items or choose Select All on the top left. Then, tap the Delete icon at the bottom.
Mozilla Firefox
To clear your download history on Mozilla Firefox for iOS:
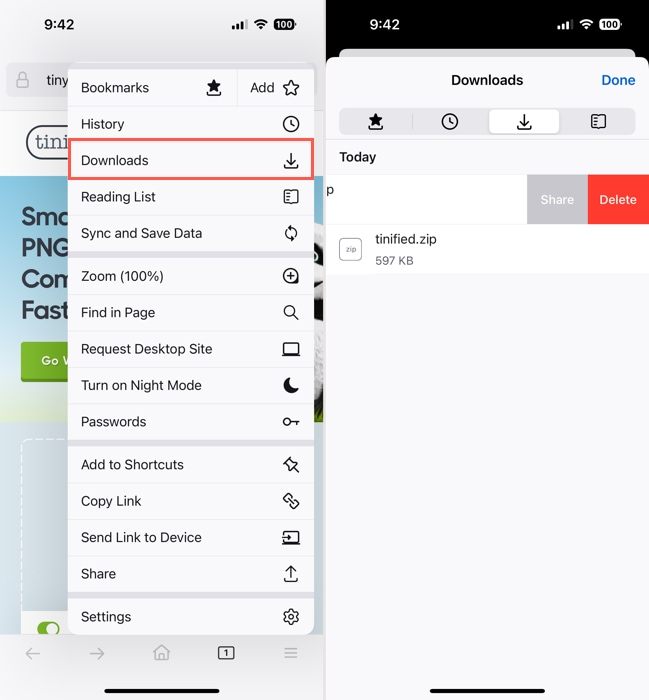
Step 1:Open Firefox and tap the menu icon (three lines) in the lower right corner.
Step 2:Select Downloads.
Step 3:To remove the items, swipe each one from right to left and pick Delete.
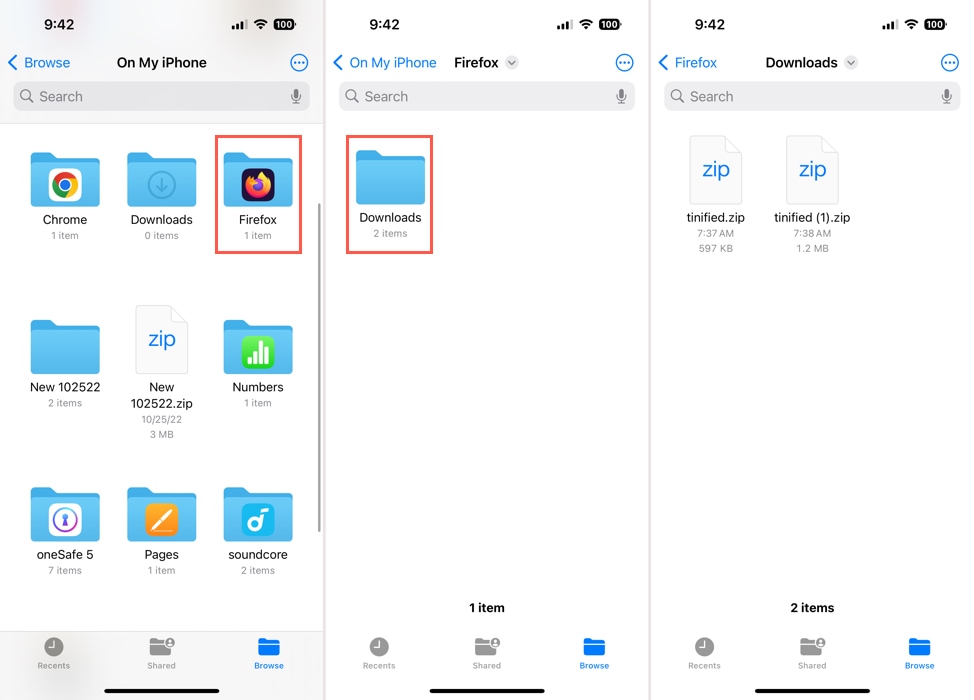
You can also find a Downloads folder for Firefox in the Files app.
Step 1:Open Files, go to the Browse tab, and select On My iPhone.
Step 2:Pick the Firefox folder and open the Downloads folder within it.
Step 3:You can then delete the downloaded items in the folder using the steps above.
Conclusion
Now that you know how to delete downloads on iPhone, take a moment to remove those files, photos, and other items you no longer need or have already saved elsewhere. When you clear downloads on iPhone, you can not only keep your items organized and make them easy to find but regain storage space on your device.


