
Most of us don’t know that our hard disk is failing until it’s too late… This can mean catastrophic levels of data loss because drive issues tend to compound over time and cause additional complications that can make data recovery nearly impossible.
Fortunately, there are ways to predict when your drive is going to fail. You can even automate an alarm system to notify you of indicators of potential failure. And if you suspect that your drive has already been compromised, the methods in this article can help you make a reliable diagnosis. Read on!
Table of Contents
Your Data Might Be At Risk – Here’s What to Do
If you’re only reading this article to pre-empt future problems on your drive – great! You can skip ahead to the guide section. But if you’re here because you’ve noticed symptoms of corruption or damage on your drive, you should know that you may experience data loss or corruption soon (if you haven’t already).
Here’s what to do to prevent data loss and safely proceed with drive monitoring and repair:
- Don’t repair your drive (if needed) YET. If your drive is in a state of disrepair, you may be prompted to macOS or by various tools to attempt to fix it. Don’t do any of that before your important files have been secured. See the next two bullets for more information.
- Create a backup. Some disk monitoring tools (including built-in ones) automatically run repair operations as they find errors in your system. Unfortunately, due to the nature of how these repair tools work, it’s possible for some of your data to be lost during the process. We strongly recommend creating a Time Machine backup before trying to repair or even diagnose your drive.
- Use data recovery software. If your data has already been lost due to Mac errors, we recommend using data recovery software ASAP before doing anything else. The more you use your Mac, the harder it will be to restore your files due to overwriting. We recommend Disk Drill (beginner-friendly), R-Studio (advanced tools), and DMDE (almost free, powerful, annoying to use).
5 Methods to Check a Drive’s Health on a Mac
This is the guide section, where we go through each method step by step to check your drive’s health and performance (to an extent) on your Mac.
We recommend using more than one method to analyze your drive – most tools don’t provide complete coverage (e.g. tools that monitor software-based errors may not be equipped to evaluate hardware components).
Method 1: Read Your Drive’s S.M.A.R.T. Status in Disk Utility on Mac
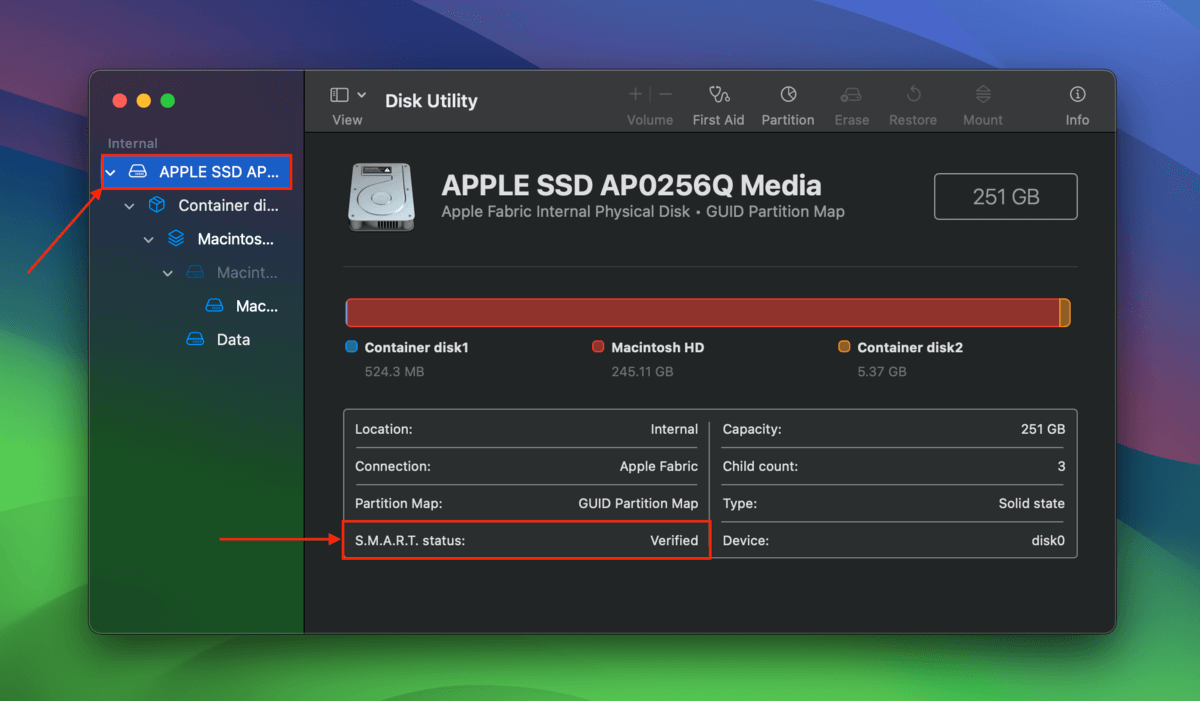
Disk Utility is a basic disk management app built into macOS. It has a feature that can detect a drive’s S.M.A.R.T. status (Self-Monitoring, Analysis, and Reporting Technology).
S.M.A.R.T. doesn’t give you the whole story, but it can thoroughly evaluate your drive’s hardware health. It analyzes parameters like temperature, spin-up times, reallocated sectors, etc. to evaluate the drive’s overall health and performance. Always check your Mac in Disk Utility!
Step 1. Open Disk Utility (Finder > Applications).
Step 2. On the left sidebar, click the disk you want to review. Its S.M.A.R.T. status should be displayed in the bottom-left corner of the disk attributes table.
Method 2: Execute the verifyDisk Command in Terminal
Contrary to S.M.A.R.T.’s hardware-related information, the verifyDisk command checks your drive on a software level.
Specifically, verifyDisk attempts to check the integrity of your drive’s file system structure. It looks for evidence of corruption in directories, invalid permissions, volume header issues, etc. It’s the closest equivalent of having CHKDSK (check disk) in the Mac Terminal.
Step 1. Open the Terminal app (Finder > Applications > Utilities).
Step 2. First, note the device file path of the disk you want to check. Type the following command and hit Return:
diskutil list
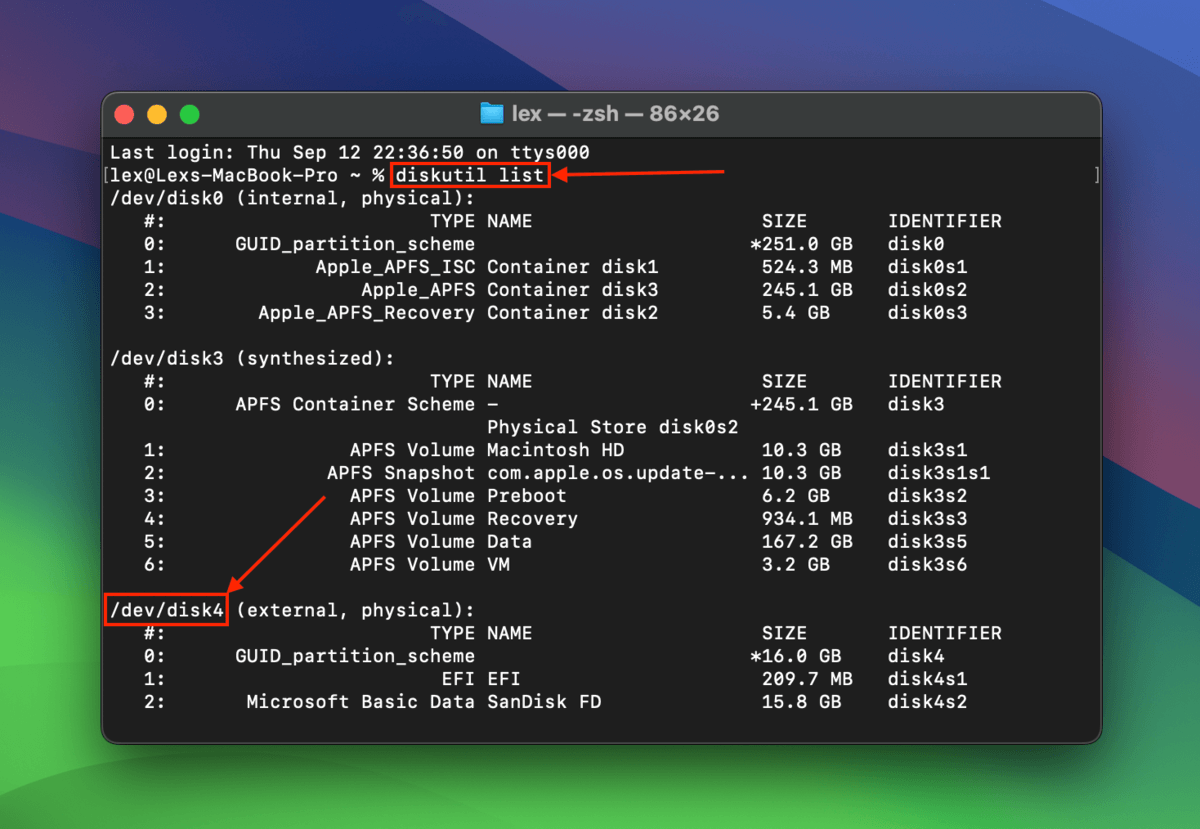
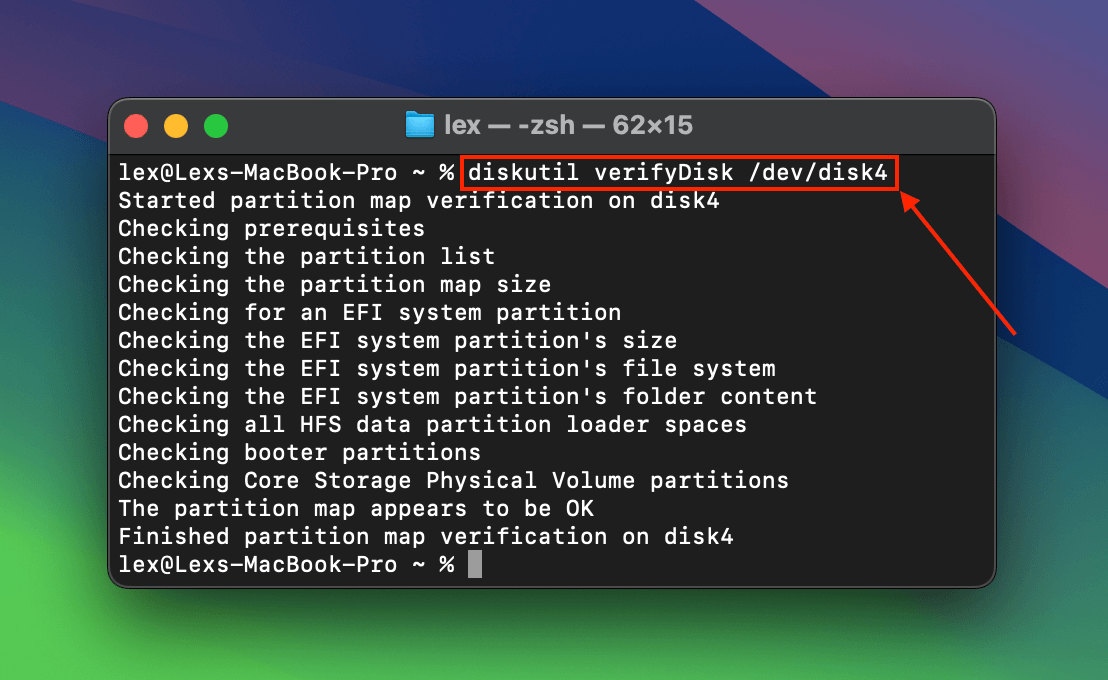
Step 3. Next, run this command to perform the file system verification on your Mac drive:
diskutil verifyDisk /dev/disk4
Replace /dev/disk4 with your own drive’s device path name.
Method 3: Run FSCK in Recovery Mode
FSCK (File System Consistency Check) is a Unix tool that you can run via Terminal commands on your Mac. It attempts to identify and repair file system inconsistencies, which can be caused by both software-based and hardware-based issues).
Specifically, we’ll be using the fsck -n variation, which simply conducts the check without attempting to repair errors.
Step 1. Shut down your Mac. Then, press and hold the power button until the Apple logo or a spinning globe appears on the screen.
Step 2. On the menu bar at the top of your screen, click Utilities > Terminal.
Step 3. Next, identify your drive’s device file path using this command (it should look something like /dev/disk0 or similar):
diskutil list
Step 4. Finally, use this command to run the FSCK tool:
sudo fsck -n /dev/disk0
Remember to replace /dev/disk0 with your own drive’s device path name.
Method 4: Test Your Mac with Apple Diagnostics
Apple Diagnostics is the upgraded version of the old Apple hard drive diagnostic tool, Apple Hardware Test. It was specifically designed to identify hardware issues on your Mac and determine which component needs attention.
Info: Apple Diagnostics reports usually consist of reference codes, which represent various errors. Here’s Apple’s official list of Diagnostics reference codes, which can tell you what each of them means and what to do about it.
To conduct a hard disk health check on your Mac using Apple Diagnostics:
Step 1. Shut down your Mac.
Step 2. Press and hold the power button until you see Options.
Step 3. Press and hold the Command + D keys. Your Mac will then run the diagnostic.
Method 5: Download and Use Third-Party Tools
If none of the built-in tools have given you a satisfactory report, consider using third-party tools that were specially built to gather and report as much information about your drive as possible.
There are a lot of options depending on your needs and preferences. Some are more lightweight, others utilize more health and performance signals, while others offer features like automation, scheduled custom tests, or even anti-malware tools.
We suggest you take some time to explore your options yourself, but we came up with a few recommendations to get you started:
- Smartmontools/smartctl Smartctl is a component of Smartmontools, which is a set of utilities that can provide a more thorough S.M.A.R.T. report. You can ask it to run custom tests and request historical S.M.A.R.T. data. You can even use it for external hard drive health checks on your Mac. It’s also completely free but you can only run it using Terminal commands.
- DriveDx Comprehensive disk monitoring tool that tracks dozens of drive health indicators in real-time. It routinely runs electrical and mechanical tests on your system in the background and can notify you (even by email) if it notices any alarming changes in your drive’s performance. You can even set the criteria yourself. Also, its free trial gives you tons of information.
- Drive Genius Advanced disk management and repair app that can help you monitor your drive from multiple angles. It has a S.M.A.R.T. feature, malware scanner, consistency check (for corruption), and various other stress tests that can analyze every single nook and cranny of your storage device. Along with DriveDx, we included Drive Genius in our recently published list of the best disk repair software for Mac.
Is your drive suffering from any health issues?
Did the methods in this article uncover any anomalies on your hard disk? Unless your drive has been physically damaged or degraded (worn down) with age, you might still be able to fix it using one of the methods in our guide for fixing corrupted hard drives on a Mac.
Just make sure that you secure your data first, either by creating a backup (if possible) or by using data recovery software and saving the restored files somewhere safe.


