
Did you accidentally delete your iCloud files? Fortunately, Apple built a lot of safety nets to protect users from permanent data loss. And even if you miss those safety nets, there are other ways you can recover those files.
The process of recovering deleted iCloud files can be a bit tricky because of the synchronization and optimization tools that come with the feature.
So we created this beginner-friendly guide that clearly covers all scenarios and walks you through the process step by step. Read on!
Table of Contents
How to Find Files in iCloud
Before you attempt any recovery methods, try locating your files first. Certain recovery methods are destructive or just difficult–for example, restoring a backup overwrites existing data on your device. Using recovery software requires a significant amount of storage space. And if you’ve been trying to find your files using a search tool (e.g., Spotlight), it’s possible that they aren’t being indexed for some reason.
To help you get started on your search, here are different ways you can find and browse your iCloud data:
- Finder (Mac): If you logged into your iCloud account on your Mac, your synced files can be found in the iCloud Drive folder, accessible via the sidebar in Finder (under Locations). If you chose to sync your Desktop and Documents folders, you’ll find them here too.
- Other Apple Devices: Do you have other Apple devices, like an iPhone, iPad, or iPod? If you log in with the same Apple account, you’ll be able to access any synced data via the Files app. Note that if you deleted your files on one device, that change would have been mirrored everywhere else.
- iCloud Drive on PC: If you have iCloud Drive installed on a Windows PC, you can access it via the sidebar in File Explorer (similar to macOS Finder). Make sure to double-check that synchronization is enabled, as it can sometimes pause automatically if account verification is required.
- iCloud website: As long as you have a stable internet connection and an updated browser, you can access your entire iCloud Drive at www.iCloud.com. You’ll need to log in with the same Apple ID as you use on your devices.
When Is It Possible to Restore Files Deleted From an iCloud Backup?
There are multiple ways to attempt recovery of a deleted iCloud file, depending on how your Mac and your iCloud are set up. The success of these methods requires one or more of the following conditions being true:
- Less than 30 days. 30 days is the default period that iCloud stores erased files in the Recently Deleted folder (Method 1) and iCloud’s own Data Recovery tool (Method 2). After 30 days, your files will no longer be retrievable via these channels.
- No overwriting occurred. In case the file is no longer available for any reason, advanced recovery methods may succeed if its file data (that gets left behind on disk) has not been overwritten by new file data.
- File data is locally available. Methods 3 and 4 rely on your iCloud files having been locally available on your Mac at certain points. Check your iCloud and Optimize Mac Storage settings.*
How to Recover Files Deleted from iCloud Backup
In this section, we’ll demonstrate 4 reliable methods to recover files that were deleted from an iCloud backup using native and third-party macOS tools. We covered every scenario where recovery is still possible.
Method #1: Restore From iCloud’s Recently Deleted Folder
Whenever a file is deleted from your iCloud Drive, it first gets sent to the Recently Deleted folder. It remains there for 30 days, available for you to restore to its original location (or manually delete permanently).
This is true whether you deleted your file from the web version of iCloud or from the iCloud folder installed locally on your Mac. Note that if you deleted the files locally, then deleted them again from the Trash folder, that change will also be reflected amongst your other Apple devices.
Once 30 days — from the moment of deletion — have passed, the file will be permanently erased from iCloud.
Step 1. Open any browser and log in to iCloud.com.
Step 2. Select iCloud Drive.

Step 3. On the left sidebar, click Recently Deleted. Then, click the meatball menu beside the file you want to restore and select Recover from the context menu. Alternatively, you can click Recover All at the bottom of the screen to restore all the files on this page.

Your file will instantly be returned to its original location in iCloud drive (without asking for a confirmation).
Method #2: Utilize iCloud’s Data Recovery Tool
iCloud has its own web-based data recovery tool. But it only works for iCloud files that don’t get sent to any “Trash folder” (like contacts, calendar entries, bookmarks, etc.), and for files that were deleted using the RM command on a Mac (which also bypasses the Trash folder). You’ll be utilizing the iCloud website, so all you need is a browser and a stable internet connection.
Step 1. Open any browser and log in to iCloud.com.
Step 2. In the top right corner of the page, click or tap the menu button (it’s beside your profile button). Then, in the dropdown menu that appears, select the Data Recovery option. Alternatively, you can scroll to the very bottom of the page and click Data Recovery.

Step 3. Click Restore Files (or whichever option corresponds to the data type you want to recover).

Step 4. Finally, click the Restore button adjacent to the file you want to recover.

The files you selected will immediately be returned to their original location in your iCloud Drive.
Method #3: Use Data Recovery Software to Restore Local iCloud Files
Data recovery software is a tool that you can install on your Mac, which helps you recover deleted files by restoring their data that gets left behind. For this demonstration, we’ll be using an app called Disk Drill. It’s a beginner-friendly tool with a modern interface and it provides excellent support for macOS and iOS files.
Disk Drill is also good at restoring original folder structures, which makes it much easier to find your iCloud Drive folder. You can try the app for free to scan your Mac and preview files — this is critical for determining whether your files are recoverable with software. We’ll show you how it works in the step-by-step guide below.
Just note that because data recovery software can only scan local and virtual disks, the data you want to restore needs to have been stored locally at least once (and it can’t have been overwritten by new file data).
Step 1. Download and install Disk Drill.
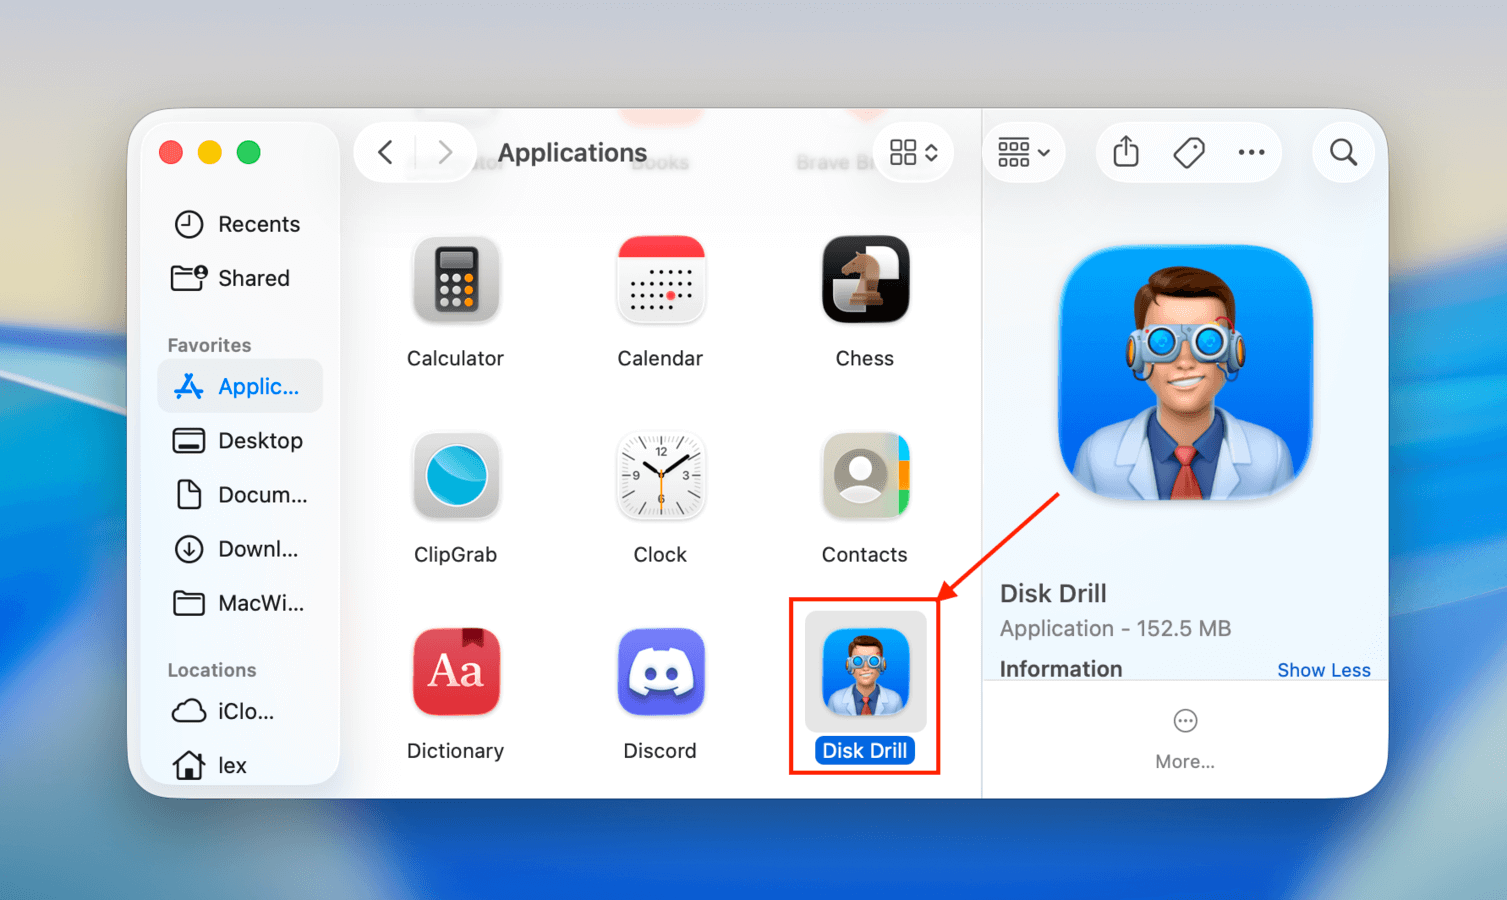
Step 2. Launch Disk Drill (Finder > Applications).
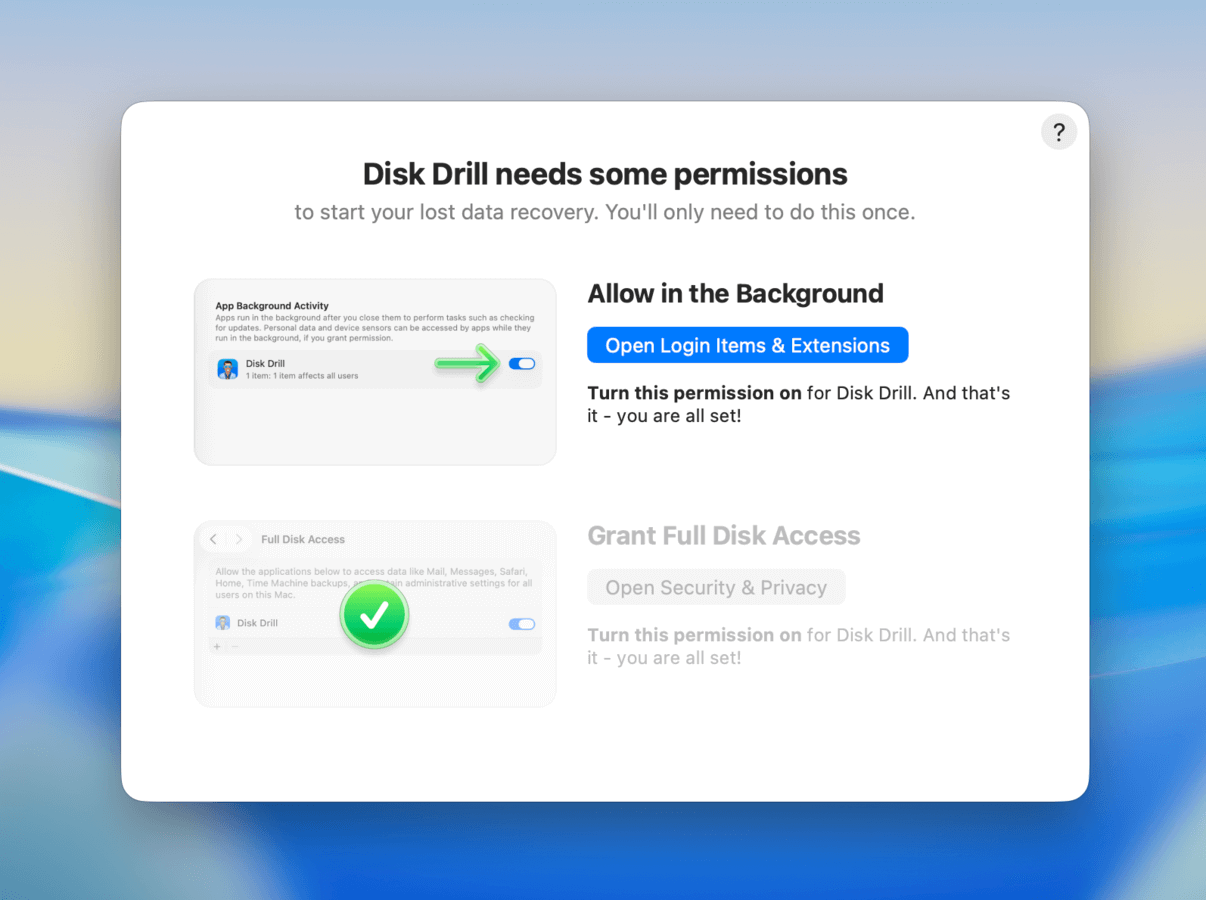
Step 3. Upon launching Disk Drill for the first time, you’ll be asked to enable system permissions that allow background activity and grant full disk access. Follow the instructions until both are activated.
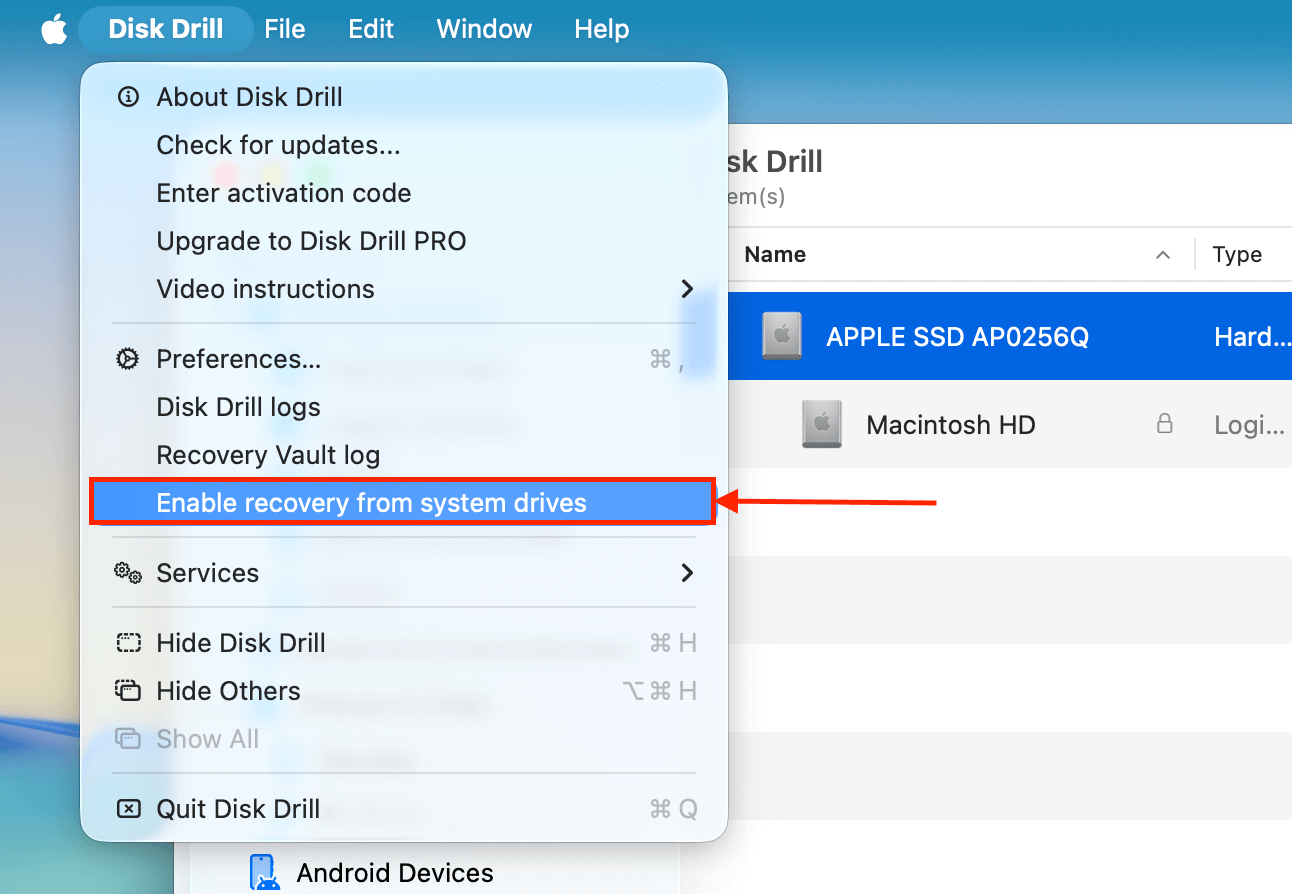
Step 4. Once Disk Drill’s main menu (the source selection page) opens up on your Mac, click the Disk Drill button on your Apple menu. In the menu that appears, select Enable recovery from system drives and follow the instructions that appear.
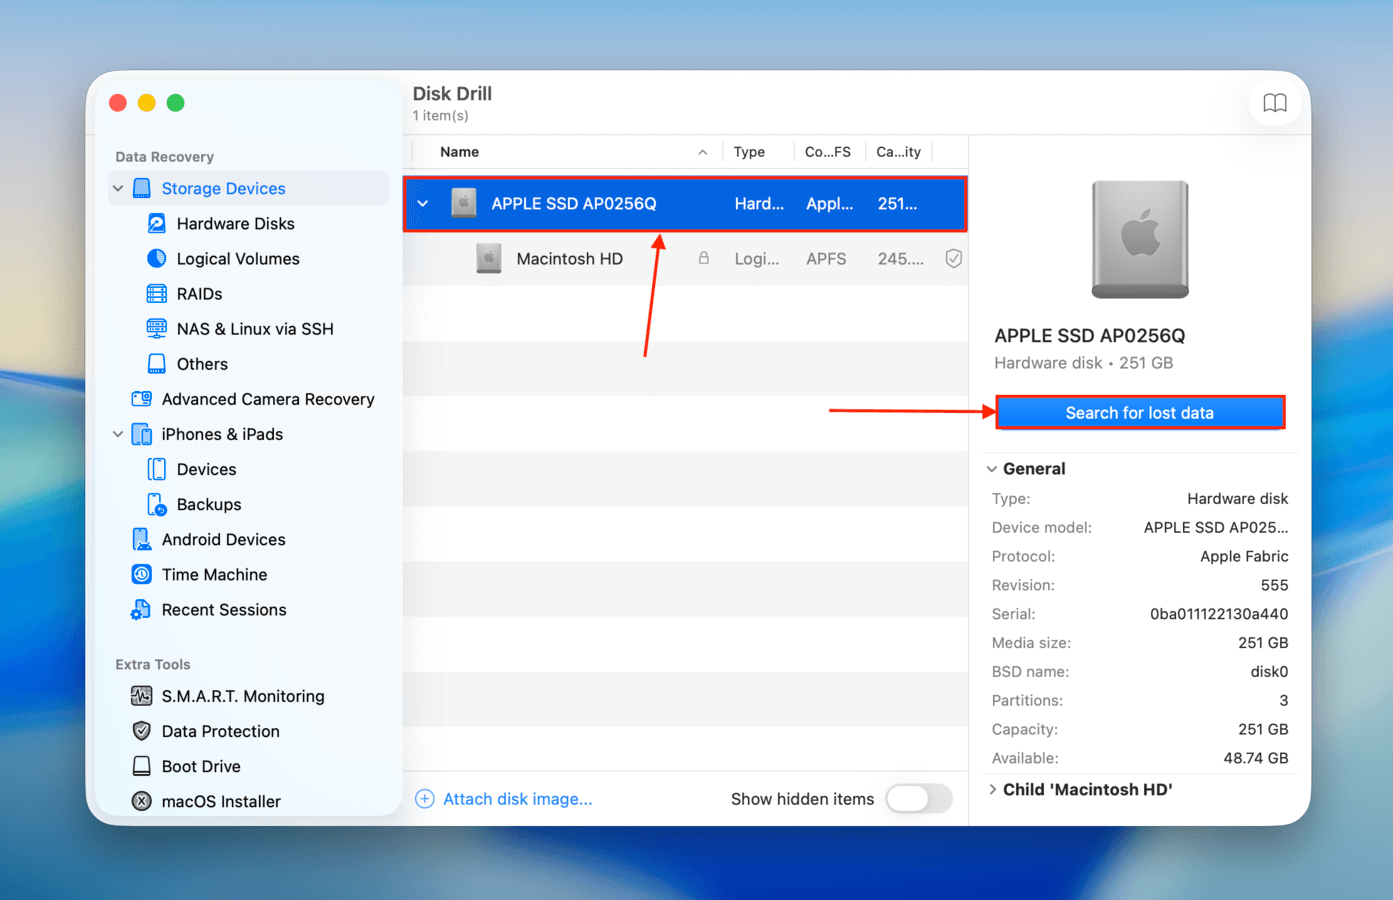
Step 4. Back in the main menu, select your system drive (usually labeled as “APPLE SSD”) and click Search for lost data.
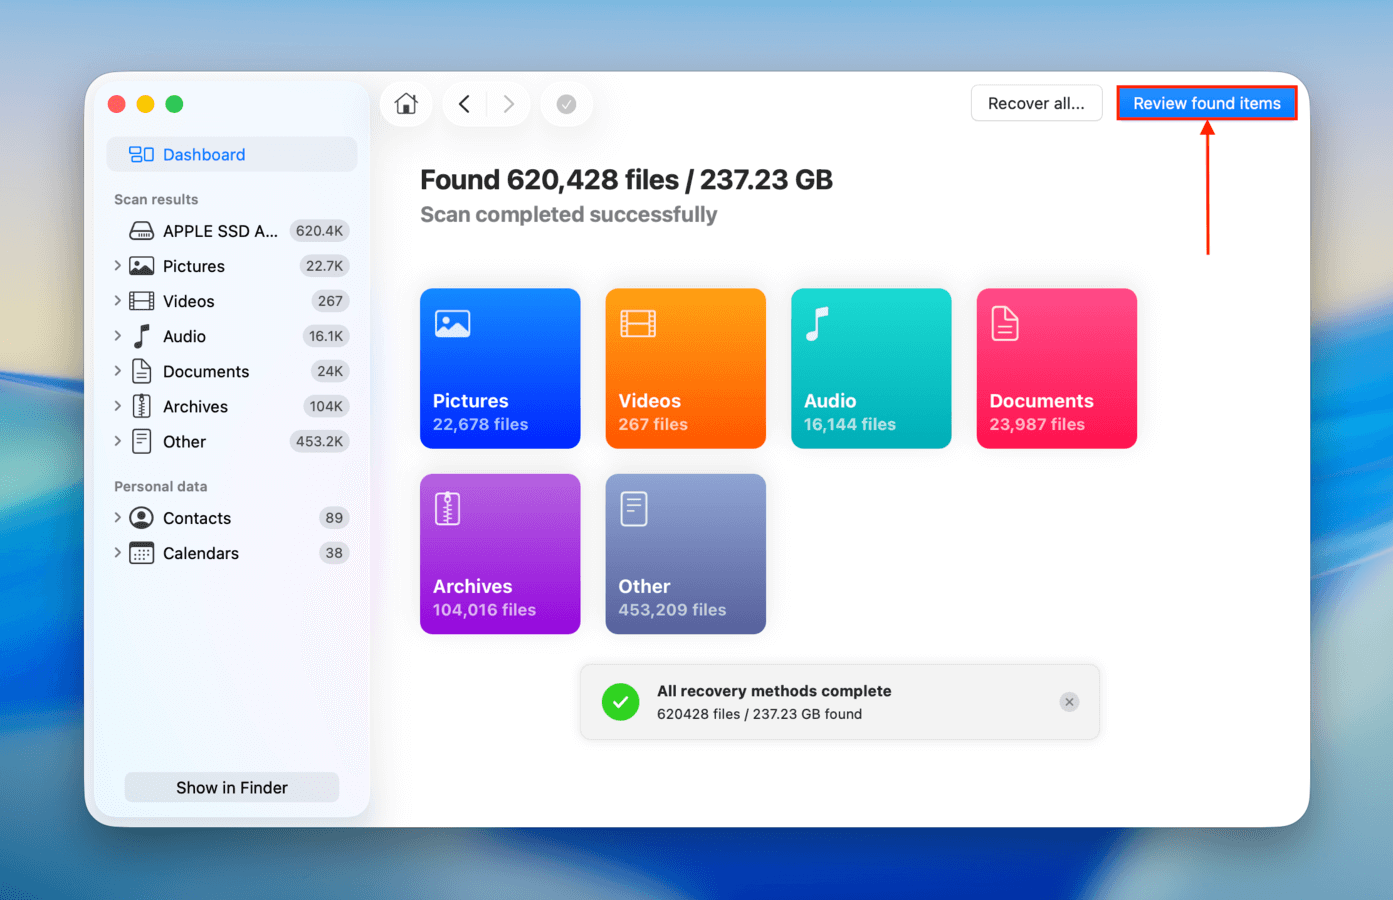
Step 5. Once the scan is complete, click Review found items.
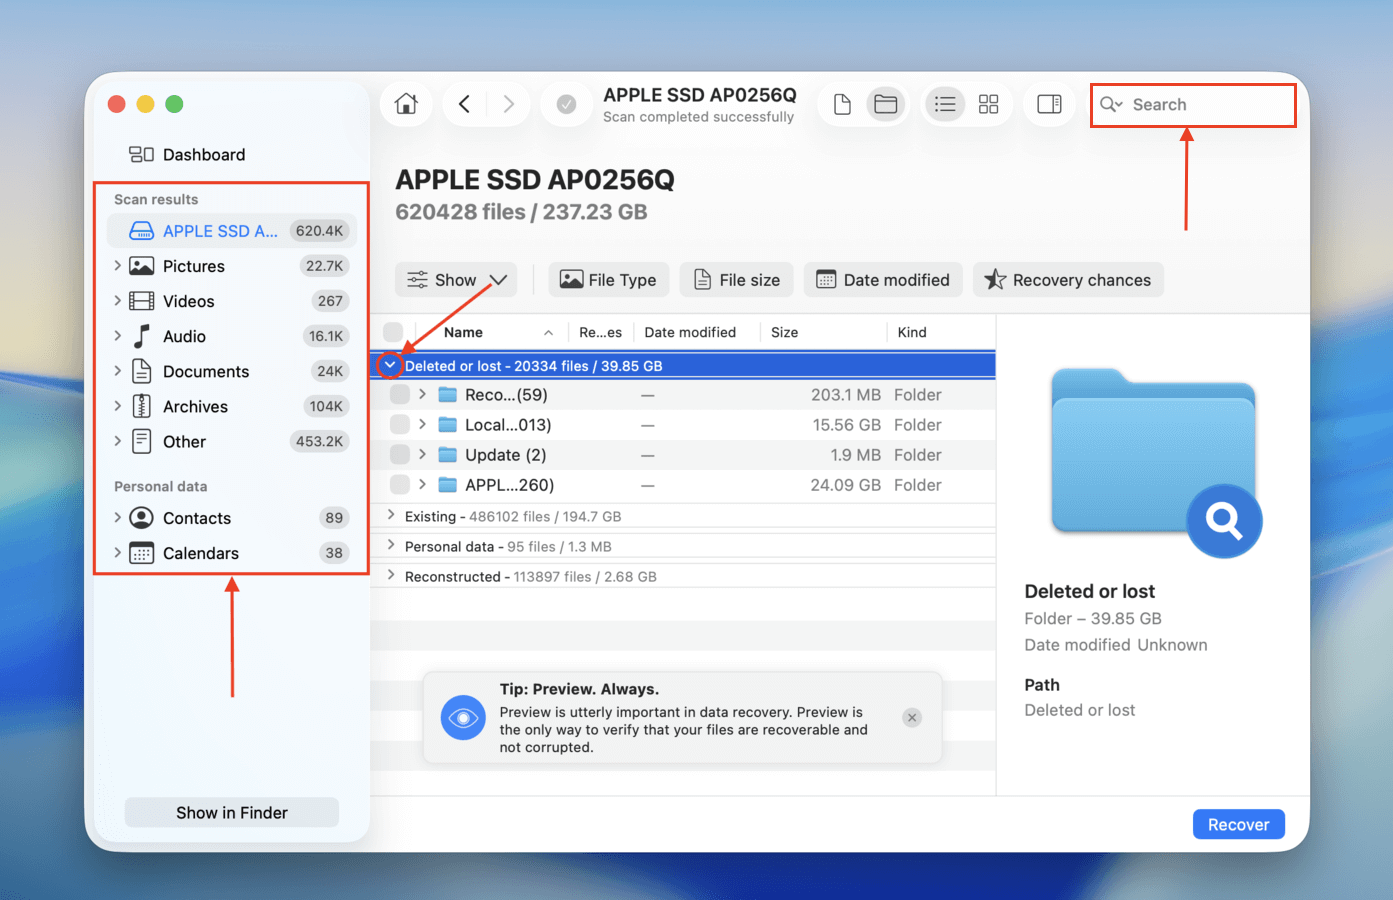
Step 6. Use the search bar (click on the magnifying glass) in the top-right corner of the Disk Drill window and/or filter your scan results using the left sidebar to quickly locate your files. Make sure to search through each of the categories, starting with Deleted or lost.
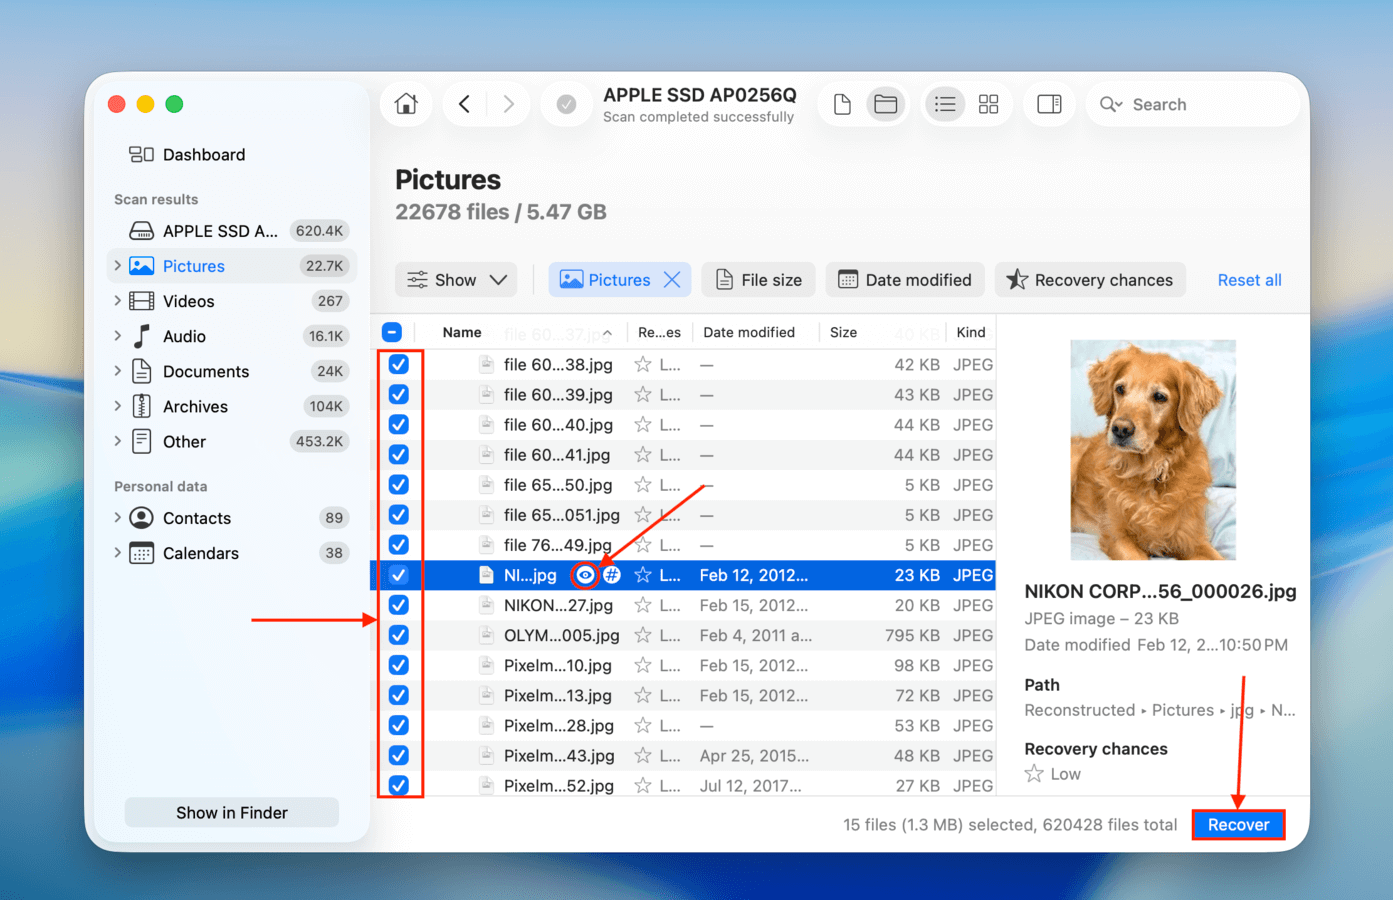
Step 7. Clicking a file will open its preview, which you can toggle using the eye button (it appears when you hover your mouse on a file). After successfully previewing your data and confirming it’s recoverable, tick the boxes in the leftmost column to select the files you want to restore. Then, click Recover.
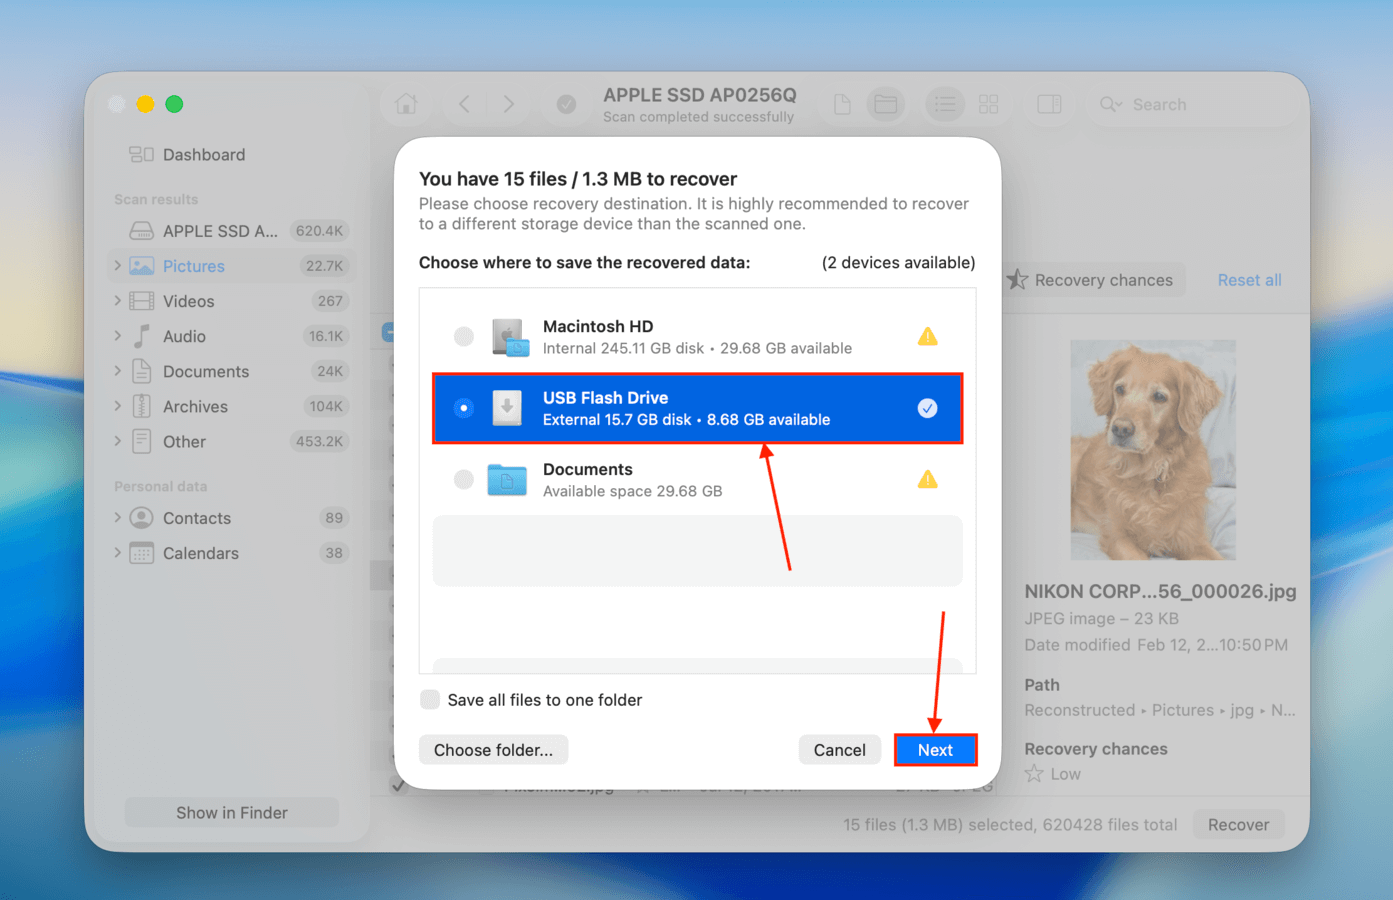
Step 8. In the dialogue box that appears, select a destination folder for the recovered files. We recommend saving them to a separate drive (like a USB) to avoid overwriting data on your Mac. Then, click Next to begin the recovery process.
Method #4: Restore a Time Machine Backup of Local iCloud Files
By default, Time Machine only backs up local files and folders on your Mac. In other words, this method will only work if your iCloud files had copies locally stored on your Mac when the Time Machine backup was created.
If this is the case for you, you should be able to restore the snapshots of your local iCloud files, as long as you have your Time Machine backup drive. If your drive is unavailable or you were unable to create a full backup before your files went missing, it’s still possible that Time Machine’s local backup picked them up. However, note that local Time Machine backups only store the data you interacted with in the last 24 hours.
Step 1. Open Finder and navigate to your iCloud Drive folder.
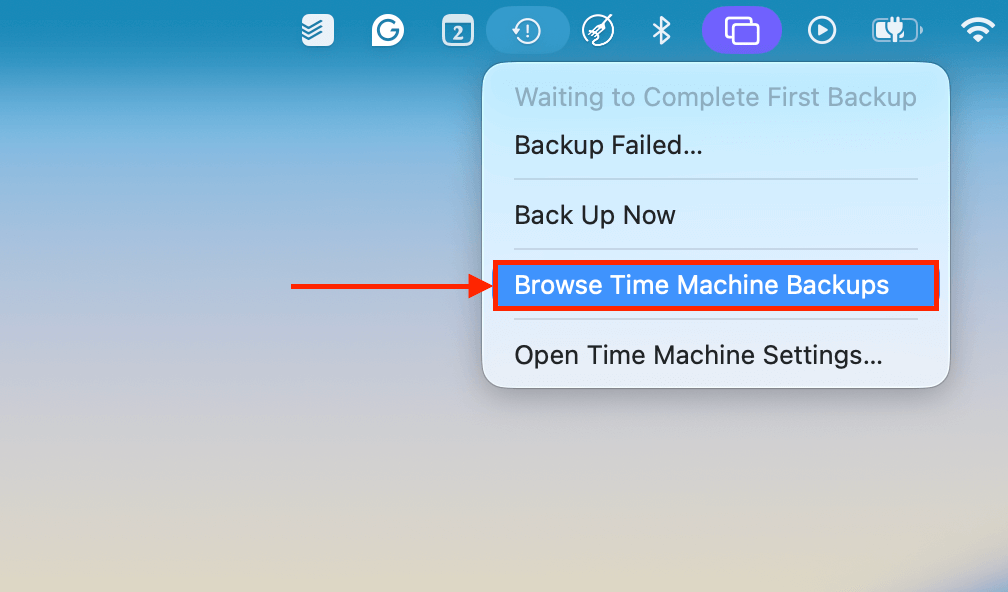
Step 2. Connect your Time Machine drive to your Mac (if you have it). Then, click the Time Machine button > Browse Time Machine backups.
Step 3. Use the arrows on the right to travel back through your iCloud Drive folder’s timeline. You can even open the Get Info menu of your files’ snapshots. If your file’s on-disk size is more than 0 KB (see parentheses in the screenshot below), then the file or folder was saved locally when the snapshot was created. You can also double-check that you’re browsing your iCloud Drive’s timeline and not your Mac’s local timeline. Once the snapshots of your missing files appear, select them and click Restore.

Did your entire Documents folder go missing from iCloud?
If you noticed that the whole Documents folder has disappeared from iCloud Drive (and you didn’t delete it), then iCloud may be experiencing a synchronization issue on your Mac. Check out the iCloud section of our guide on how to find and restore the iCloud Documents folder.


